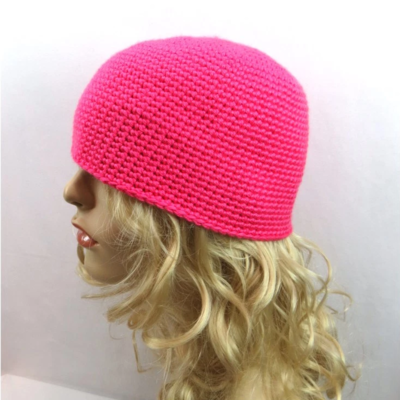
Halsey Street Pompom Helmet

Step out in style with the Halsey Street Pompom Helmet. Inspired by the streets of Queens, New York, this trendy crochet hat will make you the envy of all your fashionista friends. Work up this free crochet pattern in no time using Lion Brand Hometown USA, a bulky yarn that's ideal for braving the elements of winter. A cute pom pom adds a fun and playful finishing touch. This easy crochet pattern stretches to fit a wide range of sizes.

Crochet HookN/15 or 10 mm hook
Yarn Weight(6) Super Bulky/Super Chunky (4-11 stitches for 4 inches)
MATERIALS:
-
LION BRAND® HOMETOWN USA® (Art. #135)
#113 Cincinnati Red 1 ball (A)
#600 Bulldogs 1 ball (B)
or colors of your choice - LION BRAND® crochet hook size P-15 (10 mm)
- LION BRAND® Pom-Pom maker
- LION BRAND® large-eyed blunt needle
SIZE:
Finished circumference: 20 in. (51 cm). Hat will stretch to fit a range of sizes.
GAUGE:
9 1/2 sts + 6 rnds = 4 in. (10 cm) over pattern.
BE SURE TO CHECK YOUR GAUGE.
When you match the gauge in a pattern, your project will be the size specified in the pattern and the materials specified in the pattern will be sufficient. If it takes you fewer stitches and rows to match the gauge, try using a smaller size hook or needles; if more stitches and rows, try a larger size hook or needles.
NOTES:
- Helmet is worked in joined rnds beg at lower edge. Do not turn at ends of rnds.
- Color is changed by fastening off the old color and joining the new color.
- Earflaps are worked back and forth in rows across lower edge of Helmet.
- Sts for Helmet are worked through back loops only. Sts for earflaps are worked through both loops.
HELMET:
With A, ch 48; join with sl st in first ch to form a ring.
Rnd 1 (RS): Join B with sc in same ch as joining, sc in each ch around; join with sl st in first sc – 48 sc. Fasten off.
Note: Beginning on Rnd 2, work through back loops only.
Rnd 2: Draw up a loop of A in any st, ch 4 (counts as first dc + ch 1 in this rnd and in all following rnds), sk next st, *dc in next st, ch 1, sk next st; rep from * around; join with sl st in 3rd ch of beg ch – 24 dc and 24 ch-1 sps at the end of this rnd.
Rnd 3: Ch 1, sc in each dc and ch-1 sp around; join with sl st in first sc – 48 sc. Fasten off.
Rnd 4: With B, rep Rnd 2. Fasten off.
Rnd 5: From RS, join A with sc in any st, sc in each dc and ch-1 sp around; join with sl st in first sc.
Rnd 6: Ch 4, sk next st, *dc in next st, ch 1, sk next st; rep from * around; join with sl st in 3rd ch of beg ch. Fasten off.
Rnd 7: Draw up a loop of B in any dc and ch 3 (counts as first dc in this rnd and in all following rnds), *sk next ch-1 sp, dc in next dc; rep from * to last ch-1 sp, sk last ch-1 sp; join with sl st in top of beg ch – 24 dc.
Rnd 8: Ch 3, dc in each st around, join with sl st in top of beg ch. Fasten off.
Rnd 9: From RS, join A with sc in any st, sc in each st around; join with sl st in first sc.
Rnd 10: Ch 1, sc in each st around; join with sl st in first sc. Fasten off.
Rnd 11: From RS, join B with sc in any st, sc in next 2 sts, sk next st, *sc in next 3 sts, sk next st; rep from * around; join with sl st in first sc – 18 sc.
Rnd 12: Ch 1, *sk next st, sc in next st; rep from * around; join with sl st in first sc – 9 sc.
Rnd 13: Ch 1, *sk next st, sc in next st; rep from * to last st, sk last st; join with sl st in first sc – 4 sc.
Fasten off, leaving a long yarn tail. Thread yarn tail through sts of last rnd and pull to gather. Knot securely.
First Earflap
Note: Work through both loops when working earflaps.
Row 1 (RS): From RS and working through both loops across opposite side of foundation ch, join B with sc in any ch, sc in next 11 ch; leave rem sts unworked – 12 sc at the end of this row.
Row 2: Ch 1, turn, sk first st, sc in each st across – 11 sc.
Row 3: Ch 3, turn, sk next st, dc in each st across – 10 dc.
Rows 4 and 5: Rep Rows 2 and 3 – 8 dc at the end of Row 5.
Row 6: Rep Row 3 – 7 dc.
Row 7: Ch 1, turn, sk first st, sc in next st, sk next st, dc in next st, sk next st, sc in next st, sk last st, sl st in edge of last row worked. Fasten off.
Second Earflap
Row 1 (RS): From RS, sk 14 unworked sts following first earflap across front of Helmet. Working through both loops across opposite side of foundation ch, join B with sc in next foundation ch, sc in next 11 ch; leave rem sts unworked – 12 sc.
Rows 2-7: Work same as Rows 2-7 of first earflap. Fasten off.
FINISHING:
Edging
From RS, join B with sl st anywhere along lower edge of Hat, sl st evenly around lower edge of Helmet and earflaps. Fasten off.
Pom-poms
With B, and following package directions, make a large pom-pom. Tie pom-pom to top of Helmet. With A, make 2 medium size pom-poms. Cut 6 in. (15 cm) lengths of B and use lengths to tie one medium pom-pom to each earflap.
Weave in ends.
ABBREVIATIONS:
beg = begin(ning)
ch = chain
ch-sp = chain space previously made
dc = double crochet
rem = remain(ing)(s)
rep = repeat
rnd(s) = round(s)
RS = right side
sc = single crochet
sk = skip
sl st = slip st
sp(s) = space(s)
st(s) = stitch(es)


Thanks for your comment. Don't forget to share!
JaneEK
Oct 16, 2017
This is a really clever design for a hat. First off, its worked from the bottom up. It probably could be worked top down, but theres really no need since the pompon covers up any hole at the crown. I love how the two colors are interlaced and the open texture around the base of the hat. The crown is still solid, so theres plenty there to keep you warm. With the added earflaps, it almost looks Peruvian.
Hippie Chick
May 26, 2017
A couple of photos that are zoomed in on the hat showing more fine details need to be included with this pattern. List of materials looks like it is complete and includes all the necessaries such as hook size, materials, sizing, gauge, and special notes included. Main instructions are easy to follow along and understand.
princess6860504
Dec 09, 2016
I made this hat and showed it to some friends. I asked if they would buy a hat like this. They said only if it had a fleece lining on the inside. I live in Wisconsin. So, is there anybody out there who can elaborate on how I could add a liner under this? The hat has to remain stretchy.
rsebd47 4052941
Oct 30, 2013
Finally, the pattern is in the e-book. You have to download the whole book
pmorrow 7624809
Oct 30, 2013
When clicking on the 'get pattern' my computer opened a new tab and I scrolled down to the image of a booklet with the 15 patterns, clicked on the download link beside it and was able to save it no problems.
Nannaneen
Oct 23, 2013
Okay! I did it! http://www.lionbrand.com/patterns/L32064.html is where they hid it. I went to IXQUICK search engine and put the entire pattern name in the search bar hit go and up jumped the link!
Nannaneen
Oct 23, 2013
Clicking and clicking and going from one advertisement to the other! Why do you make the pattern impossible to find? Why not tell us to go to the Lion Brand site and find it there? Is it there? Hell NO! Just went through all of the sign-in rigmarole and typed in the entire name of the pattern only to be told that it does not exist. Phooey on this.
myescapefrom2 7827 403
Oct 23, 2013
I couldn't even find this pattern on the Lion Brand site. Tired of seeing an ad for a pattern and not being directed to it. What gives?!
Report Inappropriate Comment
Are you sure you would like to report this comment? It will be flagged for our moderators to take action.
Thank you for taking the time to improve the content on our site.