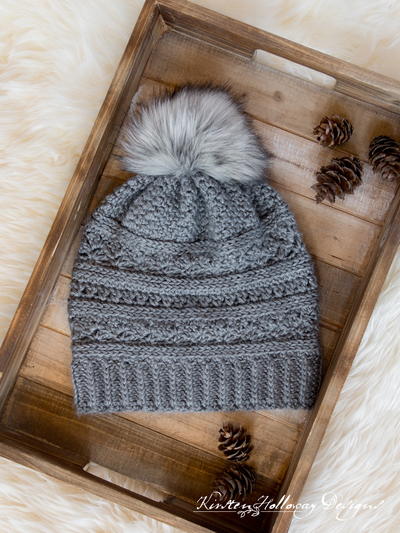
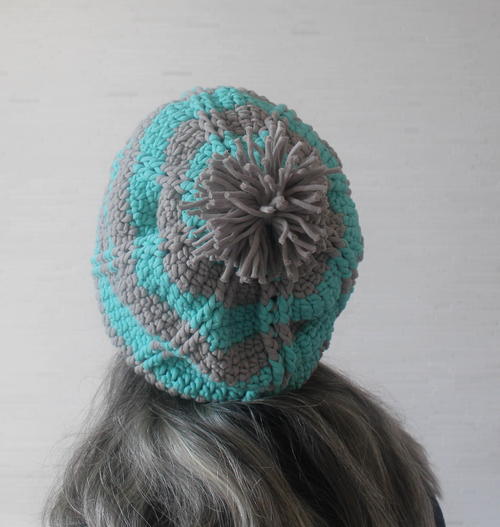
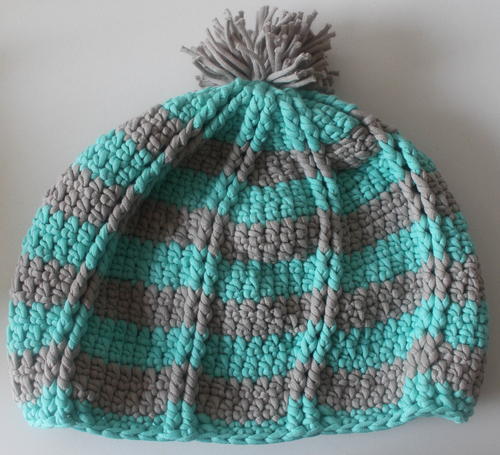
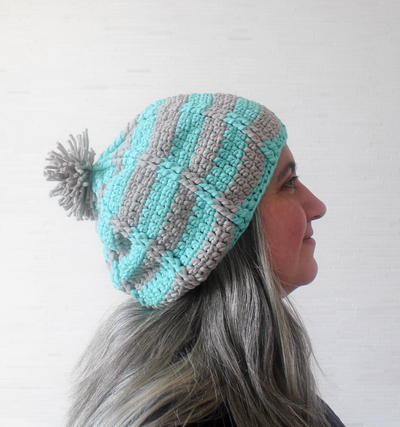
Aqua Ridge Slouchy Hat Crochet Pattern
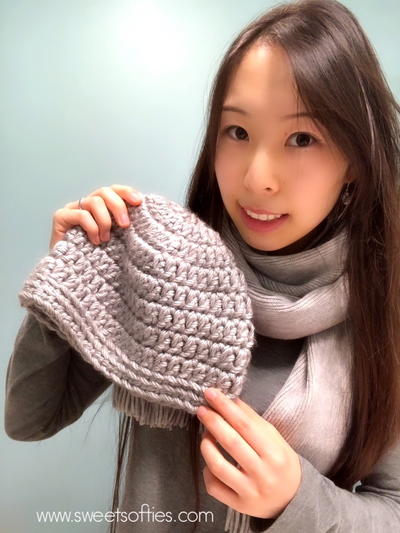
This is a great slouchy beanie crochet pattern for guys or gals.

You are going to fall in love with this bulky yarn crochet slouchy hat pattern. The Aqua Ridge Slouchy Hat is a cozy crochet slouch hat worked up in simple, repeating pattern that features some front-post double crochet stitches for texture and effect.
This intermediate pattern uses bulky yarn for extra warmth and features a fun little pom-pom on top for a distinctive element. This crochet hat will look great with any type of winter coat, and will be extra cozy when paired with a bulky-weight crochet scarf. This crochet hat is ideal for both men and women, too.

Crochet HookK/10.5 or 6.5 mm hook
Yarn Weight(5) Bulky/Chunky (12-15 stitches for 4 inches)
Crochet GaugeThrough Rnd 5 in pattern = 4.5” (11.5 cm) diameter. For best fit, always check your gauge.
Finished SizeAdult Small: 20.5” (52 cm) hat circumference, 8.5” (21.5 cm) length
Materials List
- Bernat Maker Home Dec (72% cotton/28% nylon, 8.8 oz/250 g/317 yd/290 m) – 1 skein each in 11005 Aqua (CA) and 11008 Clay (CB), or approximately 317yd (290 m) in any bulky weight, cotton blend yarn
- US Size K-10.5/6.5 mm crochet hook, or size needed to obtain gauge
- Yarn needle
- Clover Pom-Pom Maker – Extra Large (optional)
Slouchy Hat Crochet Pattern
Notes:
Hat is worked in the round with right (front) side facing.
Use CA for starting chain through Rnd 5, then change colors every 2 rows, carrying unworked color loosely on wrong side (inside of hat).
Click on any images below to enlarge.
Hat Pattern:
-
Starting at crown, ch 4, skip 3 ch, join with slip st to first ch to form ring.
-
Rnd 1: Ch 3 (counts as dc, here and throughout), 7 dc in ring, join with sl st to top of first ch 3. (8 sts)
-
Rnd 2: 2 FPdc around each st from Rnd 1, join with sl st to top of first FPdc. (16 sts)
-
Rnd 3: Starting in first st, *(Fpdc around next st, dc in same st), FPdc around next st; rep from * around, join with sl st to top of first FPdc. (24 sts)
-
Rnd 4: Starting in first st, *FPdc around next st, 2 dc in next st, FPdc around next st; rep from * around, join with sl st to top of first FPdc. (32 sts)
-
Rnd 5: Starting in first st, *FPdc around next st, 2 dc in next st, dc in next st, FPdc around next st; rep from * around, join with sl st to top of first FPdc. (40 sts)
-
Rnd 6: Starting in first st, *FPdc around next st, 2 dc in next st, dc in next 2 sts, FPdc around next st; rep from * around, join with sl st to top of first FPdc. (48 sts)
-
Rnd 7: Starting in first st, *FPdc around next st, 2 dc in next st, dc in next 3 sts, FPdc around next st; rep from * around, join with sl st to top of first FPdc. (56 sts)
-
Rnd 8: Starting in first st, *FPdc around next st, 2 dc in next st, dc in next 4 sts, FPdc around next st; rep from * around, join with sl st to top of first FPdc. (64 sts)
-
Rnd 9: Starting in first st, *FPdc around next st, 2 dc in next st, dc in next 5 sts, FPdc around next st; rep from * around, join with sl st to top of first FPdc. (72 sts)
-
Rnd 10: *FPdc around next st, dc in next 4 (5, 6, 7, 8) sts, FPdc around next st; rep from * around, join with sl st to top of first FPdc.
-
Rep Rnd 10 until hat measures approximately 8” (20.5 cm) from crown, ending after color change.
-
Rnd 11: Starting in first st, *FPdc around next st, sc2tog, sc in next 5 sts, FPdc around next st; rep from * around, join with sl st to top of first FPdc. (64 sts)
-
Rnd 12: Starting in first st, *FPdc around next st, sc2tog, sc in next 4 sts, FPdc around next st; rep from * around, join with sl st to top of first FPdc. (56 sts)
-
Fasten off.
Finishing:
-
With yarn needle, weave in ends on wrong side (inside of hat).
-
Using CB, follow package instructions to form pom pom. With yarn needle and yarn tails from tying pom pom, secure pom pom to hat by weaving yarn tails in on inside of hat.

If you like this slouchy-style hat, here's another one you'll appreciate. Kristi Simpson shows us how to crochet your own crochet hat with just the perfect amount of relaxed slouch so we can wear it to keep warm or just to look cool.
What colors do you want to use for this hat?
Your Recently Viewed Projects
Thanks for your comment. Don't forget to share!
Delphine Bryant
Nov 14, 2018
I really like this aqua ridge slouch hat. Aqua is one of my favorite colors and I really like the pom pom at the top. This particular hat is made from the top to the brim. Not all hats are made that way and with each pattern I notice I like from crown to brim more. I am still not a fan of color change so I will probably opt for a single color or use a gradient / ombre yarn. Thanks for sharing the pattern.
Morehouse17
Oct 29, 2018
Its time. I can feel the chill in the air. Soon I will be wishing I had one or something similar to these to keep my head ward. I like this slouchy look because I feel like my head can breath. I have this thing about things tight about my head. I would probably only make a single change. I would make this in a single color instead of using two colors.
JaneEK
Oct 12, 2018
I really like how the vertical cables contrast with the colored stripes on this hat. The minimalist cables are actually just a couple of Front Post DCs, so theyre not tricky to work up at all. I do think I would go with a fuller pom than the examplelooks kind of skimpy to me. I have that exact Clover pom maker, and I dont think she used enough yarn.
princess6860504
Oct 10, 2018
So fresh for a white winter day! The aqua is stunning. And you'll have to be comfortable with your front post double crochets for this one -) But there are TONS of tutorials that can be found on YouTube in case you need a refresher. I would add more loft to my pom. I'd even suggest trying a faux fur one for an extra trendy touch. I appreciate the entire pattern accessible right here on this page, too.
AFC Editor Annalis a
Sep 30, 2016
The colors, striped design, and pom pom all combine to make this the perfect winter hat. I especially like how the aqua color is bright, but the gray color makes it work for the cooler months.
Report Inappropriate Comment
Are you sure you would like to report this comment? It will be flagged for our moderators to take action.
Thank you for taking the time to improve the content on our site.