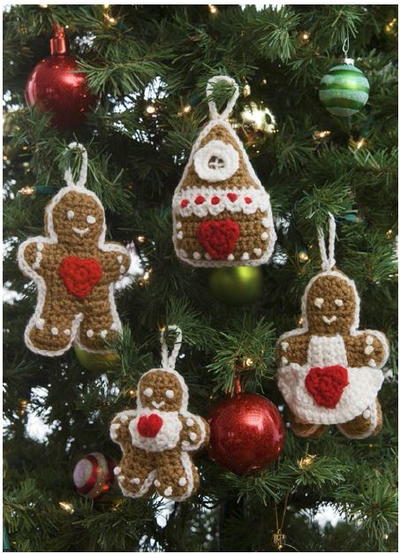
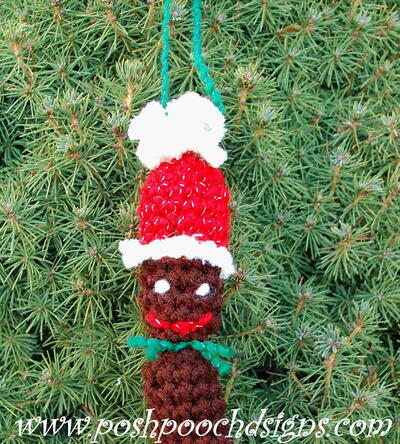
Gingerbread Crochet Ornaments

You can create a whole family of ornaments when you work up the Gingerbread Crochet Ornaments. You've got a dad, a mom, a child, and their gingerbread house out of this printable pattern! Hang them on your tree or use them as gift tags or fashion them into a bunting. You can even make your own family out of these crochet patterns. If you've got more than one child, simply make more of the gingerbread children. These sweet Christmas ornaments are almost good enough to eat.

Crochet HookG/6 or 4 mm hook
Yarn Weight(4) Medium Weight/Worsted Weight and Aran (16-20 stitches to 4 inches)
Crochet Gauge4 sc = 1 (2.5 cm); 4 rows = 1 (2.5 cm). CHECK YOUR GAUGE. Use any size hook to obtain the gauge.
Materials:
- RED HEART® Super Saver®: 1 skein each:
- 336 Warm Brown A
- 316 Soft White B
- 319 Cherry Red C (Note: Only a small quantity of C is needed for this project)
- Susan Bates® Crochet Hook: 4 mm [US G-6]
- Yarn needle
- Polyester fiberfill
Sizing:
- Man and Lady measure 5½” (14 cm) tall
- House measures 5” (12.5 cm) tall
- Baby measures 4½” (11.5 cm) tall
Special Stitches
- sc2tog = [Insert hook in next stitch, yarn over and pull up a loop] twice, yarn over and draw through all 3 loops on hook.
- sc3tog = [Insert hook in next stitch, yarn over and pull up a loop] 3 times, yarn over and draw through all 4 loops on hook.
Special Technique: Join with sc = Place a slip knot on hook, insert hook in indicated stitch, yarn over and draw up a loop, yarn over and draw through both loops on hook.

Want to fill your whole tree with crochet? Check out: 16 Holly Jolly Crochet Christmas Ornaments
Notes
- Each ornament is made from 2 pieces worked back and forth in rows that are sewn together and stuffed.
- To change color, work last stitch of old color to last yarn over. Yarn over with new color and draw through all loops on hook to complete stitch. Proceed with new color. Cut old color.
- To minimize weaving in, you may prefer to pull ends to wrong side of front after pieces are sewn on and tuck ends in as front and back are sewn together.
ORNAMENTS
Large Heart (make 3)
With C, ch 2.
Round 1 (right side): Work 6 sc in 2nd ch from hook—6 sc. Do not join.
Round 2: (Sc, ch 2, sc) in first sc, slip st in next sc, 2 hdc in next sc, ch 1, slip st in next sc, ch 1, 2 hdc in next sc, slip st in next sc; join with slip st in first sc. Fasten off, leaving long tail for sewing.
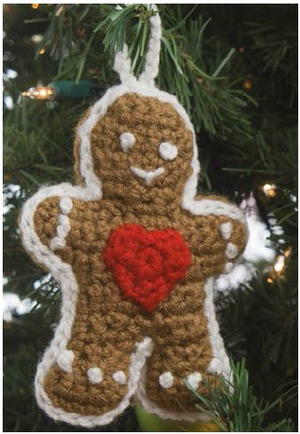
MAN
Body (make 2)
Beginning at top of head, with A, ch 4.
Row 1 (right side): Work 2 sc in 2nd ch from hook, sc in next ch, 2 sc in last sc, turn—5 sc.
Row 2: Ch 1, sc in first sc, *2 sc in next sc, sc in next sc; repeat from * across, turn—7 sc.
Rows 3–6: Ch 1, sc in each sc across, turn.
Row 7: Ch 1, sc2tog, sc3tog, sc2tog, turn— 3 sc.
Row 8: Ch 6, sc in 2nd ch from hook and in next 4 ch, sc in next sc, 2 sc in next sc, sc in last sc, turn—9 sc.
Row 9: Ch 6, sc in 2nd ch from hook and in next 4 ch, sc in each sc across, turn—14 sc.
Row 10: Ch 1, sc2tog, sc in next 10 sc, sc2tog, turn—12 sc.
Row 11: Ch 1, sc in first 10 sc; leave remaining sts unworked, turn—10 sc.
Row 12: Ch 1, sc in first 8 sc; leave remaining sts unworked, turn—8 sc.
Rows 13 and 14: Ch 1, sc in each sc across, turn.
First Leg
Row 1 (right side): Ch 1, sc in first 2 sc, sc2tog; leave remaining sts unworked, turn—3 sc.
Rows 2 and 3: Ch 1, sc in each sc across, turn.
Row 4: Ch 1, sc in first 2 sc, 2 sc in last sc, turn—4 sc.
Row 5: Ch 1, 2 sc in first sc, sc in last 3 sc, turn—5 sc.
Row 6: Ch 1, sc in each sc across. Fasten off.
2nd Leg
Row 1 (right side): With right side facing, join A with sc in first unworked sc of Row 14, sc in next 2 sc; leave remaining sts unworked, turn—3 sc.
Rows 2 and 3: Ch 1, sc in each sc across, turn.
Row 4: Ch 1, 2 sc in first sc, sc in last 2 sc, turn—4 sc.
Row 5: Ch 1, sc in first 3 sc, 2 sc in last sc, turn—5 sc.
Round 6: Ch 1, sc in each sc across; working across ends of rows, in sts, and in opposite side of foundation ch, sc evenly spaced around working 2 sc as needed in rows at curved edges; join with slip st in first sc. Fasten off, leaving long tail on one piece for sewing.
FINISHING MAN
- Select one piece as front. Leave remaining piece unworked.
- Edging Round (right side): With right side facing and working in front loops only, join A with sc in any sc, sc in each sc around; join with slip st in first sc.
- With B, embroider French knot eyes and 3 French knots across each arm and leg. Using photograph as a guide, embroider small straight stitches under eyes for smiling mouth.
- Sew large heart on front.
- Working through unworked back loops of Edging Round and both loops of back, sew front and back together, tucking in ends and stuffing lightly as you go.
- Hanging Loop Join B with slip st to center of top of head, ch 15, slip st in same st as joining st. Fasten off.
Weave in ends.
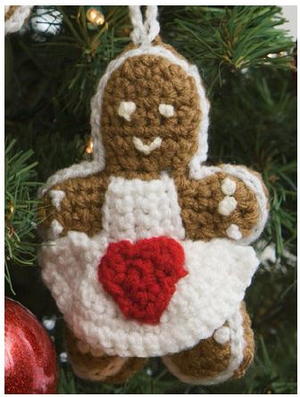
LADY
Body (make 2)
Work same as man.
Bib Apron
Bib
With B, ch 5.
Row 1 (right side): Ch 1, sc in 2nd ch from hook and each ch across, turn—4 sc.
Rows 2–4: Ch 1, sc in each sc across, turn.
Row 5: Ch 1, sc in each sc across. Do not turn.
Apron
Row 1 (right side): Ch 1, work 5 sc evenly spaced across ends of rows, turn—5 sc.
Rows 2 and 3: Ch 1, 2 sc in each sc across, turn—20 sc.
Rows 4–6: Ch 1, sc in each sc across, turn. Fasten off, leaving a long tail for sewing.
FINISHING LADY
Work Steps 1 and 2 of Finishing Man instructions.
Sew large heart on apron. Sew apron to front of lady.
Work Steps 4 and 5 of Finishing Man instructions. Weave in ends.
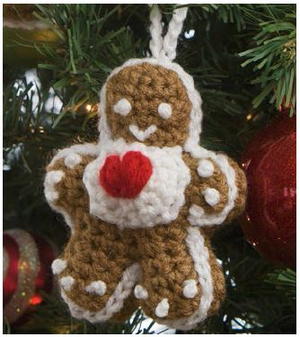
BABY
Body (make 2)
Beginning at top of head, with A, ch 4.
Row 1 (right side): Work 2 sc in 2nd ch from hook and each ch across, turn—6 sc.
Rows 2–5: Ch 1, sc in each sc across, turn.
Row 6: Ch 1, [sc2tog] 3 times, turn—3 sc.
Row 7: Ch 5, sc in 2nd ch from hook and in next 3 ch, sc in next sc, 2 sc in next sc, sc in next sc, turn—8 sc.
Row 8: Ch 5, sc in 2nd ch from hook and in next 3 ch, sc in each sc across, turn—12 sc.
Row 9: Ch 1, sc2tog, sc in last 10 sc, turn— 11 sc.
Row 10: Ch 1, sc2tog, sc in next 7 sc; leaveremaining sts unworked, turn—8 sc.
Row 11: Ch 1, sc in first 6 sc; leave remaining sts unworked, turn—6 sc.
First Leg
Row 1 (wrong side): Ch 1, sc in first 3 sc; leave remaining sts unworked, turn—3 sc.
Row 2: Ch 1, sc in each sc across, turn.
Row 3: Ch 1, 2 sc in first sc, sc in next 2 sc, turn—4 sc.
Row 3: Ch 1, sc in each sc across. Fasten off.
2nd Leg
Row 1 (wrong side): With wrong side facing, join A with sc in first unworked sc of Row 11, sc in next 2 sc, turn—3 sc.
Row 2: Ch 1, sc in each sc across, turn.
Row 3: Ch 1, sc in first 2 sc, 2 sc in last sc, turn—4 sc.
Row 4: Ch 1, sc in each sc across.
Round 5: Work same as Round 6 of man.
Bib
With B, ch 2.
Row 1 (right side): Work 4 sc in 2nd ch from hook, turn.
Row 2: Ch 1, sc in first sc, 2 sc in next 2 sc, sc in last sc, turn—6 sc.
Row 3: Ch 1, sc in first sc, *2 sc in next sc, sc in next 2 sc; repeat from * across, turn—8 sc.
Row 4: Ch 1, sc in each sc across, turn.
Row 5: Ch 1, sc in next sc, sc2tog, sc in next 2 sc, sc2tog, sc in last sc, turn—6 sc.
Row 6: Ch 1, sc in next sc, [sc2tog] twice, sc in last sc. Fasten off, leaving a long tail for sewing.
FINISHING BABY
Work Steps 1 and 2 of Finishing Man instructions.
Using photo as a guide and with 2 strands of C held together, embroider heart on bib with 2 lazy daisy stitches. Begin and end each stitch in same place in center of bib, angling stitches away from each other. Sew bib to front.
Work Steps 4 and 5 of Finishing Man instructions. Weave in ends.
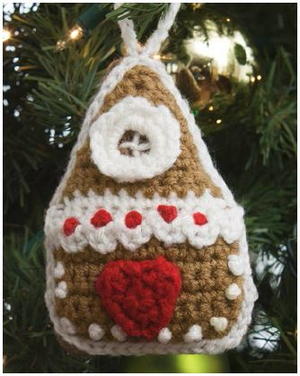
HOUSE
Front
With A, ch 14.
Row 1 (right side): Ch 1, sc in 2nd ch from hook and in each ch across, turn—13 sc.
Rows 2–6: Ch 1, sc in each sc across, turn.
Row 7: Ch 1, sc in each sc across; change to B, turn.
Row 8: Ch 1, sc in each sc across, turn.
Row 9: Ch 1, working in back loops only, sc2tog, sc in each sc across to last 2 sc, sc2tog; change to A, turn—11 sc.
Row 10: Ch 1, sc in each sc across, turn.
Row 11: Ch 1, sc2tog, sc in each sc across to last 2 sc, sc2tog, turn—9 sc.
Rows 12–17: Repeat last 2 rows 3 times— 3 sc.
Round 18: Ch 1, sc3tog; working down first side, sc in end of each row; working in opposite side of foundation ch, 3 sc in first ch, sc in each ch across to last ch, 3 sc in last ch, working up other side, sc in end of end of each, 3 sc in first sc; join with slip st in next st. Fasten off.
Back
Work same as front, omitting all color changes.
Window
With B, ch 8; join with slip st in first ch to form a ring.
Round 1 (right side): Ch 1, 12 sc in ring. Do not join.
Round 2: Slip st in front loop of first sc, *ch 2, skip next sc, slip st front loop of next sc; repeat from * around, ch 2, skip last sc; join with slip st in first slip st. Fasten off.
FINISHING HOUSE
On front, work Edging Round of Finishing Man instructions.
Trim With right side of front facing and held upside down (top of piece closest to you), join B with slip st in first unworked loop of Row 9, *ch 4, skip next unworked loop, slip st in next unworked loop; repeat from * across. Fasten off, leaving a long tail. Tack loops down.
Using photograph as a guide, sew window in place and embroider 2 crossing straight stitches for panes.
With C, embroider a French knot in center of each ch-4 space of trim. With B, embroider French knots around sides and lower edge of front.
Work Steps 3–5 of Finishing Man instructions.
Weave in ends.

ABBREVIATIONS
- A, B, C = Color A, Color B, Color C, etc.
- ch = chain(s)
- hdc = half double crochet
- sc = single crochet
- st(s) = stitch(es)
- ( ) = work directions in parentheses into same st
- [ ] = work directions in brackets the number of times specified
- * = repeat whatever follows the * as indicated.
Up Next
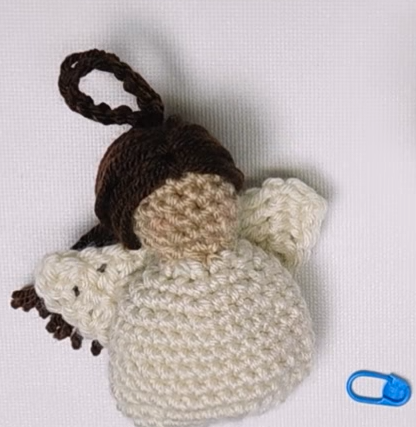
Read NextEasy Crochet Angel Ornament
Your Recently Viewed Projects
Thanks for your comment. Don't forget to share!
mulberrygalprinces s
Jul 07, 2018
These are just adorable. There is such a variety I don't know where to start. Plus the patterns are very easy to make. I love ornaments like this because they are cute but most of all because I have four little grand kids so breakage us always a factor. Not with these!
Daughter of Light
Jan 24, 2018
How adorable are these Gingerbread Crocheted Ornaments!?! Wow! Could you ever personalize them for your own family or anybody else you want to give them to. You could trim them each in a different color and make a family of them. You could have them each holding something different that represents that person. The good thing about this gingerbread is that it won't be disappearing anytime soon!
Morehouse17
Nov 22, 2017
My longtime friend, Judy loves to decorate with Spode and gingerbread. What a combination, huh? I think these four little beauties will be an excellent addition to her Christmas tree.
Delphine Bryant
Nov 18, 2017
When we got married, my husband requested I make gingerbread that first Christmas together. Not the cookies, but the actual gingerbread. Had never had it and now it is part of our tradition. Because of that, I like to include gingerbread in my decor. These are just the item for this year's tree.
Hippie Chick
Aug 08, 2017
What a whimsical gingerbread family of ornaments. My tree could definitely use a few more ornaments and these would be a great tradition to start with so I could pass them down to my kids when they are older. A set made for each child to hang is in order so there wont be any fighting later.
princess6860504
Jul 10, 2017
Oooh! I'd adore having a full set of these for my mother's country rustic decor. Perhaps 4 of each design will make a nice addition to her country Christmas tree?! I believe these to be so very easy to make. It just looks complicated- but they are easy because they are made with two like pieces that are then sewn together. I would put a small piece of cinnamon stick inside each one to add to the novelty factor.
Lisa
Dec 08, 2016
It's nice that these are more 3 dimensional. I've seen other patterns that were just flat. Having the back piece and stuffing really makes them pop. Plus the back piece will cover up the back side of the embroidery. I'm not one of those whose embroidery looks just as good on the back as on the front! Love the lady's apron.
JaneEK
Dec 04, 2016
This collection of ornaments would look wonderful on a tree, wreath, or mantle piece. The individual pieces are easy to work up, but it is a bit fiddly when it comes to the assembly and details. I generally like projects that are completely crochet with minimal other steps. But the results are worth it as these little cookies look very much like the real thing.
Cheryl Y
Nov 26, 2016
I love these Gingerbread Crochet Ornaments! They are so cute and so easy to whip up!! I give my adult children a Christmas ornament every year and I think these would be great to give this year. The pattern is very well written and so easy to follow. I'll be making 4 sets of these and have fun doing it! Thank you for this free crochet pattern.
mulberrygalprinces s
Aug 22, 2016
I am so glad I found these. I knew I had seen them but could not remember where. I already have the pattern for a bunch of ginger bread houses and wanted the ginger bread people to go with it. This is great. And I love that he pattern and instructions are right out front so you don't have to download anything to get them. Thank you so much for offering these.
Report Inappropriate Comment
Are you sure you would like to report this comment? It will be flagged for our moderators to take action.
Thank you for taking the time to improve the content on our site.