This project was submitted by one of our readers, just like you.
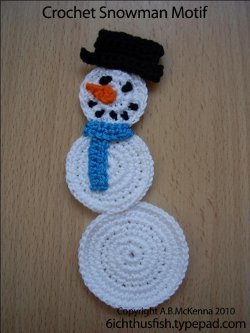
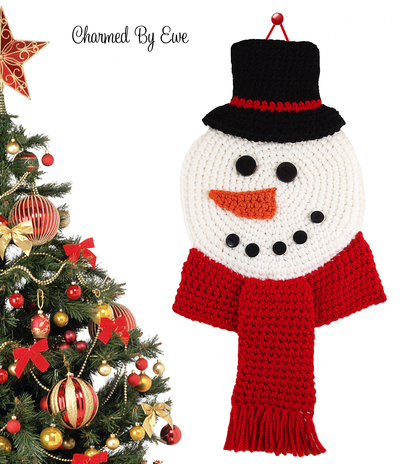
Snowman Wall Hanging

Snowman Wall Hanging
This jolly fellow would be great hanging on the front door to welcome friends, or just as a decorative wall hanging in the home. The Snowman Wall Hanging is an easy crochet pattern that helps you create your own flat snowman motif. You'll be working with multiple colors, both within the same piece and for separate pieces to sew together at the end, so if you're worried about color changes, don't be - this is an easy enough pattern to practice on. Hang this friendly crochet snowman on your front door or anywhere in your home to add a little bit of extra holiday cheer to your home this season.
NotesNotes:
-If a round or row has a beginning chain, it does not count as a stitch.
-Unless directed otherwise, rounds are worked in a spiral; use a stitch marker to track the first stitch of each round.

Crochet HookI/9 or 5.5 mm hook
Yarn Weight(4) Medium Weight/Worsted Weight and Aran (16-20 stitches to 4 inches)
Crochet GaugeGauge in SC: 13 sts and 14 rows = 4" (10 cm)
Finished Size9" wide by 20" tall
Materials List
- Red Heart With Love worsted weight yarn in: White, Holly, Berry, Black, Mango
- 5.5 mm (I-9) crochet hook or size needed to obtain the gauge
- 1" Black buttons (2)
- ½” Black buttons (5)
- Poly fiber fill (optional)
- Stitch markers
- Yarn needle
Pattern
Top Hat
-
Round 1: With Black - Ch 15, sc in 2nd ch from hook, sc in next 12 chs, make 2 sc in last ch. Working the other side of the chain: sc in next 13 chs, do not join (28)
-
Round 2: Sc in each st around (28)
-
Round 3: *Sc2tog, sc in next 12 sts* 2 times (26)
-
Round 4 - 13: Sc in each st around (26)
-
Secure the working loop of Black. Join Red in first stitch.
Round 14: With Red - Ch 1, sc in each st around, do not join (26) -
Round 15: Sc in each st around, sl st first st, fasten off (26)
Continue with Black yarn from Round 13. -
Round 16: With Black - *Sc in first st, make 2 sc in next st*, repeat between * around, do not join (39)
-
Round 17: *Sc in first 2 sts, make 2 sc in next st*, repeat between * around, do not join (52)
-
Round 18: Sc in each st around, do not join (52)
-
Round 19: Ch 1, hdc in each stitch around, sl st to join in first hdc (52) Fasten off, leaving a lengthy tail for sewing.
Nose
-
Row 1: With Mango - Ch 11, sl st in 2nd ch from hook, sc in next 3 chs, hdc in next 3 chs, dc in last 3 chs, turn (10)
-
Row 2: Ch 2, dc in first st, dc in next 4 sts, sc in next 3 sts, sl st in last 2 sts (10)
Fasten off, leaving a lengthy tail for sewing.
Head
Make 2
-
Round 1: With White - Ch 2, make 6 sc in the 2nd ch from hook, do not join (6)
-
Round 2: Make 2 sc in each st around (12)
-
Round 3: *Sc in first st, make 2 sc in next st*, repeat around (18)
-
Round 4: *Sc in first 2 sts, make 2 sc in next st*, repeat around (24)
-
Round 5: *Sc in first 3 sts, make 2 sc in next st*, repeat around (30)
-
Round 6: *Sc in first 4 sts, make 2 sc in next st*, repeat around (36)
-
Round 7: *Sc in first 5 sts, make 2 sc in next st*, repeat around (42)
-
Round 8: *Sc in first 6 sts, make 2 sc in next st*, repeat around (48)
-
Round 9: *Sc in first 7 sts, make 2 sc in next st*, repeat around (54)
-
Round 10: *Sc in first 8 sts, make 2 sc in next st*, repeat around (60)
-
Round 11: *Sc in first 9 sts, make 2 sc in next st*, repeat around (66)
-
Round 12: *Sc in first 10 sts, make 2 sc in next st*, repeat around (72)
-
Round 13: *Sc in first 11 sts, make 2 sc in next st*, repeat around (78)
-
The increases on the next two rounds are staggered to give the circle a more rounded shape.
Round 14: Sc in first 4 sts, *make 2 sc in next st, sc in next 12 sts*, repeat between * around (84) - Your last repeat section will end with 8 sts instead of 12. -
Round 15: Sc in first 8 sts, *make 2 sc in next st, sc in next 13 sts*, repeat between * around (90) - Your last repeat section will end with 5 sts instead of 13.
-
Head Piece # 1: Sl st in next st and fasten off.
At this point, I pinned the hat in place at the top of Piece # 1 so I could configure the placement of the eyes, nose and mouth. I then sewed the face parts only in place before continuing with Head Piece # 2. -
Head Piece # 2: Do not fasten off. With wrong sides facing, hold piece # 1 and piece # 2 together. Working through both layers of the outer round: Sc in each stitch back to start, join in first sc. If preferred, you can lightly stuff the head with poly fiber fill before sealing it up completely. Fasten off.
-
You can now sew the hat on top of the head. Place the seamed head pieces between the two brim layers of the hat and use the hat tail to sew through all 4 layers, going across the whole length of the brim.
Neck Scarf
-
Mark the bottom 25 stitches of the head, as shown.
-
Turn your work so the stitch markers are at the top. With the right side of the Snowman facing you, slip stitch to join Color Red in the Front Loop only of marked stitch A. The first round will be worked in the front loops only across to Marker B, then the piece is turned and you will work in the back loops only of the same stitches back to Marker A.
-
Round 1: Ch 1, working in Front Loops only, sc in same st, sc in next 3 sts, make 2 sc in next st, *sc in next 4 sts, make 2 sc in next st*, repeat between * to marked stitch B. Turn your work and continue working in the un-used Back Loops only: repeat the instructions between * back to start, do not join (60)
-
Round 2: Hdc in first 8 sts, sc in next 14 sts, hdc in next 16 sts, sc in next 14 sts, hdc in last 8 sts, do not join (60)
-
Round 3: Hdc in first 7 sts, sc in next 16 sts, hdc in next 14 sts, sc in next 16 sts, hdc in last 7 sts, do not join (60)
-
Round 4: Hdc in first 6 sts, sc in next 18 sts, hdc in next 12 sts, sc in next 18 sts, hdc in last 6 sts, do not join (60)
-
Round 5: Sc in each stitch around, do not join (60)
-
Round 6 and 7: Repeat Round 5
-
The next row of SC stitches will be worked through both layers to seam the bottom of the scarf.
-
Row 8: Sl st in next st to move your starting position. Ch 1, sc across, fasten off (30)
Dangling Scarf Piece
This piece is worked in a tube. Do not join the rounds. Leave a lengthy beginning tail for sewing.
-
Round 1: Ch 21, sc in 2nd ch from hook, and in each chain to end, bring the ends together and sl st in first sc to form a ring (20)
-
Round 2: Ch 1, sc in each stitch around, do not join (20)
-
Repeat Round 2 until tube measures approximately 5" in length.
-
Final Row: Working through both layers, sc across the bottom edge of the piece to close the end (10)
-
Fasten off. Center the un-seamed edge over the neck scarf, just below the snowman's chin and sew in place using the beginning tail.
-
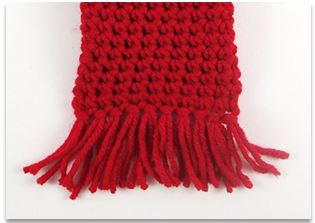
Scarf Fringe: Cut 20 pieces of yarn that are each 5" in length. Use 2 pieces of yarn per stitch to add fringe along the bottom edge of the scarf. Trim the ends to an even length.
Up Next

Read NextLuxe Christmas Baubles
Your Recently Viewed Projects
Thanks for your comment. Don't forget to share!
Linda Kress
Aug 19, 2019
I feel so stupid. I am not understanding the 2nd part of round 1. what does it mean working the other side of the chain-i don't see how this will extend the already 15 single crochets to 13 more. please someone simplify this for me so I can hurry and start these little cuties. I am at a loss to understand. HELP
princessalmck5290
May 15, 2019
could someone help me? i am trying to save this pattern to my box but the save button isn't under the name of the pattern like the help thing says!
FerryP
May 19, 2019
Hi there, I was having the same problem. I just joined this site, couldn't find the save button, saw your comment, was hoping for an answer but I think I found it myself. All the way below the entire pattern there is a row of buttons red for Pinterest, dark blue for FB, light blue for Twitter, followed by two grey buttons one to place a comment, and next to it a save button. When I tired that save button I got a message box saying it was on my list and the grey button changed from "save" into "remove". See the attached print-screen image. I just checked "My Crochet Patterns" and lo and behold, I saved the Christmas decoration. I hope this helps.
Linda Kress
Aug 20, 2019
can you help me I am not understanding what the pattern means when it says work the other side of the chain. can you explain. I have tried several ways and don't understand how it will extend the count to 28 for the following round
Delphine Bryant
Sep 23, 2018
This is such an easy crochet project that will be one of the family favorites in no time. This snowman wall hanging will be perfect to hang in any room of the house to add just a little bit of holiday cheer.
Crafty Suz
Aug 30, 2018
This is so cute and would make a great addition to my sister's snowman collection! It would be sweet on one of her interior doors. I think it would also be neat to figure out a female companion for the snowman. Using a different colored yarn for the hat and a few snowflakes or floral embellishments would be perfect. If you did that, what colors would you use? I'm thinking blue or green.
Morehouse17
Aug 16, 2018
I know at my house, there is not a lot of room for any thing else to hang on the wall, but during the winter holiday, I will rearrange a few items to allow for Christmas decorations. This would be a great addition to the items I display in the downstairs guest bathroom. I can not wait to get started.
elocin1104 2800379
Dec 03, 2017
This is such an awesome idea! You could make it and keep it up all winter long, not just for Christmas decorating! If you do not like the red scarf, you could change the color to suit your tastes! I would go with a more understated color, to match the colors I already have around.
mulberrygalprinces s
Oct 26, 2017
I think I hit the save button in record time. I love snowmen, or as my grand daughter says, snow people. I like to hang holiday de orations on the back side of the front and back doors. I even hang them on inside room doors. This is going up on my bedroom door!
Cheryl Y
Aug 28, 2017
Oh how cute is this Snowman Wall Hanging. The pattern, on this page is well written and easy to follow, with the print tab I saved this pattern quickly. I love this and will be making a few of them to give family for this Holiday season. I so love the scarf on this snowman and think he will look so good on our front door to great people. I want to cross stitch Happy Holidays on the scarf. Thank you so much for sharing this free crochet pattern.
princess6860504
Aug 19, 2017
I think I know just the right person to make this for- my mother! She is 71, lives in a senior mobile home community, and likes to decorate but can't have stuff that is too, too large and/or too difficult to put up and take down herself. This would be perfect for her. I like the fact that this is not a Santa or a reindeer that looks specifically Christmas. This snowman can be left up all winter long! Made up of just never ending rounds of single crochets it will be a piece of cake to work up. For a little more upscale and modern snowman, try a different color scarf-perhaps in a frosty sparkly blue!
nitcham 9316557
Aug 17, 2017
How can a person make this larger ? Want to hang on front door. Would like it to be 12 inches across.
cagirl 4438763
Aug 17, 2017
This is such a cute pattern. I also appreciate how the fonts are big enough to read without straining your eyes. I will try to make this before Christmas this year. Thank you so much!
Alysanne
Dec 15, 2016
This is a wonderful project to work up in the summer and have ready for decorating and gift giving. He can be embellished in many ways to make each one special. The pattern appears to be straight forward and I am anxious to work these up for next year.
cluegirl
Dec 07, 2016
Love this pattern! I've already made 3 for people. Is it alright to sell the finished project?
lindanorton 440121 6
Aug 31, 2016
I too have looked and looked and can't find the instructions. Should have saved them last year when I first saw it.
AFC Editor Julia
Sep 01, 2016
Hi there - we had a server issue where a few patterns were hidden from the public view. This should be fixed and the pattern should be available in full on this page. Please let me know if you continue to have any problems! Julia, editor for AllFreeCrochet
debbie1177
Aug 31, 2016
Has anyone been able to find the pattern? I've tried everywhere, and they all link back to here.
AFC Editor Julia
Sep 01, 2016
Hi there - we had a server issue where a few patterns were hidden from the public view. This should be fixed and the pattern should be available in full on this page. Please let me know if you continue to have any problems! Julia, editor for AllFreeCrochet
claudcat1 9662152
Aug 30, 2016
Where is a printable pattern for this?
AFC Editor Julia
Sep 01, 2016
Hi there - we had a server issue where a few patterns were hidden from the public view. This should be fixed and the pattern should be available in full on this page. Please let me know if you continue to have any problems! Julia, editor for AllFreeCrochet
hestermagpie
Aug 29, 2016
there is no link to the pattern
AFC Editor Julia
Sep 01, 2016
Hi there - we had a server issue where a few patterns were hidden from the public view. This should be fixed and the pattern should be available in full on this page. Please let me know if you continue to have any problems! Julia, editor for AllFreeCrochet
hestermagpie
Sep 03, 2016
thank you for the speedy response. glad you got the server fixed. tina
mulberrygalprinces s
Aug 21, 2016
Can this be any cuter? The minute I saw it I said aww, followed by, I have to make it. I want it for above my mantel as a wall hanging. I know my daughter will want one also so I best get working. I am going to work on it until I can make one a snow lady to go with him.
Report Inappropriate Comment
Are you sure you would like to report this comment? It will be flagged for our moderators to take action.
Thank you for taking the time to improve the content on our site.