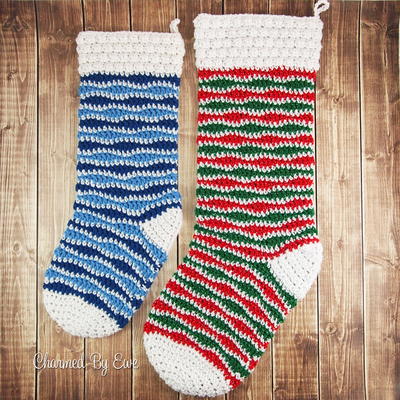
Holly Jolly Holiday Crochet Stocking

Using regular worsted weight yarn, a handful of colors and the puff stitch, you too can make your own Holly Jolly Holiday Crochet Stocking. This easy crochet Christmas pattern is available in two sizes, regular and large, so it's perfect for any member of the family. The colors are customizable too, so stick with a traditional holiday theme or go with the recipient's favorite hues - this holiday crochet stocking pattern will look so cute either way! This Christmas crochet pattern is also a good way to practice color changes and carrying your yarn on the inside.
NotesSpecial Instructions:
-The beginning chain does not count as a stitch.
-Start each round in the same stitch as the beginning chain until you get to the cuff.
-Join each round by slip stitching in the first stitch, not the beginning chain.
-Carry the yarn on the inside of the work between rounds.

Crochet HookH/8 or 5 mm hook
Yarn Weight(4) Medium Weight/Worsted Weight and Aran (16-20 stitches to 4 inches)
Crochet GaugeGauge in DC: 14 stitches and 8 rows = 4" (10 cm)
Finished SizeRegular and large
Materials List
- Worsted weight yarn - For size regular, Red Heart Holiday in White/Silver (A) - 113 yards (47 gm); Red Heart With Love in True Blue (B) - 34 yards (18 gm); Red Heart With Love in Bluebell (C) - 34 yards (18 gm)) -- for size large, Red Heart Holiday in White/Silver (A) - 139 yards (59 gm); Red Heart Holiday in Red/Silver (B) - 60 yards (25 gm); Red Heart Holiday in Green/Silver (C) - 60 yards (25 gm)
- 5.0 mm (H-8) crochet hook or size needed to obtain the gauge
- Yarn needle for weaving in ends
- Stitch markers
Stocking Pattern
Size Regular
Width = 5.75" • Height = 18"
-
Round 1: With A - Ch 2, make 8 hdc in the 2nd chain from hook, sl st to join in first hdc (8)
Round 2: Ch 1, make 2 hdc in each st around, join (16)
Round 3: Ch 1, *hdc in first st, make 2 hdc in next st* repeat around, join (24)
Round 4: Ch 1, *hdc in first 2 sts, make 2 hdc in next st* repeat around, join (32)
Round 5: Ch 1, *hdc in first 3 sts, make 2 hdc in next st* repeat around, join (40)
Round 6: Ch 1, sc in each stitch around, join (40) - change to Color B in join.
Round 7: With B - Ch 1, *sc in first 3 sts, hdc in next st, dc in next 3 sts, hdc in next st*, repeat between * around, join in first sc (40) - change to Color A in join.
Round 8: With A - Ch 1, sc in each st around, join in first sc (40) - change to Color C in join.
Round 9: With C - Ch 2, *dc in first 3 sts, hdc in next st, sc in next 3 sts, hdc in next st*, repeat between * around, join in first dc (40) - change to Color A in join.
Round 10: With A - Ch 1, sc in each st around, join in first sc (40) - change to Color B in join.
Round 11 through Round 18: Repeat Rounds 7 through 10
Round 19: Repeat Round 7
Round 20: Repeat Round 8
Round 21: Repeat Round 9 - change to Color A in join. Fasten off Colors B and C. -
Heel
Row 1: Ch 1, sc in same stitch, sc in next 15 sts, turn (16)
Row 2: Ch 1, sc in each stitch across, turn (16)
Row 3: Ch 1, sc in first 5 sts, sc2tog, hdc in next 2 sts, sc2tog, sc in last 5 sts, turn (14)
Row 4: Ch 1, sc in first 6 sts, hdc in next 2 sts, sc in last 6 sts, turn (14)
Row 5: Ch 1, sc in first 4 sts, sc2tog, hdc in next 2 sts, sc2tog, sc in last 4 sts, turn (12)
Row 6: Ch 1, sc in first 5 sts, hdc in next 2 sts, sc in last 5 sts, turn (12)
Row 7: Ch 1, sc in first 3 sts, sc2tog, hdc in next 2 sts, sc2tog, sc in last 3 sts, turn (10)
Row 8: Ch 1, sc in first 4 sts, hdc in next 2 sts, sc in last 4 sts, turn (10)
Row 9: Ch 1, sc in first 2 sts, sc2tog, hdc in next 2 sts, sc2tog, sc in last 2 sts, turn (8)
Row 10: Ch 1, sc in first st, sc2tog, hdc in next 2 sts, sc2tog, sc in last st, turn (6)
Next, resume working in Rounds. -
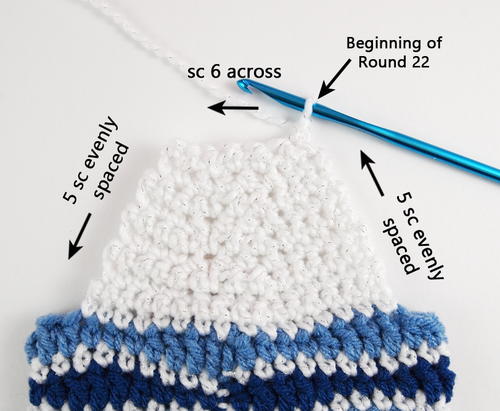
Round 22: Ch 1, sc in first 6 sts, working down the ends of the rows, evenly work 5 sc (approximately one every other row), working stitches from Round 21: sc in next 24 sts (you should be at the beginning of the other side of the heel rows), work 5 sc up the ends of the rows, join in first sc, fasten off (40) - Photo visual for round 22 below.
Sl st to join Color B in the 4th stitch of the round.
Round 23: With B - Ch 1, *sc in first 3 sts, hdc in next st, dc in next 3 sts, hdc in next st*, repeat between * around, join in first sc (40) - change to Color A in join.
Round 24: With A - Ch 1, sc in each st around, join in first sc (40) - change to Color C in join.
Round 25: With C - Ch 2, *dc in first 3 sts, hdc in next st, sc in next 3 sts, hdc in next st*, repeat between * around, join in first dc (40) - change to Color A in join.
Round 26: With A - Ch 1, sc in each st around, join in first sc (40) - change to Color B in join.
Round 27 through Round 46: Repeat Rounds 23 through 26
Round 47: Repeat Round 23
Fasten off Color B and Color C. Your seam will have travelled off center from the back of the stocking. Join Color A in the center back stitch, which should be about 6 or 7 stitches into the round. This is where you will create the loop for hanging when working the final round.
Round 48: Ch 1, sc in each st around, join in first sc, TURN your work (40)
Round 49: Ch 1, *puff st in first st, sc in next st*, repeat between * around, join in first puff st, turn (40)
Round 50: Ch 1, sc in each st around, join in first sc, turn (40)
Round 51: Ch 1, *sc in first st, puff st in next st*, repeat between * around, join in first sc, turn (40)
Round 52 through Round 55: Repeat Rounds 48 through 51
Round 56: Ch 10, sl st in first st (creates loop for hanging), sc in next st and in each st back to start, sl st to join in first sc (encases the base of the ch-10 loop) (39 sc + 10 chs)
Fasten off and weave in all ends.
Size Large
Width = 7" • Height = 22.5"
-
Round 1: With A - Ch 2, make 8 hdc in the 2nd chain from hook, sl st to join in first hdc (8)
Round 2: Ch 1, make 2 hdc in each st around, join (16)
Round 3: Ch 1, *hdc in first st, make 2 hdc in next st* repeat around, join (24)
Round 4: Ch 1, *hdc in first 2 sts, make 2 hdc in next st* repeat around, join (32)
Round 5: Ch 1, *hdc in first 3 sts, make 2 hdc in next st* repeat around, join (40)
Round 6: Ch 1, *hdc in first 4 sts, make 2 hdc in next st* repeat around, join (48)
Round 7: Ch 1, sc in each stitch around, join (48) - change to Color B in join.
Round 8: With B - Ch 1, *sc in first 3 sts, hdc in next st, dc in next 3 sts, hdc in next st*, repeat between * around, join in first sc (48) - change to Color A in join.
Round 9: With A - Ch 1, sc in each st around, join in first sc (48) - change to Color C in join.
Round 10: With C - Ch 2, *dc in first 3 sts, hdc in next st, sc in next 3 sts, hdc in next st*, repeat between * around, join in first dc (48) - change to Color A in join.
Round 11: With A - Ch 1, sc in each st around, join in first sc (48) - change to Color B in join.
Round 12 through Round 23: Repeat Rounds 8 through 11
Round 24: Repeat Round 8
Round 25: Repeat Round 9
Round 26: Repeat Round 10 - change to Color A in join. Fasten off Colors B and C. -
Heel
Row 1: Ch 1, sc in same stitch, sc in next 19 sts, turn (20)
Row 2: Ch 1, sc in each stitch across, turn (20)
Row 3: Ch 1, sc in first 6 sts, sc2tog, hdc in next 4 sts, sc2tog, sc in last 6 sts, turn (18)
Row 4: Ch 1, sc in first 7 sts, hdc in next 4 sts, sc in last 7 sts, turn (18)
Row 5: Ch 1, sc in first 5 sts, sc2tog, hdc in next 4 sts, sc2tog, sc in last 5 sts, turn (16)
Row 6: Ch 1, sc in first 6 sts, hdc in next 4 sts, sc in last 6 sts, turn (16)
Row 7: Ch 1, sc in first 4 sts, sc2tog, hdc in next 4 sts, sc2tog, sc in last 4 sts, turn (14)
Row 8: Ch 1, sc in first 5 sts, hdc in next 4 sts, sc in last 5 sts, turn (14)
Row 9: Ch 1, sc in first 3 sts, sc2tog, hdc in next 4 sts, sc2tog, sc in last 3 sts, turn (12)
Row 10: Ch 1, sc in first 4 sts, hdc in next 4 sts, sc in last 4 sts, turn (12)
Row 11: Ch 1, sc in first 2 sts, sc2tog, hdc in next 4 sts, sc2tog, sc in last 2 sts, turn (10)
Row 12: Ch 1, sc in first 3 sts, hdc in next 4 sts, sc in last 3 sts, turn (10) -
Resume working in rounds.
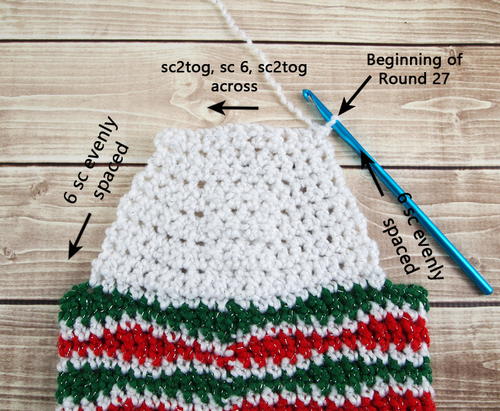
Round 27: Ch 1, sc2tog, sc next 6 sts, sc2tog, working down the ends of the rows, evenly place 6 sc (approximately one every other row), working stitches from Round 26: sc in next 28 sts (you should be at the beginning of the other side of the heel rows), work 6 sc up the ends of the rows, join in first sc, fasten off (48) - Visual representation for this round is below.
Sl st to join Color B in the 5th stitch of the round.
Round 28: With B - Ch 1, *sc in first 3 sts, hdc in next st, dc in next 3 sts, hdc in next st*, repeat between * around, join in first sc (48) - change to Color A in join.
Round 29: With A - Ch 1, sc in each st around, join in first sc (48) - change to Color C in join.
Round 30: With C - Ch 2, *dc in first 3 sts, hdc in next st, sc in next 3 sts, hdc in next st*, repeat between * around, join in first dc (48) - change to Color A in join.
Round 31: With A - Ch 1, sc in each st around, join in first sc (48) - change to Color B in join.
Round 32 through Round 59: Repeat Rounds 28 through 31
Round 60: Repeat Round 28
Fasten off Color B and Color C. Your seam will have travelled off center from the back of the stocking. Join Color A in the center back stitch, which should be about 7 or 8 stitches into the round. This is where you will create the loop for hanging when working the final round.
Round 61: Ch 1, sc in each st around, join in first sc, TURN your work (48)
Round 62: Ch 1, *puff st in first st, sc in next st*, repeat between * around, join in first puff st, turn (48)
Round 63: Ch 1, sc in each st around, join in first sc, turn (48)
Round 64: Ch 1, *sc in first st, puff st in next st*, repeat between * around, join in first sc, turn (48)
Round 65 through Round 68: Repeat Rounds 61 through 64
Round 69: Repeat Round 61
Round 70: Repeat Round 62
Round 71: Ch 10, sl st in first st (creates loop for hanging), sc in next st and in each st back to start, sl st to join in first sc (encases the base of the ch-10 loop) (47 sc + 10 chs)
Fasten off and weave in all ends.
Abbreviations
- Puff stitch (puff st)
- Yarn over, insert hook in next stitch, yarn over and pull up a loop (3 loops on hook), yarn over and pull through first 2 loops on hook (2 loops left on hook), yarn over, insert hook in same stitch, yarn over and pull up a loop (4 loops on hook), yarn over and pull through all loops on hook.
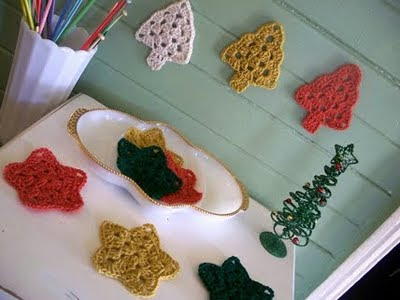
Read NextGrandma's Crochet Christmas Trees
Your Recently Viewed Projects
Thanks for your comment. Don't forget to share!
Morehouse17
Nov 18, 2018
This is an instant classic. These holly jolly holiday crochet stocking look like they could have been a part of the decorations for years. I love the traditional colors but so many of us including myself have adopted much more modern color schemes. I will be making these in my holiday colors of purple and gold. Thanks for sharing.
JaneEK
Sep 30, 2017
I recognize this stitch pattern as one of my favorite motifs! I cant even tell you how many times Ive worked the Brainwave Beanie pattern. Ive used all sorts of colors including camo with blaze orange and local university team colors. Everyone seems to love this stitch pattern and its one of my best sellers, too! Cant wait to work up Christmas stockings now. Ill make most of them in holiday colors, but I know my son is going to want the camo/blaze orange version!
Lisa
Dec 06, 2016
I made this as part of a Christmas crochet-a- long. This was my first CAL and it was great fun. So encouraging to be part of a group and see everyone's comments. Also it was a good stash busting project. I already had the ivory and dark red, so only had to buy the green. Bottom line join a CAL -- it really motivates you to finish!
AFC Editor Annalis a
Sep 02, 2016
I like the wavy stripes of these stockings! It's a different take on a classic design.
Report Inappropriate Comment
Are you sure you would like to report this comment? It will be flagged for our moderators to take action.
Thank you for taking the time to improve the content on our site.