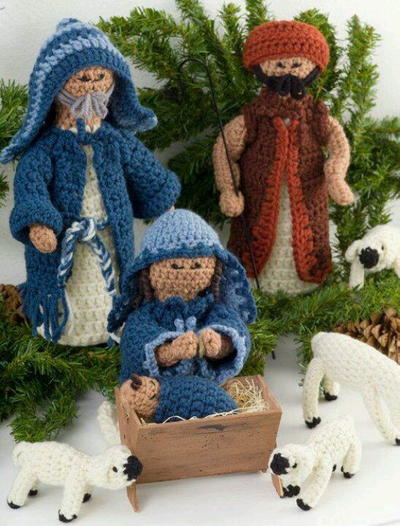
Crochet Nativity Set

Make your very own Jesus, Mary, and Joseph this year with this Crochet Nativity Set. It's an intermediate crochet pattern by Red Heart Yarn that will add the perfect homemade Christmas touch to your holiday decor. Make this Christmas decor pattern for yourself or give it as a special gift to your church. Either way, it is sure to become a precious heirloom over the years. Red Heart Super Saver yarn is used to work up this free crochet pattern.

Crochet HookG/6 or 4 mm hook
Yarn Weight(4) Medium Weight/Worsted Weight and Aran (16-20 stitches to 4 inches)
MATERIALS:
JOSEPH, MARY, & SHEPHERD
- RED HEART® “Super Saver®”: 1 Skein each 336 Warm Brown A, 313 Aran B, 882 Country Blue C, 380 Windsor Blue D, 365 Coffee E, 332 Ranch Red F
- Crochet Hooks: 4mm [US G-6]. 6.5mm [US K-10.5] for Joseph’s head band only
- Three 2” Styrofoam® balls
- Two 8” x 3” Styrofoam® cones, one 6” x 3” Styrofoam® cone
- Six beige chenille stems
- Three small wooden craft sticks
- Three 3 oz pyramid shaped fishing weights
- Three 3” ivory felt circles
- Small amounts of black, brown and gray embroidery floss
- Six tiny pompom eyes
- Two small Velcro® squares
- Tapestry needle
- Craft glue
BABY JESUS
- RED HEART® “Super Saver®”: 1 skein 336 Warm Brown A, 313 Aran B, and 882 Country Blue C.
- Crochet Hook: 3.25mm [US D-3].
- 1” piece of curly Mary hair (see instructions for Mary),
- Small amount of black embroidery floss,
- Small amount of fiberfill material.
LAMBS
- RED HEART® “Super Saver®”: 1 skein each 313 Aran A and 312 Black B.
- Crochet Hook: 3.25mm [US D-3]
- Small amount of fiberfill material,
- Four 12” 6mm white chenille stems
- Tapestry needle
- Craft glue.
GAUGE:
Joseph, Mary, & Shepherd: 16 sc = 4”; 16 rows = 4” with smaller hook.
Baby Jesus & Lambs: 20 sc = 4”; 20 rows = 4”.
CHECK YOUR GAUGE. Use any size hooks to obtain the gauges.
SIZE:
Joseph & Shepherd: 10.5” tall without headdresses
Kneeling Mary:7.24” tall without headdress.
Baby Jesus: 4” tall.
Large Lamb:2¾” tall.
Small Lamb: 2" tall.
SPECIAL ABBREVIATIONS:
Dec: [Draw up a loop in next st] 2 times; yo and draw through all 3 loops on hook.
Hdcdec: [Yo and draw up a loop in next st] 2 times; yo and draw through all 5 loops on hook.
Dcdec: [yo and draw up a loop in next st, yo and draw through 2 loops] 2 times; yo and draw through all 3 loops on hook.
INSTRUCTIONS:
JOSEPH
HEAD: With smaller hook and A, ch 4; join with a slip st to
form a ring.
Rnd 1: Ch 3 (counts as 1st dc), dc 11 in ring; join with a slip
st in top of ch-3 – 12 sts.
Rnd 2: Ch 3, 2 dc in next st, * dc in next st, 2 dc in next st;
repeat from * around; join – 18 sts.
Rnd 3: Ch 2 (counts as 1st hdc), hdc in next st, 2 hdc in next
st, * hdc in next 2 sts, 2 hdc in next st; repeat from * around;
join – 24 sts.
Rnd 4: Ch 2, hdc in each st around.
Rnd 5: Repeat Rnd 4; insert Styrofoam® ball.
Rnd 6: Ch 2, hdc in next st, hdcdec over next 2 sts, * hdc
in next 2 sts, hdcdec over next 2 sts; repeat from * around;
join – 18 sts.
Rnd 7: Ch 2, hdcdec over next 2 sts, * hdc in next st,
hdcdec over next 2 sts; repeat from* around; join – 12 sts.
Rnd 8: Ch 2, hdc in each st around; join.
Rnd 9: Repeat Rnd 8; fasten off.
UNDER ROBE-Rnd 10: Attach B with a slip st to last st, ch
1, 2 sc in next st, * sc in next st, 2 sc in next st; repeat from *
around; join – 18 sts.
Rnds 11-13: Ch 3 (counts as 1st dc), dc in each st around
and join at top of ch-3.
Rnd 14: Ch 3, dc in next st, 2 dc in next st, * dc in next 2 sts,
2 dc in next st; repeat from * around; join – 24 sts.
Rnds 15-17: Ch 3, dc in each st around; join.
Rnd 18: Ch 3, dc in next 2 sts, 2 dc in next st, * dc in next 3
sts, 2 dc in next st; repeat from * around; join – 30 sts.
Rnds 19-24: Ch 3, * dc in next st; repeat from * around; join.
Rnd 25: Ch 3, dc in next 2 sts, dcdec in next 2 sts, * dc in next
3 sts, dcdec in next 2 sts; repeat from * around; join – 24 sts.
Rnd 26: Ch 1, sc around; join and fasten off.
BODY: Glue a 4” piece of craft stick into top of Styrofoam®
cone (leave 1” protruding to glue into head). Allow to
dry. Apply glue to remaining portion of craft stick and fit
crocheted Under Robe over cone, carefully fitting stick into
Styrofoam® ball. Cut pyramid shaped hole into bottom
of cone and glue weight and felt circle into place. Wrap 2
chenille stems together and insert through body at bottom of
second Under Robe row for arms (use a skewer or an awl to
help guide the stem through). Position stem equally on body
and fold over at each end (approximately ½”) for hands.
Dab a small amount of glue where arms and body meet and
allow to dry.
ARMS (Make 2): With smaller hook and A, ch 38; turn.
Row 1: Dc in 4th ch from hook, dc in next 13 ch, hdc in next
8 ch, dc in last 14 ch, ch 3; turn.
Row 2: Dc in next 13 sts, hdc in next 8 sts, dc in last 14 sts;
fasten off, leave a 20” tail for sewing.
Using tapestry needle, fold arm together (end to end) and
stitch to fold. Turn and stitch first 4 hdc together. Fit onto
wire arm, wrap tail around three times to form wrist, continue
sewing up the arm then stitch to under robe at shoulders.
FACE: Using gray embroidery floss, cut a 30” and a 10”
piece. Loop the 30” piece around a 5”piece of cardboard
and sew at top of each ear. Loop the 10” section around a
2” piece of cardboard and attach above beard for mustache.
The mustache may be tacked into place at the ends, if
desired. Use black floss to form small lines for eyes and glue
pompoms into place above each eye.
ROBE: With smaller hook and C, ch 36.
Row 1: Dc in 4th ch from hook, dc in each ch across; turn –
33 sts.
Row 2: Ch 3 (counts as first dc), dc in next 5 sts, ch 3, skip
next 3 sts, dc in next 16 sts, ch 3, skip next 3 sts, dc in last 5
sts and in top of ch-3; turn.
Row 3: Ch 3, dc in each dc and in each ch across; turn.
Rows 4-10: Ch 3, dc in each st across; turn.
Row 11: Ch 1, sc in each st across. Fasten off.
Fringe: Cut thirty six 4” strands of C and attach two in every
other st on bottom edge of robe.
Tie: With C, ch 55. Fasten off. Weave through first dc row at
top of robe for neck gathering.
SLEEVES (Make 2): With smaller hook and C and leaving
10” beginning tail for sewing, ch 12; join.
Rnd 1: Ch 3 (counts as 1st dc), dc in each ch around; join –
12 sts.
Rnds 2-4: Ch 3, dc around; join.
Rnd 5: Ch 3, dc in next st, 2 dc in next st, * dc in next 2 sts,
2 dc in next st; repeat from * around; join – 16 sts.
Rnd 6: Ch 3, dc in each st around; join.
Rnd 7: Ch 3, dc in next 2 sts, 2 dc in next st, * dc in next 3
sts, 2 dc in next st; repeat from * around; join – 20 sts.
Rnd 8: Ch 1, (sc in each st) around; join. Fasten off.
Stitch each sleeve into place on robe.
HEADPIECE: With smaller hook and C, ch 38.
Row 1: Dc in 4th ch from hook and in each chain across;
drop yarn, DO NOT TURN – 35 sts.
Row 2: Attach D at top of 1st dc, ch 3 (counts as beginning
dc), dc in each st across; drop yarn; turn.
Row 3: Pick up C and slip stitch to top of last dc, ch 3, dc in
each st across; drop yarn.
Row 4: With D, repeat Row 3; turn at end.
Row 5: With C, repeat Row 3. Fasten C off.
Row 6: With D, repeat Row 3. Fasten D off.
Fold tog end to end and with C, stitch last row together.
With right side facing, attach D at one side of bottom and sc
once in each st and twice around each post across. Fasten
off.
HEAD BAND: With larger hook, hold one strand each B, C,
and D together as one; ch 45. Fasten off.
Tie around Joseph’s head to hold headpiece in place.
MARY
HEAD & UNDER ROBE: Work same as for Joseph.
BODY: Using the 6” Styrofoam® cone, measure 4” down
back and 5” down front and cut at an angle. Glue a 4” piece
of craft stick into top of cone (leave 1” protruding to glue
into head). Allow to dry. Apply glue to remaining portion of
craft stick and fit crocheted Under Robe over cone, carefully
fitting stick into Styrofoam® ball. Cut pyramid shaped hole
into bottom of cone and glue weight and felt circle into place.
Fold excess Under Robe material under and stitch together
to form kneeling legs. Wrap 2 chenille stems together and
insert through body at bottom of second Under Robe row
for arms (use a skewer or an awl to help guide the stem
through). Position stem equally on body and fold over at
each end (approximately ½”) for hands. Dab a small amount
of glue where arms and body meet and allow to dry.
ARMS: Work same as for Joseph. Glue Velcro® onto hands
for a praying posture.
FACE: To form Mary’s curls, wrap black and brown strands
of yarn together around wooden skewer after dipping into
a diluted glue solution. Allow to dry overnight. Unwrap, and
sew small portions over ears, as desired; finish eyes as
described for Joseph.
ROBE: With smaller hook and C, ch 31.
Row 1: Dc in 4th ch from hook, dc in each ch across; turn –
28 sts.
Row 2: Ch 3 (counts as 1st dc), dc in next 4 sts, ch 3, skip
next 3 sts, dc in next 13 sts, ch 3, skip next 3 sts, dc in last 4
sts and at the top of 1st ch-3; turn.
Row 3: Ch 3, dc in each dc and in each ch across; turn.
Rows 4-7: Ch 3, dc in each st across; turn.
Row 8: Ch 1, sc in each st across. Fasten off.
Trim: With right side facing, attach D at the upper left front
of robe. Ch 1, sc around post, * ch 1, sc around next post;
repeat from * to bottom; ** ch 3, sc in next st, skip next st;
repeat from ** across bottom; ch 3, sc around next post;
repeat from * to top of right side. Fasten off.
Tie: With C, ch 55. Fasten off. Weave through first dc row of
robe for neck gathering.
SLEEVES (Make 2): With smaller hook and C, and leaving
1st 10” tail for sewing, ch 12; join.
Rnd 1: Ch 3 (counts as 1st dc), dc in each ch; join.
Rnds 2-3: Ch 3, dc in each st; join.
Rnd 4: Ch 3, dc in next st, 2 dc in next st, * dc in next 2 sts,
2 dc in next st; repeat from * around; join – 16 sts.
Rnds 5-6: Repeat Rnds 2-3. Fasten off.
Rnd 7: Attach D, * ch 3, skip next st, sc; repeat from *
around; join. Fasten off.
Stitch each sleeve into place on robe.
HEADPIECE: With smaller hook and D, ch 6; join.
Rnd 1: Ch 2 (counts as 1st hdc), hdc 11 times in ring; join to
the top of 1st hdc – 12 sts.
Rnd 2: Ch 2, 2 hdc in next st, * hdc in next st, 2 hdc in next
st; repeat from * around; join – 18 sts.
Rnd 3: Ch 2, hdc in next st, 2 hdc in next st, * hdc in next 2
sts, 2 hdc in next st; repeat from * around; join – 24 sts.
Rnd 4: Ch 2, hdc in next 2 sts, 2 hdc in next st, * hdc in next
3 sts, 2 hdc in next st; repeat from * around; join – 30 sts.
Rnd 5: Ch 2, hdc in each st; join.
Rnd 6: Ch 1, sc in first 4 sts, dec in next 2 sts, * sc in next 4
sts, dec; repeat from * around; join – 35 sts.
Row 7: Ch 3 (counts as 1st dc); TURN; dc in next 2 sts,
dcdec in next 2 sts; [dc in next 3 sts, dcdec in next 2 sts] 2
times; dc in next 3 sts; turn – 18 sts.
Rows 8-9: Ch 3, dc in each st across; turn.
Row 10: Ch 3, dc in next st, 2 dc in next st, * dc in next 2
sts, 2 dc in next st; repeat from * across; turn – 24 sts.
Row 11: Ch 3, dc in each st; join. Fasten off.
Trim: Join C to last st, ch 3, sc in every other st and around
each post around headpiece; join. Fasten off.
SHEPHERD
Work Head, Under Robe, Body, and Arms same as for
Joseph.
FACE: Using black yarn, finish same as for Joseph.
ROBE: With smaller hook and E, ch 31.
Row 1: Dc in 4th ch from hook, dc in each ch across; turn.
Row 2: Ch 3 (counts as 1st dc), dc in next 4 sts, ch 3, skip
next 3 sts, dc in next 13 sts, ch 3, skip next 3 sts, dc in next
3 sts, dc in 3rd ch of beginning ch-3; turn – 28 sts.
Row 3: Ch 3, dc in each dc and in each ch across; turn.
Rows 4-11: Ch 3, dc in each st across; turn.
Row 12: Ch 3, skip next st, sc in next st, * ch 3, skip next st,
sc in next st; repeat from * across. Fasten off.
Trim: Join F at the top post on left side of robe. Slip st in
same post and in next st, [2 sc around next post] 3 times;
[2 hdc around next post] 2 times; [2 dc around next post]
2 times; [2 tr in next post] 3 times; ch 4 and sc in first ch-3
space at bottom of robe, ch 4, sc in each ch space across
bottom, ch 4, [2 tr around next post] 3 times; [2 dc in next
post] 2 times; [2 hdc in next post] 2 times; [2 sc in next post]
3 times; slip st in next post, 2 slip st in last post. Fasten off.
Tie: With E, ch 55. Fasten off. Weave through first dc row at
the top of robe for neck gathering.
Finishing: Join E at a ch in armhole, ch 1, sc in same ch, ch
3, skip next st, sc in next st, ch 3, sc around next post, ch 3,
sc in next st, ch 3, skip next st, sc in next st, ch 3, sc around
next post, ch 3; join to 1st sc. Fasten off. Repeat for other
armhole.
HEADPIECE: With smaller hook and F, ch 30.
Row 1: Hdc in 3rd ch from hook (counts as first hdc), hdc in
each ch across; turn – 28 sts.
Rows 2-3: Ch 2, hdc in each st across; turn.
Row 4: Ch 1, sc in next 5 sts, dec in next 2 sts, * sc in next
5 sts, dec in next 2 sts; repeat from * across. DO NOT
FASTEN OFF.
Finishing: Fold over and sc ends together evenly to form
circle. Fasten off.
BABY JESUS
Baby Jesus is 4” tall.
RED HEART® “Super Saver®”: 1 skein 336 Warm Brown
A, 313 Aran B, and 882 Country Blue C.
Crochet Hook: 3.25mm [US D-3].
1” piece of curly Mary hair (see instructions for Mary), small
amount of black embroidery floss, small amount of fiberfill
material.
GAUGE: 20 sc = 4”; 20 rows = 4”. CHECK YOUR GAUGE.
Use any size hook to obtain the gauge.
SPECIAL ABBREVIATIONS:
Dec: [Draw up a loop in next st] 2 times; yo and draw
through all 3 loops on hook.
Hdcdec: [Yo and draw up a loop in next st] 2 times; yo and
draw through all 5 loops on hook.
BODY: With B, ch 4; join to form ring.
Rnd 1: Ch 2 (counts as 1st hdc), 9 hdc in circle, join at top of
beginning ch-2 – 10 sts.
Rnd 2: Ch 2, 2 hdc in next st; * hdc in next st, 2 hdc in next
st; repeat from * around; join – 15 sts.
Rnd 3: Ch 2, hdc in the next st, 2 hdc in next st, * hdc in
next 2 sts, 2 hdc in next st; repeat from * around; join – 20
sts.
Rnd 4: Ch 2, hdc in next st and in each st around; join.
Rnd 5: Repeat Rnd 4.
Rnd 6: Ch 1, sc in first 3 sts, dec in next 2 sts, * sc in next 3
sts, dec in next 2 sts; repeat from * around; join – 16 sts.
Rnd 7: Ch 1, sc in first 2 sts, dec in next 2 sts, * sc in next 2
sts, dec in next 2 st; repeat from * around; join – 12 sts. Fill
lightly with fiberfill material.
Rnd 8: Ch 1, sc in 1st st, dec in next 2 sts, * sc in next st,
dec in next 2 sts; repeat from * around; join. Fasten off.
HEAD: With A, work same as Body through Rnd 2.
Rnd 3: Ch 2, hdc in each st around; join – 15 sts.
Rnd 4: Ch 2, hdc in next 2 sts, hdcdec in next 2 sts, * hdc in
next 3 sts, hdcdec in next 2 sts; repeat from * around; join –
12 sts.
Rnd 5: Ch 1, sc in 1st 2 sts, dec in next 2 sts, * sc in next 2
sts, dec in next 2 sts; repeat from * around; join – 9 sts. Fill
lightly.
Rnd 6: Ch 1, sc in 1st st, dec in next 2 sts, * sc in next st,
dec in next 2 sts; repeat from * around; join. Fasten off.
Finishing: Sew head and body together. Use three strands
of black embroidery floss to form closed eyes and to stitch
on curl.
SWADDLING CLOTHES: With C, ch 6; join.
Rnd 1: Ch 2 (counts as 1st hdc), 11 hdc in circle; join –12
sts.
Rnd 2: Ch 2, 2 hdc in next st, * hdc in next st, 2 hdc in next
st; repeat from * around; join –18 sts.
Rnds 3-6: Ch 3 (counts as 1st dc), dc in each st around;
join.
Rnd 7: Ch 2, hdc in each st around; join.
Rnd 8: * Ch 3, skip next st, sc in next st; repeat from *
around; join. Fasten off.
LAMBS
Large Lamb is 2¾” tall. Small Lamb is 2” tall.
RED HEART® “Super Saver®”: 1 skein each 313 Aran A
and 312 Black B.
Crochet Hook: 3.25mm [US D-3].
Small amount of fiberfill material, four 12” 6mm white
chenille stems, tapestry needle and craft glue.
GAUGE: 20 sc = 4”; 20 rows = 4”. CHECK YOUR GAUGE.
Use any size hook to obtain the gauge.
SPECIAL ABBREVIATIONS:
Dec: [Draw up a loop in next st] 2 times; yo and draw
through all 3 loops on hook.
Hdcdec: [Yo and draw up a loop in next st] 2 times; yo and
draw through all 5 loops on hook.
LARGE LAMB
With A, ch 6; join.
Rnd 1: Ch 2 (counts as 1st hdc), 9 hdc in ring; join – 10 sts.
Rnd 2: Ch 2, 2 hdc in next st, * hdc in next st, 2 hdc in next
st; repeat from * around; join – 15 sts.
Rnd 3: Ch 2, hdc in next st, 2 hdc in next st, * hdc in next 2
sts, 2 hdc in next st; repeat from * around; join – 20 sts.
Rnds 4-8: Ch 2, hdc in each st around; join.
Rnd 9: Ch 2, hdc in next 2 sts, hdcdec in next 2 sts, * hdc in
next 3 sts, hdcdec in next 2 sts; repeat from * around; join –
16 sts.
Rnd 10: Ch 2, hdc in next st, hdcdec in next 2 sts, * hdc in
next 2 sts, hdcdec in next 2 sts; repeat from * around; join –
12 sts. Fill lightly with fiberfill.
Rnds 11-13: Ch 2, hdc in each st around; join.
Rnd 14: Ch 2, 2 hdc in next st, * hdc in next st, 2 hdc in next
st; repeat from * around; join – 18 sts.
Rnds 15-16: Ch 2, hdc in each st around; join.
Rnds 17: Ch 1, sc in 1st 3 sts, dec in next 2 sts, * sc in next
st, dec in next 2 sts; repeat from * around; join – 12 sts. Fill
head lightly.
Rnd 18: Ch 1, sc in 1st 2 sts, dec in next 2 sts, * sc in next
2 sts, dec in next 2 sts; repeat from * around; join – 9 sts.
Fasten off.
Rnd 19: Join B in any st, ch 1, sc in 1st st, dec in next 2 sts,
* sc in next st, dec in next 2 sts; repeat from * around; join –
6 sts.
Rnd 20: Slip st in each st.
Rnd 21: Repeat Rnd 20. Fasten off, leaving 8” tail for
forming eyes.
Using tapestry needle, form a black eye on each side of
head and fasten off.
EARS (Make 2): With A, ch 6.
Row 1: Sc in 2nd ch from hook, hdc in next ch, dc in next 2
ch, tr in last ch. Fasten off.
TAIL: With A, ch 8.
Row 1: Hdc in 3rd ch from hook and in each ch across.
Fasten off.
LEGS (Make 4): With A, leave beginning 10” tail, ch 11.
Row 1: Hdc in 3rd ch from hook and in each ch across; turn
–9 sts.
Row 2: Ch 2, hdc in each st across; turn.
Row 3: Repeat Row 2.
Fasten off, leaving another 10” tail for sewing.
Hooves: Join B to end which has no tails, leaving a small
tail for tying.
Row 1: Ch 1, 3 sc evenly across. Fasten off and tie onto
beginning black tail (this begins to form a cylinder for leg).
FINISHING: Fold two chenille stems in half. Insert one
through body at top of Rnd 3 and one through body at top
of Rnd 10, centering equally. Dab a small amount of glue
where legs meet body. Note: Use wooden skewer or awl to
help guide stems through lamb’s body.With tapestry needle,
sew tail and ears onto bodies. Stitch legs together, fit onto
wires and sew onto bodies.
SMALL LAMB
With A, ch 4; join.
Rnd 1: Ch 2 (counts as 1st hdc), 7 hdc in ring; join – 8 sts.
Rnd 2: Ch 2, 2 hdc in next st, * hdc in next st, 2 hdc in next
st; repeat from * around; join – 12 sts.
Rnd 3: Ch 2, hdc in next st, 2 hdc in next st, * hdc in next 2
sts, 2 hdc in next st; repeat from * around; join – 16 sts.
Rnds 4-5: Ch 2, hdc in each st around; join.
Rnd 6: Ch 2, hdc in next st, hdcdec in next 2 sts (hdc in next
2 sts, hdcdec in next 2 sts) around; join – 12 sts.
Rnd 7: Ch 2, hdcdec in next 2 sts; * hdc in next st, hdcdec in
next 2 sts; repeat from * around; join – 8 sts. Fill body lightly.
Rnds 8-9: Ch 2, hdc in each st around; join. Fill neck lightly.
Rnds 10-11: Ch 2, 2 hdc in next st, * hdc in next st, 2 hdc in
next st; repeat from * around; join – 12 sts.
Rnd 12: Ch 1, sc in 1st st, dec in next 2 sts; * sc in next st,
dec in next 2 sts; repeat from * around; join – 8 sts.
Rnd 13: Ch 1, sc in 1st 3 sts, dec in next 2 sts, sc in next st,
dec in next 2 sts; join – 6 sts. Faste off. Fill head lightly.
Rnd 14: With B, join in any st, ch 1, sc in 1st st, dec in next
2 sts, sc in next st, dec in next 2 sts; join – 4 sts.
Rnd 15: Slip st in each st.
Rnd 16: Repeat Rnd 15. Fasten off, leaving 8” tail of yarn for
forming eyes. Finish as described for Large Lamb.
EARS (make 2): With A, ch 5.
Row 1: Sc in 2nd ch from hook, hdc in next ch, dc in next
ch, tr in last ch. Fasten off, leaving 6” tail for sewing.
TAIL: With A, ch 6.
Row 1: Hdc in 3rd ch from hook and in each ch across.
Fasten off, leaving 6” tail for sewing.
LEGS (Make 4): With A, leave beginning 8” tail, ch 8.
Row 1: Hdc in 3rd ch from hook, hdc in each ch across; turn
– 6 sts.
Row 2: Ch 2, hdc in each st across; turn.
Row 3: Repeat Row 2. Fasten off, leaving another 8” tail for
sewing.
Hooves: work as for Large Lamb.
FINISHING: Cut two chenille stems to 8”, fold in half. Insert
one through body at top of Rnd 2 and one through body at
top of Rnd 7. Finish as for Large Lamb.
ABBREVIATIONS: A, B = color A, B; ch = chain;
dc = double crochet; dec = decrease; hdc = half double
crochet; mm = millimeters; rnd = round; sc = single crochet;
st(s) = stitch(es); tr = treble crochet; yo = yarn over; * or **
= repeat whatever follows the * or ** as indicated; [ ] = work
directions in brackets the number of times specified.
Read NextRed Truck Christmas Ornament
Your Recently Viewed Projects

Thanks for your comment. Don't forget to share!
Delphine Bryant
Oct 03, 2018
I would love to think I can make these but I know I am not skilled enough to pull these off. These are adorable and there is so much detail in all of the pieces. I have saved this project and hopefully in the future after I have completed a few projects I can come back to this and make it.
Morehouse17
Sep 29, 2018
I have a couple nativity sets. One is a crystal one and one I made from cross stitch. They are both very special to me and I would like to add this one to the collection as now I call myself a crocheter.
mulberrygalprinces s
Dec 13, 2017
This is great. I collect nativity sets. I have 18 of them. Wood, glass, porcelain , different ethnic groups. But this year I am going to try making this. It would be different and unique and add to my collection. I only need to do three pieces so I should be able to get it done in time.
JaneEK
Oct 30, 2017
This is a cute set but if you are even THINKING about making this, ignore the instructions on this page and go directly to the Red Heart Yarn page located here http//www.redheart.com/free-patterns/nativity-set Youll find a free download (sorry, no additional photos) that can be printed off for your convenience. There are so many parts and pieces that youll want something you can easily refer to.
Catdabrat
Oct 28, 2017
Where can I see a picture of this project?
mulberrygalprinces s
Sep 07, 2017
I love this. I have four little grand kids that love to touch the Nativity set that their parents and I have. So they got a toy set. But they are made of wood and not head friendly! So if I can make this set they won't have to worry about breaking anything with them.
JaneEK
Jan 14, 2017
This would have to be a real labor of love. The pattern is simple enough, but there are so many parts that its not something you can just whip up in an evenings time. This would make a wonderful gift for a household with small children. The children could act out the Nativity with these soft toys rather than more fragile figures.
Report Inappropriate Comment
Are you sure you would like to report this comment? It will be flagged for our moderators to take action.
Thank you for taking the time to improve the content on our site.