Baby Elephant Crochet Hat
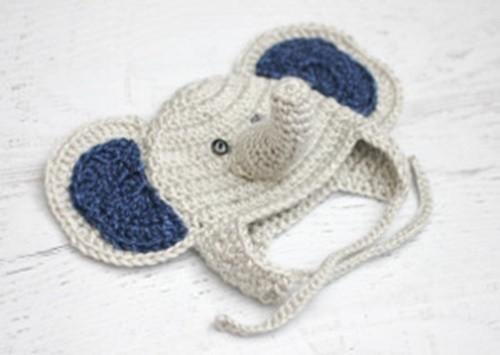
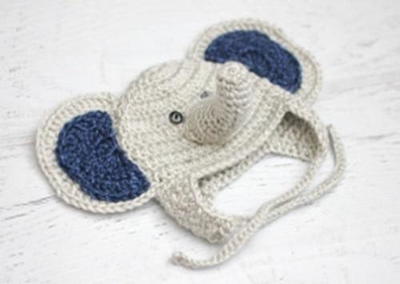
You don't have to visit the zoo in order to see elephants! Crochet your very own with this insanely cute Elephant Crochet Hat. Made with Lion Brand Heartland yarn, this crochet hat pattern was designed with newborns in mind, but it shouldn't be too hard to adjust the size. A small amount of stuffing is needed for the trunk, and buttons are used for the eyes. You can also crochet the eyes if you want.
This simply hat is worked up in multiple parts: the main hat, each earflap, the ears, the insides of each ear, and the trunk. It sounds like a lot, but each piece is easy to make, and the seaming and joining is quite easy! Soon you'll have a tiny elephant hat that's perfect for Halloween or any newborn photoshoots.

Crochet HookH/8 or 5 mm hook
Yarn Weight(4) Medium Weight/Worsted Weight and Aran (16-20 stitches to 4 inches)
Materials List
- Lion Brand Heartland Yarn in Katmai and Olympic
- Size H Crochet Hook
- Tapestry needle
- Black buttons for eyes (or you could crochet eyes)
- Poly-fil stuffing for trunk
Hat Pattern
Main Body
-
Magic Ring, chain 2 and make 11 DC inside ring, join to first DC, chain 2
-
Round 2: 2 DC in each stitch around, join, chain 2 (22 DC)
-
Round 3: 2 DC in first stitch, DC in next stitch, join, chain 2 (33 DC)
-
Round 4: 2 DC in first stitch, DC in next 2 stitches, join, chain 2 (44 DC)
-
Rounds 5-9: DC in each stitch around, join, chain 1 (44 DC)
-
Round 10: SC in each stitch around, join (44 SC)
-
Continue on earflaps or fasten off and leave hat without earflaps
Earflap 1
-
Chain 1, SC in next 10, chain 1, turn
-
Row 2: SC decrease, SC in next 6, SC decrease, chain 1, turn
-
Row 3: SC across (8 SC)
-
Row 4: SC decrease, SC in next 4, SC decrease, chain 1, turn
-
Row 5: SC across ( 6 SC)
-
Row 6: SC decrease, SC in next 2, SC decrease, chain 1, turn
-
Row 7: SC across (4 SC)
-
Row 8: Make 2 SC decreases, chain 1, turn
-
Row 9: SC decrease, fasten off, weave in ends
Earflap 2
-
Leave 16 stitches along the front of hat...
-
Join yarn, chain 1, SC in next 10, chain 1, turn
-
Row 2: SC decrease, SC in next 6, SC decrease, chain 1, turn
-
Row 3: SC across (8 SC)
-
Row 4: SC decrease, SC in next 4, SC decrease, chain 1, turn
-
Row 5: SC across ( 6 SC)
-
Row 6: SC decrease, SC in next 2, SC decrease, chain 1, turn
-
Row 7: SC across (4 SC)
-
Row 8: Make 2 SC decreases, chain 1, turn
-
Row 9: SC decrease, and continue to SC around hat and earflaps, when you get to the top of each earflap: chain 35, slip stitch in 2nd chain from hook and the rest of the way down the chain. Continue to SC around the hat and fasten off when you get the entire way around.
Left Ear
-
Magic Ring, chain 2 and make 8 DC in ring, pull tight but do not join. You should have a half circle, chain 2, turn
-
Row 2: 2 DC in each stitch, chain 2, turn (16 DC)
-
Row 3: 2 DC in first stitch, DC in next, repeat till end, chain 2, turn ( 24 DC)
-
Row 4: [2 DC in first stitch, DC in next 2] (4x), 2 SC, SC in next 2, *2 DC, DC in next 2, repeat from * until end. Fasten off leaving long tail.
Inside Left Ear
-
Magic Ring, chain 2 and make 8 DC in ring, pull tight but do not join. You should have a half circle, chain 2, turn
-
Row 2: 2 DC in each stitch, chain 2, turn (16 DC)
-
Row 3: [2 DC in first stitch, DC in next] (4x), 2 SC, SC in next, *2 DC, DC in next, repeat from * till end, fasten off leaving long tail
Right Ear
-
Magic Ring, chain 2 and make 8 DC in ring, pull tight but do not join. You should have a half circle, chain 2, turn
-
Row 2: 2 DC in each stitch, chain 2, turn (16 DC)
-
Row 3: 2 DC in first stitch, DC in next, repeat till end, chain 2, turn ( 24 DC)
-
Row 4: [2 DC in first stitch, DC in next 2] (3x), 2 SC, SC in next 2, *2 DC, DC in next 2, repeat from * until end. Fasten off leaving long tail.
Inside Right Ear
-
Magic Ring, chain 2 and make 8 DC in ring, pull tight but do not join. You should have a half circle, chain 2, turn
-
Row 2: 2 DC in each stitch, chain 2, turn (16 DC)
-
Row 3: [2 DC in first stitch, DC in next] (3x), 2 SC, SC in next, *2 DC, DC in next, repeat from * till end, fasten off leaving long tail
Trunk
-
Magic Ring, chain 1 and make 10 SC in ring, join, continue to SC in rounds
-
Round 2: in back loops only, SC in each stitch around (10 SC)
-
Rounds 3-5: SC in each stitch around
-
Round 6: SC decrease, 2 SC, SC in next 3 stitches, 2 SC, SC in next 3 stitches
-
Round 7: SC decrease, SC in next 9 stitches
-
Round 8: SC decrease, 2 SC, SC in next 3 stitches, 2 SC, SC in next 3 stitches
-
Round 9: 2 SC in first, SC in next 4, 2 SC, SC in next 4 stitches
-
Round 10: SC in each stitch around (12 SC)
-
Round 11: 2 SC, SC in next 3 stitches, repeat around (15 SC)
-
Round 12: SC in each stitch around (15 SC)
-
Fasten off leaving long tail.
-
Stuff trunk lightly and sew onto middle-front of hat.
-
Sew inside ears to outer ears and sew onto sides of hat.
-
Sew two black buttons on for eyes, right above trunk.
Read NextQuick-to-Stitch Baby Hat
princess6860504
May 10, 2018
There are some toddlers in my extended family. I envision making this super cute animal hat and having their eyes light up when they see it. The big elephant ears make a great fidget for inquisitive fingers. I think the pattern is easy to follow, but I wish there was a diagram included.
JaneEK
Apr 20, 2017
This is an easy pattern to follow, but like almost all the patterns without a linked pattern, it really suffers from the lack of photos. This is especially important when it comes to assembling the parts of the hat. Other than one small photo at the top of the pattern, I am given only written directions for assembly. Even these arent specific, just generalities.
Hippie Chick
Feb 15, 2017
With all of the comments, this elephant hat seems to be very popular. Do you also have an alternate pattern that would fit older children. It always seems like the cutest projects are always for the tinies. My kids are older, but they would still enjoy sporting this hat around.
schiebet
Dec 16, 2016
I saw this hat and immediately thought of one of my children's favorite books Elmer the Patchwork Elephant. This is my new favorite baby shower gift the hat and book! Thanks so much for creating it!
Diana C
Nov 12, 2016
Am going to start crocheting this hat today. A couple of questions. Has the ear dispute been corrected in the pattern and can someone clear up for me where exactly in the pattern would I change the color for the ears. blue. thanks Diana
amn46 8129081
Oct 15, 2016
Looking forward to making this. How much yarn is needed for this hat? I don't see it listed.
noviyamama 4607048
Sep 19, 2016
Is it just me or is the stitch counting off on the trunk starting at round 9 by 1?
talkercat1961 6476 958
Mar 08, 2016
I'm looking for the little bottom (with tail) that completes the outfit.
Heidi Lorene
Mar 07, 2016
This hat is so adorable, my friend is having a baby soon and this would be so fun to make as a baby shower gift. I noticed it the comments that somebody mentioned that the ears may be off. Has anybody made this recently and noticed if that problem has been fixed?
clevergirlash
Mar 07, 2016
I believe that it has been fixed. It should set itself inside the ear nicely. If not I have found that it is possible to use a snaller size hook and repeat the original pattern, only this time it'll be smaller and tighter. it can come across as a cute/interesting texture. It's a fantastic baby shower gift and actually I myself am going to make and gift this for a friend's baby girl ) Good luck and if you do decide to make it, please post a pic! i'll be excited to see your work!!
arnts1ta
Apr 06, 2016
I hope the pattern has been fixed as well, this is such a cute baby hat and would make a wonderful baby shower or new baby gift! I would love to make a bunch of them with different coordinating colors, so easy to customize with pinks for girls, blues for boys and every color in between! If you try making this hat, Heidi, come back and let us know how it turned out!
bobbylonardo 50143 99
Nov 20, 2014
It looks like the weight of the trunk would cause the hat to constantly be sliding down onto the baby's face.
dinah1023 5981461
Oct 27, 2014
Back again. I mean left ear, right ear, left inside right inside
Ms Miller
Jan 20, 2015
Was our comment about the ears confirmed? Is the pattern shown now correct? I am about to start on the hat, so am looking for confirmation. Thanks
AllFreeCrochet Edi torCW
Jan 27, 2015
So sorry it's taken so long to see this comment. Have you figured it out?
Christina
Feb 02, 2018
Editor allfreechrochet, I'm confused about the ears? Are they made separate and then attached? If they are what loop of the stitch on the hat should the ear be attached to?
AFC Editor Julia
Feb 02, 2018
Hi Christina, Yes, they're made separately - and it doesn't look like there's a specification for where to attach them to the rest of the hat. I would just use your best judgement and do it freehand. Sorry about that! Julia, AFC editor
Ms Miller
Feb 03, 2015
Not yet, still not certain if the pattern is labeled correctly as it is shown on your sight.
dinah1023 5981461
Oct 27, 2014
On the baby elephant pattern, I believe the ears and inside ears are mixed up. Following your directions, one ear will be larger than the other. It should read right ear, right inside ear, left ear, left inside ear.
Report Inappropriate Comment
Are you sure you would like to report this comment? It will be flagged for our moderators to take action.
Thank you for taking the time to improve the content on our site.

