Star Bright Crochet Table Runner
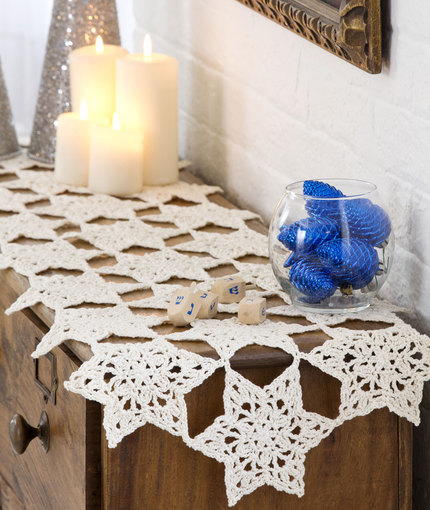
The Star Bright Crochet Table Runner is the perfect way to dress up any table. The lovely lacy snowflake pattern adds a special touch to your celebration. The neutral color makes this crochet pattern incredibly versatile. Your guests will certainly be impressed when they sit down for dinner at your home and see this beautiful crochet table runner. The runner can also be placed on your mantle to give your fireplace an extra touch of festive elegance. The delicate pattern would make a great gift for a friend or family member who loves to decorate during the holiday season.

Crochet HookD/3 or 3.25 mm hook
Yarn Weight(0) Lace (33-40 stitches to 4 inches). Includes crochet thread.
Crochet GaugeStar = 6 (15 cm) diameter between points. CHECK YOUR GAUGE. Use any size hook to obtain the gauge given.
Finished SizeTable runner measures 15” x 50” (38 x 127 cm).
Materials List
- AUNT LYDIA’S® Fashion 3: 4 balls 926 Bridal White
- Susan Bates® Crochet Hook: 3.25 mm [US D-3]
- Yarn needle
Instructions
Note
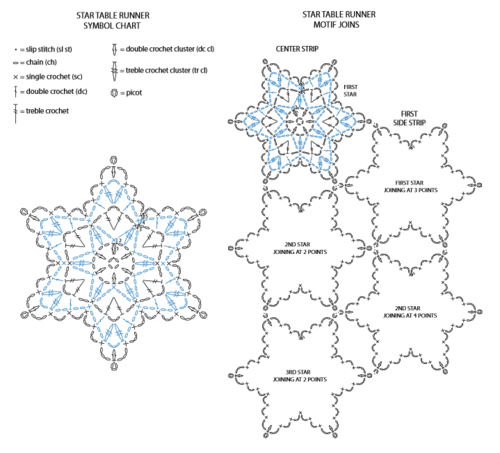
When joining 3 stars in a corner, join last star with slip st to same picot where other star was already joined.
Special Stitches
- dc cl (double crochet cluster) = [Yarn over, insert hook in next space, yarn over, draw yarn through st, yarn over, draw yarn through 2 loops on hook] twice in same space, yarn over, draw yarn through 3 loops on hook.
- tr cl (treble crochet cluster) = *Yarn over (twice), insert hook in next space, yarn over, draw yarn through st, [yarn over, draw yarn through 2 loops on hook] twice; repeat from * once in same space, yarn over, draw yarn through 3 loops on hook.
- 2-tr/dc cl (2 treble crochet/double crochet cluster) = *Yarn over (twice), insert hook in next space, yarn over, draw yarn through st, [yarn over, draw yarn through 2 loops on hook] twice; repeat from * once in same space, yarn over, insert hook in next sc, yarn over, draw yarn through st, yarn over, draw yarn through 2 loops on hook, yarn over, draw yarn through 3 loops on hook.
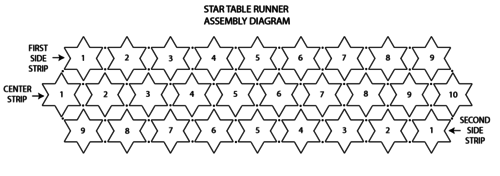
Center Strip
-
First Star
Ch 4, join with slip st to form a ring. -
Round 1 (right side): Ch 2, dc in ring (ch 2, dc counts as first dc cl), ch 2, *dc cl in ring, ch 2; repeat from * 4 more times; join with slip st in first dc cl—6 dc cl.
-
Round 2: Ch 1, sc in same st as joining, *ch 3, tr clin next ch-2 space, ch 3, sc in next dc cl; repeat from * 4 more times, ch 3, 2-tr/dc cl in next ch-2 space and next sc—6 cl.
-
Round 3: Ch 1, sc in top of first cluster, *ch 2, (tr, ch 3, tr) in next sc, ch 2**, sc in next tr cl; repeat from * around, ending last repeat at **; join with slip st in first sc—12 tr.
-
Round 4: Ch 1, sc in same st as joining, *ch 2, dc in next tr, ch 2, (tr cl, ch 3, tr cl) in next ch-3 sp, ch 2, dc in next tr, ch 2**, sc in next sc; repeat from * around, ending last repeat at **; join with slip st in first sc—12 tr cl.
-
Round 5: Ch 1, sc in same st as joining, *ch 3, sc in next dc, ch 3, sc in next tr cl, ch 3, dc cl in next ch-3 sp, ch 3, slip st in top of last dc cl made – picot made, ch 3, sc in next tr cl, ch 3, sc in next dc, ch 3**, sc in next sc; repeat from * around, ending last repeat at **; join with slip st in first sc – 6 picots. Fasten off.
-
Second Star (2 points joined)
Rounds 1-4: Repeat Rounds 1-4 of first star. -
Round 5: Ch 1, sc in same st as joining, [ch 3, sc in next dc, ch 3, sc in next tr cl, ch 3, dc cl in next ch-3 sp, ch 3, slip st in top of last dc cl made – picot made, ch 3, sc in next tr cl, ch 3, sc in next dc, ch 3, sc in next sc] 4 times, *ch 3, sc in next dc, ch 3, sc in next tr cl, ch 3, dc cl in next ch-3 sp, ch 1, with wrong sides together, slip st in corresponding picot on previous star, ch 1, slip st in top of last dc cl made on current star – joined picot made, ch 3, sc in next tr cl, ch 3, sc in next dc, ch 3**, sc in next sc; repeat from * to ** once; join with slip st in first sc—6 picots. Fasten off.
-
Third through Tenth Stars
Work 8 more stars same as second star, joining in a strip, skipping 1 point on each side of stars.
First Side Strip
-
First Star (3 points joined)
Rounds 1–4: Repeat Rounds 1–4 of first star on center strip. -
Round 5: Ch 1, sc in same st as joining, [ch 3, sc in next dc, ch 3, sc in next tr cl, ch 3, dc cl in next ch-3 sp, work picot, ch 3, sc in next tr cl, ch 3, sc in next dc, ch 3, sc in next sc] 3 times, *ch 3, sc in next dc, ch 3, sc in next tr cl, ch 3, dc cl in next ch-3 sp, ch 1, with wrong sides together, slip st in next picot on first star of center strip after 2 picot joins, ch 1, slip st in top of last dc cl made on current star – joined picot made, ch 3, sc in next tr cl, ch 3, sc in next dc, ch 3**, sc in next sc; repeat from * once, joining with slip st to next picot on same center star (where first and second stars on center strip were already joined); repeat from * to ** once, joining with slip st to next picot on second star on center strip; join with slip st in first sc—6 picots. Fasten off.
-
Second Star (4 points joined)
Rounds 1–4: Repeat Rounds 1–4 of first star on center strip. -
Round 5: Ch 1, sc in same st as joining, [ch 3, sc in next dc, ch 3, sc in next tr cl, ch 3, dc cl in next ch-3 sp, ch 3, slip st in top of last dc cl made – picot made, ch 3, sc in next tr cl, ch 3, sc in next dc, ch 3, sc in next sc] 2 times, *ch 3, sc in next dc, ch 3, sc in next tr cl, ch 3, dc cl in next ch-3 sp, ch 1, with wrong sides together, slip st in corresponding picot on previous star, ch 1, slip st in top of last dc cl made on current star – joined picot made, ch 3, sc in next tr cl, ch 3, sc in next dc, ch 3**, sc in next sc; repeat from * 2 times, joining to corresponding picot of appropriate star, then repeat from * to ** once ; join with slip st in first sc—6 picots. Fasten off.
-
Third through Ninth Stars
Work 7 more stars same as second star, joining in a strip across side of center strip, following assembly diagram for placement.
Second Side Strip
Make and join 9 more stars, joining to center strip same as first side strip, following assembly diagram for placement.
Finishing
Weave in ends. Pin table runner to measurements with 3” (8 cm) between points on sides and 6” between points diagonally. Spray with water and allow to dry.
Abbreviations
- ch
- chain
- cl
- cluster
- dc
- double crochet
- mm
- millimeters
- sc
- single crochet
- st(s)
- stitch(es)
- tr
- treble crochet
- [ ]
- work directions in brackets the number of times specified
- ( )
- work directions in parentheses into specified st or sp
- * or **
- repeat whatever follows the * or ** as indicated
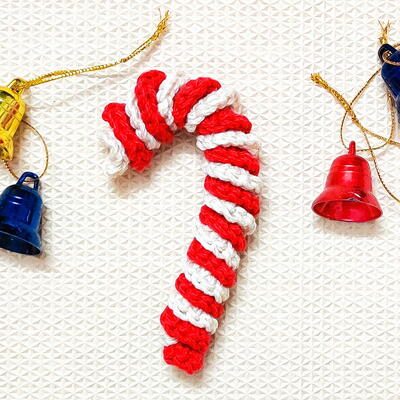
Read NextHow To Crochet A Easy Candy Cane


Thanks for your comment. Don't forget to share!
Hook72
Nov 26, 2018
If you decide to make this table runner I am sure it will be a favorite to display for more than just one holiday. It can be used as a runner on the main table or on a side table for decorations as well. For the fourth of July this would be pretty in red, white and blue stars.
Morehouse17
Nov 18, 2018
This star bright crochet table runner is really pretty. It is a simple design and it is as simple as making the required number of stars and joining them. The designer elected to use crochet thread so this project will take some time to complete. I think the reason for the intermediate skill level is because of how the starts are joined.
horseyfolks
Nov 05, 2018
I don't understand how they stars are connected. You fasten off after each star??
EditorLP
Nov 05, 2018
Hi horseyfolks, yes, you will fasten off after each star, and then join them using a slip stitch, as shown in the diagram above. We hope this helps! - Editors of AllFreeCrochet
horseyfolks
Oct 23, 2018
How are the stars connected? I dont understand slip st when they are separate.
mulberrygalprinces s
Apr 25, 2018
This is so pretty. I love table runners. I have an antique wooden dining table that has gorgeous wood grains in it. I don't want to cover them up so a runner is a much better choice. And this one is open just enough to show off the table top underneath.
schiebet
Apr 24, 2018
I love this and can't wait to get it started. I think I'm reading the pattern correctly the stars connect together so you really make one long strip and then the second strip and the third strip. Does the first strip connect to the second strip as it is crocheted? Thanks
Tricia108
Apr 23, 2018
This is such a lovely table runner and not hard to do. I like table runners and doilies. They cover and protect furniture and add a nice detail. The great thing about making your own table runner is you get to choose the color and design. You also can wash them. Sure you can lots of money in the store or buy something plastic but plastic leaves a film. Also it is nice to have something you created. Thank you for the pattern.
Hippie Chick
Apr 23, 2018
This is so pretty. It is a great way to cover your furniture and keep it from getting scratched from everyday use. It also add a modern chic look to the typical doilies of the past. Love the star design. These are so easy to make and just add more and less to get a customized size for your needs.
Zeemer
Nov 22, 2017
Using a table runner on a cabinet in the living room, dining room or in any part of the house is now very rare. Only a few families who have crochet linen like this Star Bright Crochet Table Runner use them. However, this can be revived by making this beautiful heirloom. There are hundreds other design for this.
princess6860504
Nov 21, 2017
We get the pattern ready to read directly above. This will take you a little bit of time to work up, but the end result will be worth your time and effort! Not every project will be a quick weekender project. So, if you are looking for something that will keep you busy for a few weeks, choose this pretty and classic looking snowflake runner.
JaneEK
Nov 15, 2017
With it just being my husband and myself at home now, we Empty Nesters rarely use the big dining room table any more. Ive still found a use for table runners though, as they usually fit perfectly on the mantle in my living room. It makes it so easy to swap them out for each season and makes a wonderful basis for any decorating. Thanks for finding this project.
Member 8615494
Nov 08, 2016
i can't get this pattern to print at all. Using the "P" icon brings up a menu that you can print from but it does not work. Can you please provide a printable pattern?
libra44423
Jan 07, 2017
Either press 'CTRL P' on your keyboard or copy and paste it into a Word document.
Report Inappropriate Comment
Are you sure you would like to report this comment? It will be flagged for our moderators to take action.
Thank you for taking the time to improve the content on our site.