Snowman Scrubby
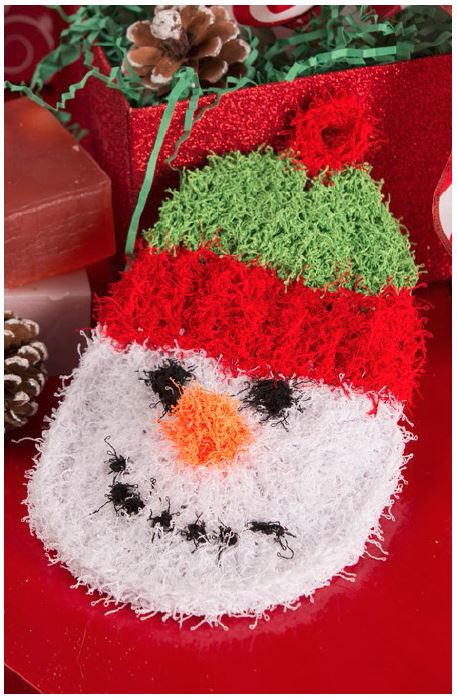
Your kids will fight to do the dishes or beg to take a bath with the Snowman Scrubby. You can use this adorable snowman as a dish scrubber or as a scrubby for bath time, and either way, the kids will love it! A crochet pattern that is popular with adults and kids alike is a rare case, so take advantage of discovering it. Winter, doing dishes, and bath time don't have to boring with a cute snowman scrubby. Get your hook and yarn and start this project before you get too busy with the holidays.

Crochet HookI/9 or 5.5 mm hook
Yarn Weight(4) Medium Weight/Worsted Weight and Aran (16-20 stitches to 4 inches)
Crochet GaugeGauge is not critical for this project.
Finished Size6 inch x 8.5 inch
Materials:
- RED HEART® Scrubby™: 1 ball each:
- 10 Coconut A
- 620 Lime B
- 905 Cherry C
- Small amounts of 258 Orange D and 12 Black E
- Susan Bates® Crochet Hook: 5.5 mm [US I-9]
- Yarn needle
Note: Scrubby is worked in nine pieces that are sewn together to form snowman. The mouth is embroidered with French knots.

We have 21 Hostess Gift Ideas for the Holidays if you need more!
Special Stitches
Bpdc (back post double crochet) = Yarn over, insert hook from back side of work to front and to back again around the post of indicated stitch; yarn over and pull up a loop (3 loops on hook), yarn over and draw through 2 loops (2 loops on hook), yarn over and draw through 2 loops (1 loop on hook). Skip the stitch “in front of” the Bpdc.
Fpdc (Front post double crochet) = Yarn over, insert hook from front side of work to back and to front again around post of indicated stitch, yarn over and pull up a loop (3 loops on hook), yarn over and draw through 2 loops (2 loops on hook), yarn over and draw through 2 loops (1 loop remains on hook). Skip the stitch “behind” the Fpdc.
Fpsc (front post single crochet) = Insert hook from front to back and to front again around post of indicated stitch, yarn over and draw up a loop, yarn over and draw through 2 loops on your hook. Skip the stitch “behind” the Fpsc.
dc2tog (double crochet 2 stitches together) = [Yarn over, insert hook in next stitch, yarn over and pull up loop, yarn over, draw through 2 loops] 2 times, yarn over, draw through all 3 loops on hook.
sc2tog = [Insert hook in next stitch, yarn over and pull up a loop] twice, yarn over and draw through all 3 loops on hook.
HEAD
With A, ch 4.
Round 1: Work 11 dc in 4th ch from hook (3 skipped ch count as first dc); join with slip st in top of beginning ch-3—12 dc.
Round 2: Ch 3 (counts as first dc here and throughout), Fpdc around beginning ch of Round 1, 2 Fpdc around each of next 11 sts; join with slip st in top of beginning ch- 3—24 dc.
Round 3: Ch 3, 2 Fpdc around next st, [Fpdc around next st, 2 Fpdc around next st] 11 times; join with slip st in top of beginning ch-3—36 dc.
Round 4: Ch 3, Fpdc around next st, 2 Fpdc around next st, [Fpdc around each of next 2 sts, 2 Fpdc around next st] 11 times; join with slip st in top of beginning ch-3—48 dc.
Round 5: Ch 3, Fpdc around each of next 2 sts, 2 Fpdc around next st, [Fpdc around each of next 3 sts, 2 Fpdc around next st] 11 times; join with slip st in top of beginning ch-3—60 dc.
Round 6: Ch 3, Fpdc around each of next 3 sts, 2 Fpdc around next st, [Fpdc around each of next 4 sts, 2 Fpdc around next st] 11 times; join with slip st in top of beginning ch-3—72 dc.
Round 7: Ch 1, Fpsc around beginning ch-3 of Round 6, Fpsc around each remaining st; join with slip st in first st. Fasten off.
EYE (make 2)
With E, ch 4, slip st in first ch. Cut yarn, leaving a long tail. Pull the long tail all the way through the slip st and pull tightly.
Using photograph as a guide, sew eyes to head taking care to work sewing stitches near the surface so they do not show on back of head.
MOUTH
With E, using photograph as a guide, embroider 7 French knots in a curve for smile.
Cover (to hide French knots on back of head): With A, ch 13. Dc in 4th ch from hook and in each ch across. Fasten off, leaving a long tail for sewing. Sew cover to back of head, covering the back of the French knots.
NOSE
With D, ch 7.
Row 1: Sc in 2nd ch from hook and in each ch across—6 sc.
Row 2: Ch 1, turn, sc in first sc, sc2tog, sc in last 3 sc—5 sc.
Row 3: Ch 1, turn, sc in first sc, sc2tog, sc in last 2 sc—4 sc.
Row 4: Ch 1, turn, [sc2tog] twice—2 sc.
Fasten off, leaving a long tail for sewing. Sew side edges together to form a cone. Using photograph as a guide, sew nose to head.
HAT (make 2)
Cuff (make 1 for each hat)
With C, ch 18.
Row 1: Dc in 4th ch from hook (3 skipped ch count as first dc) and in each ch across—16 dc.
Rows 2 and 3: Ch 3 (counts as first dc), turn, [Fpdc around next st, Bpdc around next st] 7 times, dc in top of beginning ch-3. Fasten off, leaving a long tail for sewing.
Top (make 1 for each hat)
With B, ch 18.
Row 1: Dc in 4th ch from hook (3 skipped ch count as first dc) and in each ch across—16 dc.
Rows 2 and 3: Ch 3 (counts as first dc here and throughout), turn, dc in each st across.
Row 4: Ch 3, turn, [dc2tog] 7 times, dc in top of beginning ch-3—9 dc.
Row 5: Ch 3, turn, [dc2tog] 3 times, dc in next st, dc in top of beginning ch-3—6 dc. Fasten off, leaving a long tail for sewing.

Find more crochet for your kitchen in 28 Free Crochet Dishcloth Patterns
Assembly
Sew a cuff to long straight edge of each hat top, overlapping the edges slightly. Using matching yarn colors, sew side edges of cuff/top pieces together, leaving lower edges unsewn. Place hat on head and sew in place.
HANGING LOOP
With C, ch 7; join with slip st in first ch to form a ring. Work 14 sc in ring.
Fasten off, leaving a long tail for sewing. Sew hanging loop to top center of hat.
FINISHING
Weave in ends.
ABBREVIATIONS
- A, B, C, etc. = Color A, Color B, Color C, etc
- ch = chain
- dc = double crochet
- sc = single crochet
- st(s) = stitch(es)
- [ ] = work directions in brackets the number of times specified.
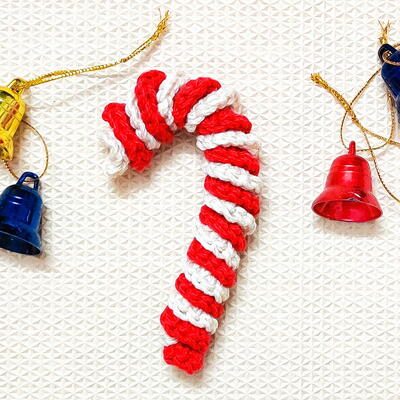
Read NextHow To Crochet A Easy Candy Cane
Your Recently Viewed Projects
Thanks for your comment. Don't forget to share!
princess6860504
Dec 12, 2017
This cheerful snowman is oh so cute! But there's one thing that worries me, and that is- all those color changes will leave ends that need to be worked in and hidden. And those ends can come loose, especially in a dish scrubby or body mitt that gets lots of use. Does anyone have tips and pointers on what works best to keep ends tucked into the work? It's been my nememis since day one.
JaneEK
Nov 24, 2017
This happy fellow is sure to add a touch of whimsy to washing up time! Great idea about using it for a bath cloth, but I would work it up in regular cotton instead of the scrubby yarn. It would be fun, too, if you doubled the project (without the face on one) and sewed it together for a bath mitt. But I also sort of agree with jobers77. Id feel guilty about scrubbing a pot with this one!
Zeemer
Nov 22, 2017
Yes. I have seen the kind of yarn used in this Snowman Scrubby. I can do this but very seasonal stuff. Perfect as gift or for your crochet business if you have one or if you wanna start one.
jobers77
Nov 18, 2016
So adorable I'd almost feel bad using him! I think I might just put a ring on his top and hang it up for a kitchen decoration or use as a pot trivet. But he is so easy to make I could always make extras in case one gets dirty. Cute and functional!
Report Inappropriate Comment
Are you sure you would like to report this comment? It will be flagged for our moderators to take action.
Thank you for taking the time to improve the content on our site.