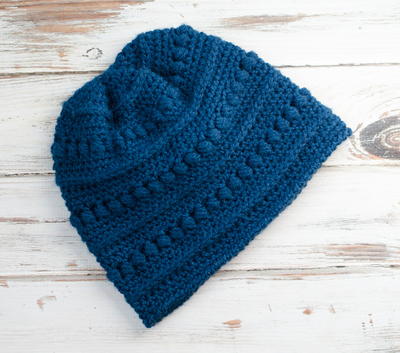
Stretchy Slouch Hat

Stay warm and stylish at the same time with this Stretchy Slouch Hat. This free crochet pattern includes two sizes, so you can learn how to crochet this hat for both kids and adults. The band is made with foundation single crochet, which provides a perfect fit that's comfortable for everyone. For a personalized look, add a crochet applique of your choice to this crochet hat. Worsted weight yarn is used to work up this free pattern.

Crochet HookI/9 or 5.5 mm hook
Yarn Weight(4) Medium Weight/Worsted Weight and Aran (16-20 stitches to 4 inches)
Crochet Gauge4 sc x 4 rows = 1" square
Finished SizeFinished lengths are as follows: Toddler – 8” Child – 9” Teen/Adult – 10”
Materials List
- Worsted Weight Yarn -- Model shown in Caron Simply Soft
- Crochet Hook: I/5.5 mm
- Yarn Needle
SIZE:
Instructions are written in Toddler/Child size with Teen/Adult in parenthesis: Toddler/Child (Teen/Adult).
The Toddler hat is shorter than the Child size so pay close attention when it comes to the end of the hat so that you stop at the appropriate length.
Finished lengths are as follows: Toddler – 8” Child – 9” Teen/Adult – 10”
If you would like your hat to be longer, continue to work in pattern to desired length and then move on to assembly.
NOTES:
Ch 3 counts as a dc.
Double treble crochets are hard to work and keep tight. To minimize gaps at the top of your stitches keep your YO’s close to each other as you work the st. The more they stretch out the bigger of a gap you will have at the top.
When choosing a yarn, I do recommend using a smoother yarn with a nice drape like Caron Simply Soft. A regular WW like Red Heart Super Saver is a little too stiff to get a good slouch in the back of the hat.
Special Stitches:
Cable – When instructed to create a cable stitch follow these directions:
Skip 4 st, fpdtr around next 2 st, dc in third and fourth skipped stitch (behind the two fpdtr’s just created), fpdtr around the first and second skipped stitch in front of all 4 stitches just created.
{There will be photos when you get to the first cable in the pattern.}
HAT
-
Round 1: Fdsc 66 (77). Join with a sl st to the top of first fdsc. (Be careful not to twist the row of stitches.) (66, 77 fdsc)
-
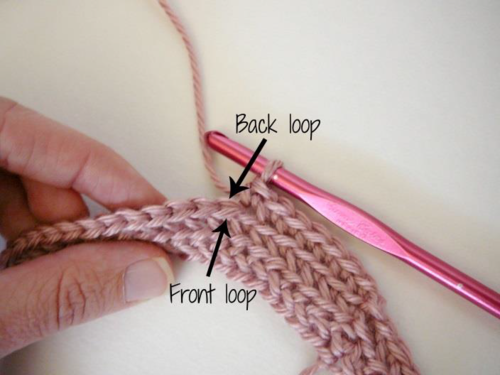
Round 2-4: Work every st in blo, ch 1, sc in each st around, join with a sl st to top of first sc in the blo. (66, 77 sc)
-
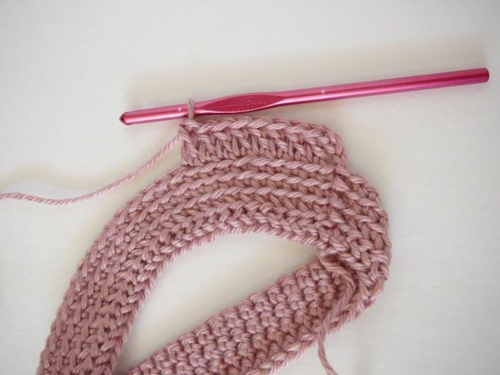
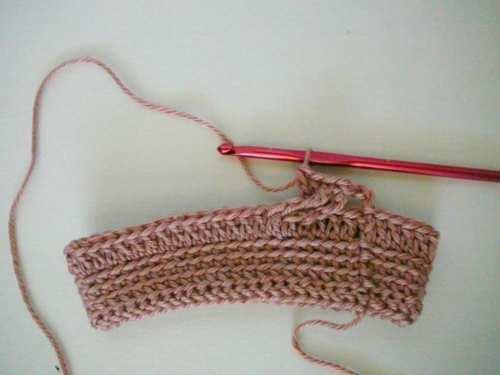
Round 5: Work every st in blo, ch 3, dc in next st and in each st around, join with a sl st to the top of beg chain 3. (66, 77 dc)
-
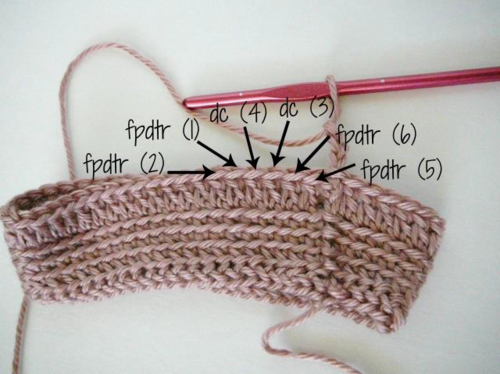
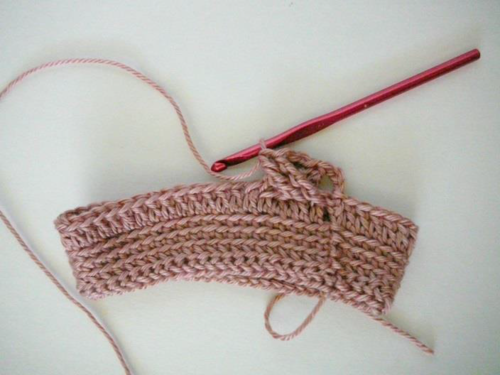
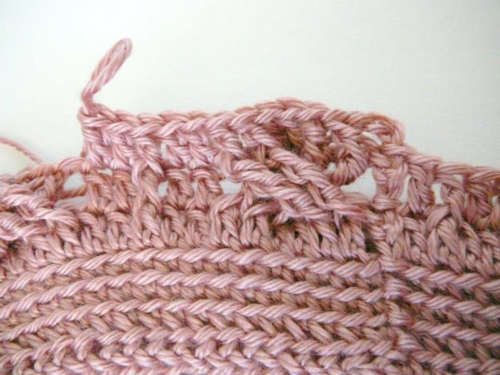
The following row has the first cable st in it. Please refer to these photos to help with stitch placement.
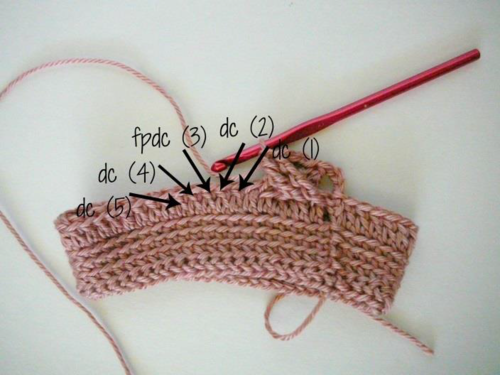
(The numbers in parenthesis in the following photo indicate the order the stitches should be worked in.) -
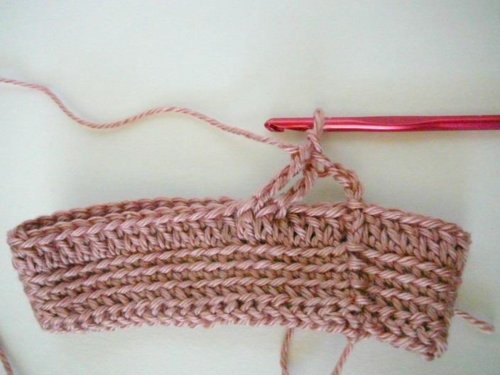
The following photos are to help with your stitch placement for the stitches following the cable.
(The numbers in parenthesis in the following photo indicate the order the stitches should be worked in.) -
Round 6: Ch 3, cable, *dc next 2 st, fpdc next st, dc next 2 st, cable,* repeat *to* around to last 4 st, dc next 2 st, fpdc next st, dc next st, join with sl st to top of beginning ch 3. (6, 7 cable groups)
-
Round 7: Ch 3, fpdc around next 2 st, dc next 2 st, fpdc around next 2 st, *dc next 2 st, fpdc next st, dc next 2 st, fpdc around next 2 st, dc next 2 st, fpdc around next 2 st,* repeat *to* around to last 4 st, dc next 2 st, fpdc next st, dc next st, join with sl st to top of beginning ch 3.
-
Round 8 & 9: Repeat round 7.
-
Round 10: Ch 3, cable, *dc next 2 st, fpdc next st, dc next 2 st, cable,* repeat *to* around to last 4 st, dc next 2 st, fpdc next st, dc next st, join with sl st to top of beginning ch 3.
-
Round 11: Ch 3, fpdc around next 2 st, dc next 2 st, fpdc around next 2 st, *dc next 2 st, fpdc next st, dc next 2 st, fpdc around next 2 st, dc next 2 st, fpdc around next 2 st,* repeat *to* around to last 4 st, dc next 2 st, fpdc next st, dc next st, join with sl st to top of beginning ch 3.
-
Round 12: Ch 3, cable, *dc next 2 st, fpdc next st, dc next 2 st, cable,* repeat *to* around to last 4 st, dc next 2 st, fpdc next st, dc next st, join with sl st to top of beginning ch 3.
-
Round 13: Ch 3, fpdc around next 2 st, dc next 2 st, fpdc around next 2 st, *dc next 2 st, fpdc next st, dc next 2 st, fpdc around next 2 st, dc next 2 st, fpdc around next 2 st,* repeat *to* around to last 4 st, dc next 2 st, fpdc next st, dc next st, join with sl st to top of beginning ch 3.
-
Round 14: Ch 3, cable, *dc next 2 st, fpdc next st, dc next 2 st, cable,* repeat *to* around to last 4 st, dc next 2 st, fpdc next st, dc next st, join with sl st to top of beginning ch 3.
-
Round 15: Ch 3, fpdc around next 2 st, dc next 2 st, fpdc around next 2 st, *dc next 2 st, fpdc next st, dc next 2 st, fpdc around next 2 st, dc next 2 st, fpdc around next 2 st,*repeat *to* around to last 4 st, dc next 2 st, fpdc next st, dc next st, join with sl st to top of beginning ch 3.
-
Round 16 & 17: Repeat round 15
-
Round 18: Ch 3, cable, *dc next 2 st, fpdc next st, dc next 2 st, cable,* repeat *to* around to last 4 st, dc next 2 st, fpdc next st, dc next st, join with sl st to top of beginning ch 3.
-
Round 19: Ch 3, fpdc around next 2 st, dc next 2 st, fpdc around next 2 st, *dc next 2 st, fpdc next st, dc next 2 st, fpdc around next 2 st, dc next 2 st, fpdc around next 2 st,* repeat *to* around to last 4 st, dc next 2 st, fpdc next st, dc next st, join with sl st to top of beginning ch 3.
*** Toddler size, continue on to assembly.*** -
Round 20: Ch 3, cable, *dc next 2 st, fpdc next st, dc next 2 st, cable,* repeat *to* around to last 4 st, dc next 2 st, fpdc next st, dc next st, join with sl st to top of beginning ch 3.
-
Round 21: Ch 3, fpdc around next 2 st, dc next 2 st, fpdc around next 2 st, *dc next 2 st, fpdc next st, dc next 2 st, fpdc around next 2 st, dc next 2 st, fpdc around next 2 st,* repeat *to* around to last 4 st, dc next 2 st, fpdc next st, dc next st, join with sl st to top of beginning ch 3.
***Child size, continue on to assembly.*** -
Round 22: Ch 3, cable, *dc next 2 st, fpdc next st, dc next 2 st, cable,* repeat *to* around to last 4 st, dc next 2 st, fpdc next st, dc next st, join with sl st to top of beginning ch 3.
-
Round 23: Ch 3, fpdc around next 2 st, dc next 2 st, fpdc around next 2 st, *dc next 2 st, fpdc next st, dc next 2 st, fpdc around next 2 st, dc next 2 st, fpdc around next 2 st,* repeat *to* around to last 4 st, dc next 2 st, fpdc next st, dc next st, join with sl st to top of beginning ch 3.
***Adult size, continue on to assembly.***
Assembly
-
Round 1: sc in each st around. (66, 77 sc)
-
Round 2: Ch 1, sc2tog in each st around (for adult size you will have one st left over, sc into it), join with a sl st to the top of first sc2tog. (33, 39 sc)
-
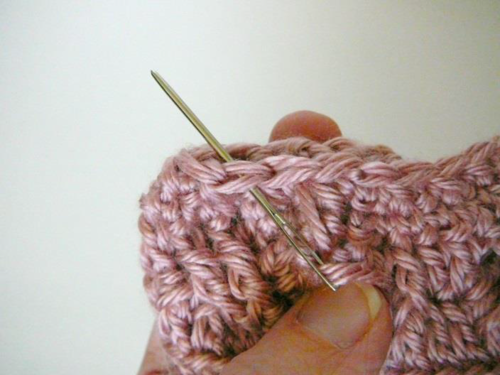
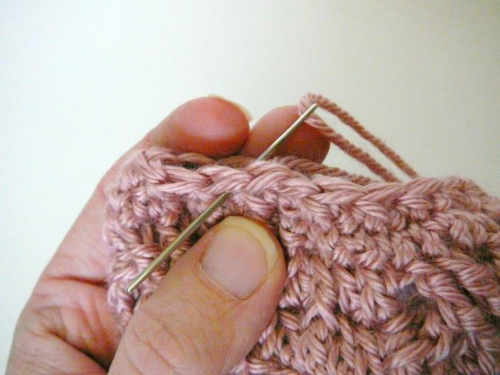
Break yarn leaving a 8” tail.
Using yarn needle, weave tail through the tops of each sc alternating front to back and back to front. -
Pull tail tightly to close up top of hat. Weave in end through the top sts to close it up tightly.
-
Weave in all remaining ends.
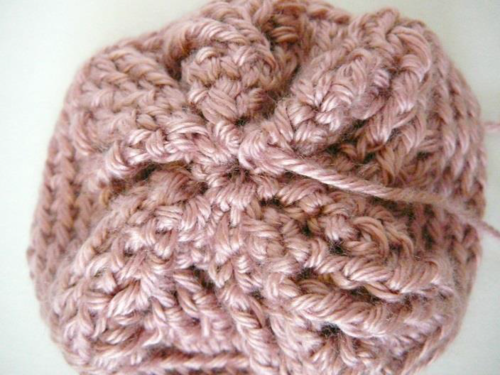
Read NextFire Flame Hat
Your Recently Viewed Projects
Thanks for your comment. Don't forget to share!
karolynher 9103127
Jan 01, 2018
I can't figure out where to insert the hook in Round 7. I don't understand where there are photos for the previous rounds, but not for this one. It's much more confusing trying to figure out where to insert the hook. I guess I have to wait to finish the hat until I receive an answer because I have no idea. Thanks.
Hippie Chick
Feb 03, 2017
This is such a pretty beanie hat but, I must admit that it looks a little advanced to me. I have been crocheting for many years so I am hoping that once I actually get into the making process that it just looks harder than what it actually is to make.
Hippie Chick
Feb 01, 2017
This is such a pretty beanie hat but, I must admit that it looks a little advanced to me. I have been crocheting for many years so I am hoping that once I actually get into the making process that it just looks harder than what it actually is to make.
arnts1ta
Nov 25, 2016
I like the look of this beanie pattern but I've never done a cable pattern on any crochet project so I find this a little intimidating! Has anyone ever attempted this pattern before?!
tamaraeckman 96273 52
Jan 17, 2016
I love the pattern, but it doesn't look good on my head. I will be giving it to a friend that likes cables.
CrochetAdvocate
Dec 03, 2014
I love this hat, but I can't seem to get into the blog to see the pattern instructions. Please, someone tell me what to do. I created an account butthat doesn't get me to the blog. Thanks
mombuone
Dec 29, 2015
Did you try printing the pattern shown on All Free Crochet rather than just saving it?
Report Inappropriate Comment
Are you sure you would like to report this comment? It will be flagged for our moderators to take action.
Thank you for taking the time to improve the content on our site.