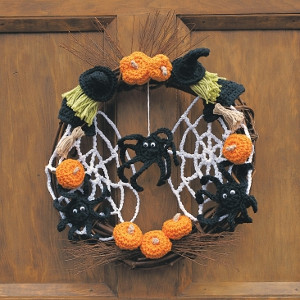
Boo Treelicious
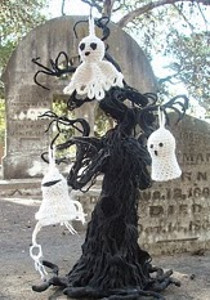
You will be amazed with this free crochet pattern for Halloween. It's for the more advanced crocheter, but the Boo Treelicious decoration will be the best on the block. Hang these ghosts outside for everyone to see so that you can flaunt your homemade Halloween decorations. Try your hand at this fun Halloween crochet pattern, but only if you dare!

Crochet HookE/4 or 3.5 mm hook
Yarn Weight(4) Medium Weight/Worsted Weight and Aran (16-20 stitches to 4 inches)
MATERIALS:
- 1 ball, Stitch.Rock.Love Sheep(ish) for Caron, in color: White(ish)
- 1 US F (4.25mm) crochet hook
- Tapestry needle
- 6, 1 1/2" Styrofoam balls
- Scraps of black craft felt
- Craft glue and white sewing pin (Ghost #3 only)
- Spooky Tree (Found at craft stores)
ABBREVIATIONS:
Sl st=Slip Stitch
Ch=Chain
Rnd=Round
Sc=single crochet
St=stitch
Sk=skip
Sc2tog= single crochet two stitches together
DIRECTIONS:
Ghost #1 (Make 2)Ch 2, join round with a sl st.
Rnd 1: Ch1, sc [6 times] in center. Join with a sl st. (7 sts)
Rnd 2: Ch1, sc in base of same st as ch. 2sc in EACH st around. Join with a sl st. (14 sts)
Rnd 3: Repeat rnd 2. (28 sts.)
Rnd 4: Ch 1, sc in next st and each st around. Join with a sl st.
Rnds 5-8: Repeat rnd 4.
INSERT STYROFOAM BALL
Rnd 9: Ch 1, *Sc2tog. Repeat from * to end/ Join with a sl st. (14 sts.)
Rnd 10: Repeat rnd 4.
Rnd 11-12: Repeat rnd 2.
Rnd 13-16: Repeat rnd 4.
Rnd 17: *Ch 7, sk 2, sl st, ch 10, sk 4, sl st, ch 12, st st. Repeat from * , ending with a sl st in the base of 1st ch. Tie off.
(See ghost finishing at bottom of post)
Ghost #2 (Make 2)
Rows 1-8: Work as for Ghost #1.
INSERT STYROFOAM BALL
Rows 9-16: Ch 1, sc in next st and each st around. Join with a sl st.
(Periodically stretch out ghost "body" while you're working, so it flares out a bit).
Tie off.
(See ghost finishing at bottom of post)
Ghost #3 (Make 2)
Ch 200. Turn.
Rnd 1: Ch 1, sc in 2nd ch from hook and every ch to end. Tie off, leaving tail.
Assembly: Pin end of crocheted strip at the top of Styrofoam ball. Put glue on several inches of the wrong side of the strip and begin wrapping around ball, leaving a small gap for the eye area to peek through. Once you get to the bottom portion of the ball (before it rounds off), stop gluing. With a tapestry needle and yarn, tack strip loosely (intentionally letting some of them show) to itself as you continue wrapping to create "body". Leave tails dangling and add a few loose strands randomly. Separate plies of yarn tales for unraveled look.
FINISHING (all ghosts)
Hanging loop: With yarn and hook, pick up stitch off-center of the top of the ghost head. Ch 12, sl st in same spot that you picked up 1st st. Tie off.
Weave in ends.
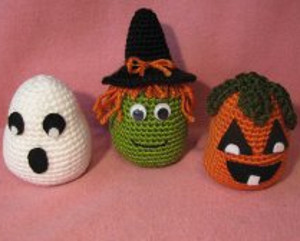
Cut out felt eyes and mouth and glue them onto appropriate ghosts. Hang on your spooky tree.
See this pattern and more in 18 Free Halloween Crochet Patterns
Read NextCrocheted Easy Halloween Trio
Your Recently Viewed Projects
Thanks for your comment. Don't forget to share!
JaneEK
Apr 20, 2017
This is a cute idea, but some of the directions are confusing. Not having any photos or diagrams to go by doesnt help. I can figure out Ghost #1 and #2, but #3 really needs further explanation. The assembly instructions indicate that the eye should be placed on the styro ball BEFORE beginning to wrap it, yet theres nothing that specifically says that. Not happy with this project at all.
mammy4423 8067217
Jun 19, 2014
I can't seem to find a spooky tree anywhere. Any ideas as to what to do?
joviedevine 773048 9
Oct 06, 2011
my son is having a halloween birthday party this yr. i am going to make them for some of the decorations
Report Inappropriate Comment
Are you sure you would like to report this comment? It will be flagged for our moderators to take action.
Thank you for taking the time to improve the content on our site.