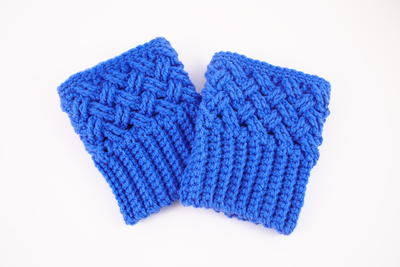
Celtic Dream Crochet Boot Cuffs

Dress up your fall look with these Celtic Dream Crochet Boot Cuffs. Slip these on under any pair of tall boots for a quick and easy way to spice up your look. These crochet boot cuffs give the layered look without any extra bulk or weight making these boot cuff patterns perfect for early fall, when you don't need to completely bundle up. Work these up in any color you choose to match your favorite boots, or work up multiple pairs so you always have that pop of color when you go out.

Crochet HookH/8 or 5 mm hook, J/10 or 6 mm hook
Yarn Weight(4) Medium Weight/Worsted Weight and Aran (16-20 stitches to 4 inches)
Crochet Gauge14 stitches and 16 rows = 4" (10 cm) in sc
Finished SizeExtra Small (10" - 12"), Small (12" - 14"), Medium (14" - 16"), Large (16" - 18")
Materials List
- Worsted weight yarn such as Red Heart With Love
- 5.0 mm (H-8) and 6.0 mm (J-10) crochet hook or sizes needed to obtain the gauge
- yarn needle for weaving in ends
Pattern
Extra Small
(10"- 12") • Finished Circumference = 10" • Finished Height = 6.5"
-
Ribbed Cuff - The cuff is worked in rows and seamed together at the end. Leave a lengthy starting tail for seaming.
With 5.0 mm hook
Row 1: Ch 12, sc in 2nd ch from hook and each chain across, turn (11)
Row 2: Working in BACK LOOPS only - Ch 1, sc in first stitch and each stitch across, turn (11)
Row 3 - 36: Repeat Row 2 --- (After Row 11 your work should measure 3" x 3")
You will now be working in the ends of the Rows to create the top portion of the cuff.
Top Portion of Cuff - Change to 6.0 mm hook
Round 1: Ch 1, make 1 sc in the end of each row, bring the ends together and join in the first sc (36)
Round 2: Ch 3, *skip 2 stitches, FPtrc in next 2 stitches, FPtrc in the 2 skipped stitches* repeat around, join in first FPtrc (36)
Round 3: Ch 3, skip first 4 stitches, FPtrc in next 2 stitches, *working behind the posts just made, FPtrc in the last 2 skipped stitches, skip 2 stitches, FPtrc in next 2 stitches* repeat from * around, join in first FPtrc (36)
Round 4: Ch 3, skip first 4 stitches, FPtrc in next 2 stitches, *working in front of the posts just made, FPtrc in the last 2 skipped stitches, skip 2 stitches, FPtrc in next 2 stitches* repeat from * around, join in first FPtrc (36)
Round 5 - 7: Repeat Round 3 & 4, ending with a Repeat of Round 3
Change to 5.0 mm hook:
Round 8: Ch 1, FPsc in every stitch around (do not cross any stitches), join in first FPsc (36)
Round 9: Ch 1, sc in each stitch around, join (36)
The sl st edging may affect the stretchiness of the cuff – if you crochet tightly, I recommend using a larger hook
Round 10: Loosely sl st around, join and fasten off (36)
Use the starting tail to seam the ends of the ribbed cuff together. Weave in all ends.
Small
(12"- 14") • Finished Circumference = 12.5" • Finished Height = 6.5"
-
Ribbed Cuff - The cuff is worked in rows and seamed together at the end. Leave a lengthy starting tail for seaming.
With 5.0 mm hook
Row 1: Ch 12, sc in 2nd ch from hook and each chain across, turn (11)
Row 2: Working in BACK LOOPS only - Ch 1, sc in first stitch and each stitch across, turn (11)
Row 3 - 42: Repeat Row 2 --- (After Row 11 your work should measure 3" x 3")
You will now be working in the ends of the Rows to create the top portion of the cuff.
Top Portion of Cuff - Change to 6.0 mm hook
Round 1: Ch 1, *make 2 sc in the end of the first row, sc in the next 20 rows* repeat once, bring the ends together and join in the first sc (44)
Round 2: Ch 3, *skip 2 stitches, FPtrc in next 2 stitches, FPtrc in the 2 skipped stitches* repeat around, join in first FPtrc (44)
Round 3: Ch 3, skip first 4 stitches, FPtrc in next 2 stitches, *working behind the posts just made, FPtrc in the last 2 skipped stitches, skip 2 stitches, FPtrc in next 2 stitches* repeat from * around, join in first FPtrc (44)
Round 4: Ch 3, skip first 4 stitches, FPtrc in next 2 stitches, *working in front of the posts just made, FPtrc in the last 2 skipped stitches, skip 2 stitches, FPtrc in next 2 stitches* repeat from * around, join in first FPtrc (44)
Round 5 - 7: Repeat Round 3 & 4, ending with a Repeat of Round 3
Change to 5.0 mm hook:
Round 8: Ch 1, FPsc in every stitch around (do not cross any stitches), join in first FPsc (44)
Round 9: Ch 1, sc in each stitch around, join (44)
The sl st edging may affect the stretchiness of the cuff – if you crochet tightly, I recommend using a larger hook
Round 10: Loosely sl st around, join and fasten off (44)
Use the starting tail to seam the ends of the ribbed cuff together. Weave in all ends.
Medium
(14"- 16") • Finished Circumference = 14" • Finished Height = 6.5"
-
Ribbed Cuff - The cuff is worked in rows and seamed together at the end. Leave a lengthy starting tail for seaming.
With 5.0 mm hook
Row 1: Ch 12, sc in 2nd ch from hook and each chain across, turn (11)
Row 2: Working in BACK LOOPS only - Ch 1, sc in first stitch and each stitch across, turn (11)
Row 3 - 48: Repeat Row 2 --- (After Row 11 your work should measure 3" x 3")
You will now be working in the ends of the Rows to create the top portion of the cuff.
Top Portion of Cuff - Change to 6.0 mm hook
Round 1: Ch 1, make 1 sc in the end of each row, bring the ends together and join in the first sc (48)
Round 2: Ch 3, *skip 2 stitches, FPtrc in next 2 stitches, FPtrc in the 2 skipped stitches* repeat around, join in first FPtrc (48)
Round 3: Ch 3, skip first 4 stitches, FPtrc in next 2 stitches, *working behind the posts just made, FPtrc in the last 2 skipped stitches, skip 2 stitches, FPtrc in next 2 stitches* repeat from * around, join in first FPtrc (48)
Round 4: Ch 3, skip first 4 stitches, FPtrc in next 2 stitches, *working in front of the posts just made, FPtrc in the last 2 skipped stitches, skip 2 stitches, FPtrc in next 2 stitches* repeat from * around, join in first FPtrc (48)
Round 5 - 7: Repeat Round 3 & 4, ending with a Repeat of Round 3
Change to 5.0 mm hook:
Round 8: Ch 1, FPsc in every stitch around (do not cross any stitches), join in first FPsc (48)
Round 9: Ch 1, sc in each stitch around, join (48)
The sl st edging may affect the stretchiness of the cuff – if you crochet tightly, I recommend using a larger hook
Round 10: Loosely sl st around, join and fasten off (48)
Use the starting tail to seam the ends of the ribbed cuff together. Weave in all ends.
Large
(16"- 18") • Finished Circumference = 16" • Finished Height = 6.5"
-
Ribbed Cuff - The cuff is worked in rows and seamed together at the end. Leave a lengthy starting tail for seaming.
With 5.0 mm hook
Row 1: Ch 12, sc in 2nd ch from hook and each chain across, turn (11)
Row 2: Working in BACK LOOPS only - Ch 1, sc in first stitch and each stitch across, turn (11)
Row 3 - 54: Repeat Row 2 --- (After Row 11 your work should measure 3" x 3")
You will now be working in the ends of the Rows to create the top portion of the cuff.
Top Portion of Cuff - Change to 6.0 mm hook
Round 1: Ch 1, *make 2 sc in the end of the first row, sc in the next 26 rows* repeat once, bring the ends together and join in the first sc (56)
Round 2: Ch 3, *skip 2 stitches, FPtrc in next 2 stitches, FPtrc in the 2 skipped stitches* repeat around, join in first FPtrc (56)
Round 3: Ch 3, skip first 4 stitches, FPtrc in next 2 stitches, *working behind the posts just made, FPtrc in the last 2 skipped stitches, skip 2 stitches, FPtrc in next 2 stitches* repeat from * around, join in first FPtrc (56)
Round 4: Ch 3, skip first 4 stitches, FPtrc in next 2 stitches, *working in front of the posts just made, FPtrc in the last 2 skipped stitches, skip 2 stitches, FPtrc in next 2 stitches* repeat from * around, join in first FPtrc (56)
Round 5 - 7: Repeat Round 3 & 4, ending with a Repeat of Round 3
Change to 5.0 mm hook:
Round 8: Ch 1, FPsc in every stitch around (do not cross any stitches), join in first FPsc (56)
Round 9: Ch 1, sc in each stitch around, join (56)
The sl st edging may affect the stretchiness of the cuff – if you crochet tightly, I recommend using a larger hook
Round 10: Loosely sl st around, join and fasten off (56)
Use the starting tail to seam the ends of the ribbed cuff together. Weave in all ends.
Read NextOne Hour Slipper

Thanks for your comment. Don't forget to share!
JaneEK
Sep 03, 2017
My rather stylish younger sister is married to an Irishman, so she loves all things Celtic. She even named her daughter after the traditional Irish goddess, Brigid. These boot cuffs will be perfect for her birthday in November. Im going to make them in Cream because she has a beautiful pair of dark brown leather boots. Theyre her favorite for fall, and these boot cuffs will be just the thing.
Zeemer
Nov 13, 2016
I've never tried wearing boot warmers but I always see their crochet patterns. Now I want to make my own pair to wear when I get the chance. It looks dressy, it adds class to the total look when used with the appropriate outfit. You can do these Celtic Dream Crochet Boot Cuffs in various colors for personal use, as gift, or for sale. Thanks for this free pattern.
achumley0003 31706 34
Oct 13, 2016
I never really cared for boot warmers until recently, but they are quick to make. And, I love the pattern and texture of these, and they can be made in array of colors to match any outfit.
AFC Editor Annalis a
Oct 07, 2016
These seem like such a great way to add a pop of color to any outfit. They're perfect for any day you plan to be outside a lot.
Report Inappropriate Comment
Are you sure you would like to report this comment? It will be flagged for our moderators to take action.
Thank you for taking the time to improve the content on our site.