Snowflake Hostess Apron
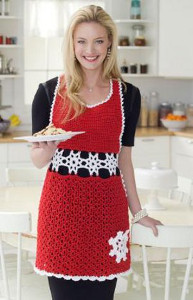
This cozy crochet pattern is perfect for any friend or relative that loves to entertain. The Snowflake Hostess Apron is a beautiful crocheted pattern with a lacy and feminine look. The best part of this crochet design is that it will easily complement anything you wear, so you can keep it on throughout your holiday party. Great for crochet fans of all skill levels, this lovely holiday apron works up quickly and makes a great last minute gift for anyone on your list...or even a quick Christmas present to yourself!

Crochet HookH/8 or 5 mm hook, J/10 or 6 mm hook
Yarn Weight(4) Medium Weight/Worsted Weight and Aran (16-20 stitches to 4 inches)
MATERIALS:
- RED HEART® Shimmer®: 2 (2, 3, 3, 4, 4) balls 1929 Red A; and 1 (1, 2, 2, 3, 3) balls 1010 Snow B
- Susan Bates® Crochet Hooks: 5mm [US H-8] and 6mm [US J-10]
- Yarn needle
SIZE:
Directions are for size Small; changes for sizes Medium, Large, X-Large, XX-Large and XXX-Large are in parentheses.
To Fit Bust: 32-34 (36-38, 40-42, 44-46, 48-50, 52-54)", [81-86 (91-97, 102-107, 111-117, 122-127, 132-137) cm].
Bodice Width: 13¼ (15¾, 18¼, 20¾, 23, 25½)", [34 (40, 4653, 58, 65) cm].
GAUGE:
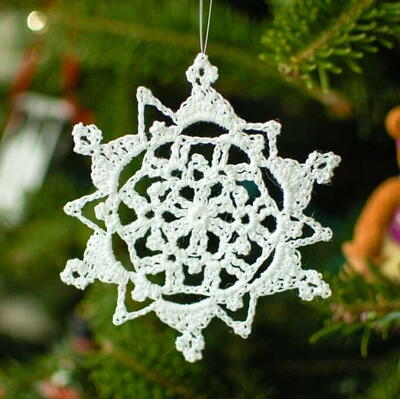
3 V-sts and 2 sc = 4" (10 cm); 7 rows = 4" (10 cm) in skirt pattern; 13 sts = 4" (10 cm); 15 rows = 4" (10 cm) in sc; snowflake = 3¼" (8 cm) across.
SPECIAL ABBREVIATIONS:
V-st = (dc, ch 2, dc) in same space or st.
sc2tog = [draw up a loop in next st] twice, yo and draw through all 3 loops on hook.
Picot = ch 3, slip st in 3rd ch from hook.
J3 (join ch-3 spaces) = ch 1, remove hook from loop, insert hook from the right side into corresponding ch-3 space and into loop, drawing loop through, ch 1.
APRON
Waistband
Snowflake [Make 6 (7, 8, 9, 10, 11)]
NOTE: After the first snowflake, all others are joined while working Round 3.
With B and smaller hook, ch 8; join with a slip st to form a ring.
Round 1: Ch 1, 2 sc in each ch around; join with a slip st in first sc – 16 sc.
Round 2: Ch 1, sc in first sc, ch 5, skip next sc, [sc in next sc, ch 5, skip next sc] 7 times; join in first sc – 8 ch-5 spaces.
First Snowflake ONLY
Round 3: * Slip st in next 2 ch, (slip st, ch 3, slip st) in next ch, slip st in next 2 ch **, slip st in next sc; repeat from * around, end at **. Fasten off.
Remaining Snowflakes
Joining Round 3: [Slip st in next 2 ch, joining to previous snowflake, (slip st, J3, slip st) in next ch, slip st in next 2 ch, slip st in next sc] twice, * slip st in next 2 ch, (slip st, ch 3, slip st) in next ch, slip st in next 2 ch **, slip st in next sc; repeat from * around, end at **. Fasten off.
Tie
Row 1: With right side facing and smaller hook, join B in right-hand ch-3 space of short end of snowflake strip; ch 6 (counts as dc, ch 3), dc in same space, (dc, ch 3, dc) in next ch-3 space; turn.
Rows 2-25 (2-26, 2-27, 2-28, 2-29, 2-30): Ch 1, (slip st, ch 6, dc) in first ch-3 space, (dc, ch 3, dc) in next ch-3 space; turn. Fasten off after last row.
Skirt
Foundation Row: With right side facing and larger hook, join A with sc in ch-3 space on first snowflake; ch 3, sc in next ch-3 space, * ch 7, sc in ch-3 space on next snowflake, ch 3, sc in next ch-3 space; repeat from * across; turn – 12 (14, 16, 18, 20, 22) sc and 6 (7, 8, 9, 10, 11) ch-3 spaces and 5 (6, 7, 8, 9, 10) ch-7 spaces.
Row 1: Ch 1, sc in each sc and ch across; turn – 65 (77, 89, 101, 113, 125) sc.
Row 2 (Right Side): Ch 1, sc in first sc, * skip next sc, V-st in next sc, skip next sc, sc in next sc; repeat from * across; turn – 17 (20, 23, 26, 29, 32) sc and 16 (19, 22, 25, 28, 31) V-sts.
Row 3: Ch 5, dc in first sc (ch-5 and dc counts as V-st), * sc in next ch-2 space, V-st in next sc; repeat from * across; turn – 17 (20, 23, 26, 29, 32) V-sts.
Row 4: (Slip st, ch 1, sc) in first ch-2 space, * V-st in next sc, sc in next ch-2 space; repeat from * across; turn.
Rows 5 and 6: Repeat Rows 3 and 4.
Row 7: Repeat Row 3.
Row 8: Ch 5, dc in first dc (increase made), sc in first ch-2 space, * V-st in next sc, sc in next ch-2 space; repeat from * to end; V-st in 3rd ch of ch-5 (increase made); turn – 18 (21, 24, 27, 30, 33) V-sts.
Row 9: Repeat Row 4.
Rows 10-13: Repeat Rows 3 and 4 twice.
Row 14: Repeat Row 3.
Row 15: Repeat Row 8 – 19 (22, 25, 28, 31, 34) V-sts.
Rows 16-22: Repeat Rows 9-15 – 20 (23, 26, 29, 32, 35) V-sts.
Row 23: Repeat Row 4.
Rows 24-27 (24-27, 24-31, 24-31, 24-31, 24-31): Repeat Rows 3 and 4 two (2, 4, 4, 4, 4) times.
Row 28 (28, 32, 32, 32, 32): Repeat Row 3. Do not turn or fasten off after last row but pivot to work over post of sts at row ends.
Skirt Border
First Side
Ch 1, 2 sc in each dc row and sc in each sc row up to waistband, slip st in ch-3 space on last snowflake – 42 (42, 48, 48, 48, 48) sc. Fasten off.
Second Side
With right side facing and larger hook, join A in outside ch-3 space of last snowflake on opposite end of waistband; ch 1, 2 sc in each dc row and sc in each sc row to lower edge. Fasten off.
Skirt Edging
With right side facing and larger hook, join B in same ch-3 space as Second Side of skirt border; * skip next sc, (slip st, picot) in next sc; repeat from * to corner; working in sts of last row of skirt, (slip st, 5 dc) in first ch-2 space, ** slip st in next sc, 5 dc in next ch-2 space; repeat from ** to next corner; (slip st, picot) in next sc on First Side of skirt border, skip next sc, *** (slip st, picot) in next sc, skip next sc; repeat from *** to waistband; slip st in ch-3 space on snowflake. Fasten off.
Bodice
Row 1: With right side facing and larger hook, working in ch-3 spaces on opposite side of snowflakes, join A with sc in first ch-3 space, * ch 3, sc in next ch-3 space; repeat from * across; turn – 12 (14, 16, 18, 20, 22) sc and 11 (13, 15, 17, 19, 21) ch-3 spaces.
Rows 2-4: Ch 1, sc in each sc and ch across; turn – 45 (53, 61, 69, 77, 85) sc.
Row 5: Ch 1, sc2tog, sc in each sc to last 2 sc; sc2tog; turn – 43 (51, 59, 67, 75, 83) sc.
Rows 6-17: Repeat Rows 2-5 three more times – 37 (45, 53, 61, 69, 77) sc.
Rows 18-20: Repeat Rows 2-4.
Row 21: Ch 1, sc in first 10 (14, 18, 22, 26, 30) sc, 4 sc in next sc, sc in next 15 sc, 4 sc in next sc, sc in each sc to end; turn – 43 (51, 59, 67, 75, 83) sc.
Rows 22-25: Ch 1, sc in each sc across; turn.
Row 26: Ch 1, sc in first 21 (25, 29, 33, 37, 41) sc, sc2tog, sc in each sc to end; turn – 42 (50, 58, 66, 74, 82) sc.
Rows 27-28 (27-28, 27-30, 27-30, 27-32, 27-32): Repeat Row 22.
Row 29 (29, 31, 31, 33, 33): Repeat Row 5 – 40 (48, 56, 64, 72, 80) sc.
Row 30 (30, 32, 32, 34, 34): Ch 1, sc in first 14 (18, 22, 26, 30, 34) sc, slip st in next 12 sc, sc in each sc to end; turn.
Row 31: Ch 1, sc in first 12 (16, 20, 24, 28, 32) sc, slip st in next 2 sc, slip st in next 12 slip sts, slip st in next 2 sc, sc in each sc to end; turn.
First Neck Strap
Row 1: Ch 1, sc in first 8 sc; TURN leaving remaining sts unworked.
Row 2: Ch 1, sc2tog, sc in each sc across; turn – 7 sc.
Row 3: Ch 1, sc in first 5 sc, sc2tog; turn – 6 sc.
Row 4: Repeat Row 2 – 5 sc.
Rows 5-91: Ch 1, sc in each sc across; turn. Fasten off after last row.
Second Neck Strap
Row 1: With wrong side facing, skip next 24 (32, 40, 48, 56, 64) sts of last long row; join A with sc in next sc, sc in each sc to end; turn – 8 sc.
Row 2: Ch 1, sc in first 6 sc, sc2tog; turn – 7 sc.
Row 3: Ch 1, sc2tog, sc in each sc across; turn – 6 sc.
Row 4: Ch 1, sc in first 4 sc, sc2tog; turn – 5 sc.
Rows 5-91: Ch 1, sc in each sc across; turn. Fasten off after last row.
Bodice Border
With right side facing and larger hook, join A with slip st in ch-3 space on last snowflake; working over row ends, sc in each sc row up to tie, slip st in each row of tie and in each sc across last row of tie and in each row end of second side, working in sts across last row of bodice, sc in each st, slip st in each row of second tie and in each sc across last row and in each row of second side, working over row ends of second side of bodice, sc in each sc row, slip st in ch-3 space on snowflake. Fasten off.
Bodice Edging
With right side facing and larger hook, join B with slip st in same ch-3 space on snowflake as border; skip next st, * (slip st, picot) in next st, skip next st; repeat from * to end; slip st in same ch-3 space on snowflake. Fasten off.
Pocket
Round 1: With larger hook and B, ch 8; join with slip st to form ring; ch 1, (sc, ch 1) in each ch around; join with slip st in first sc – 8 sc and 8 ch-1 spaces.
Round 2: Ch 1, sc in first sc, ch 5, [sc in next sc, ch 5] 7 times; join in first sc.
Round 3: Slip st in next ch-5 space, ch 3 (counts as dc), 5 dc in same space, 6 dc in each ch-5 space around; join in top of ch-3 – 48 sts.
Round 4: Slip st in next 2 dc, * ch 3, slip st in next 3 dc, ch 1 **, slip st in next 3 dc; repeat from * around, end at **; join.
Round 5: Working over slip st of previous round, slip st in next 2 sts, * (slip st, [picot, slip st] twice) all in next ch-3 space, slip st in next 3 sts, slip st in next sc of Round 2 **, slip st in next 3 sts; repeat from * around, end at **. Fasten off.
With yarn needle and B, tack edges of pocket to skirt leaving top two points open using photo as guide for placement.
See this snowflake pattern along with others in 13 Crochet Snowflake Patterns!
Your Recently Viewed Projects

Thanks for your comment. Don't forget to share!
princess6860504
Nov 15, 2017
My girlfriend would love wearing this around the house as she's hosting her holiday parties and serving drinks! What a novel idea, and pretty too! It's a bit of a departure from the types of projects I normally take on. I am totally unfamiliar with a bodice, for instance. Pattern is well written, though, so I am sure I could tackle this with confidence.
mulberrygalprinces s
Nov 14, 2017
This is one of the prettiest ones yet. I can't get over it. I have to start on it right away so I can give it as a hostess gift during the holidays. I have been invited to a bunch of brunches and dinners and this will be a wonderful gift. It's easy too!
JaneEK
Oct 08, 2017
This strikes me as very Nordic looking, and worked with the red background, very much like Mrs. Santa as well. Theres a free download at the Red Heart site. If you dont celebrate Christmas or just want to keep using it for more than just the holidays, I think it would look nice with a dark to medium blue background. You might even add a few more smaller snowflakes scattered across the top, too.
tammyorr 5262462
Oct 29, 2013
This is cute! I would love to make this and give away for christmas
Report Inappropriate Comment
Are you sure you would like to report this comment? It will be flagged for our moderators to take action.
Thank you for taking the time to improve the content on our site.