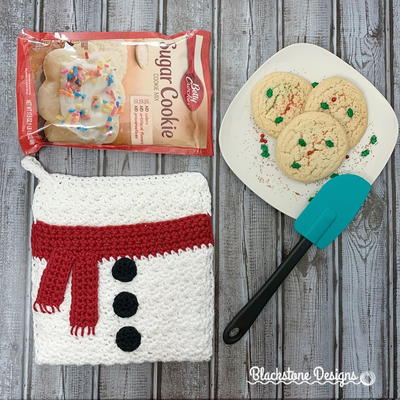
Mr. Claus Potholder Pattern
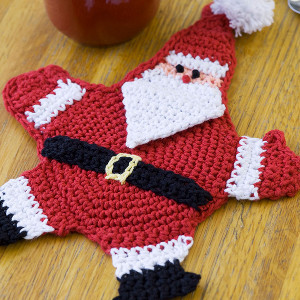
Ho, ho, ho! Get cooking for Christmas with this Mr. Claus Potholder Pattern. Your kids might even want to get it on the fun when they see the cute Santa potholder pattern you're using! Make cooking have a little more of a festive feel and get in the mood for the upcoming holiday by working up this crochet potholder. Set your meal on the table Christmas Eve to get your family in the same festive mood while you wait for Santa to come lay out all the presents.

Crochet HookH/8 or 5 mm hook
Yarn Weight(4) Medium Weight/Worsted Weight and Aran (16-20 stitches to 4 inches)
MATERIALS:
- Coats Creme de la Creme, 1 ball each:
- A: 905 Rally Red
- B: 1 White
- C: 12 Black
- D: 255 Tearose
- E: 205 Golden Yellow
- Susan Bates Crochet Hook (H/8 or 5 mm)
- Yarn Needle
- Pompom Maker
SIZE:
Potholder is 12” (30.5 cm) tall x 8” (20 cm) at widest point
GAUGE:
14 sc = 4" (10 cm); 15 rows = 4" (10cm)
SPECIAL ABBREVIATIONS:
sc2tog (sc dec) = Insert hook into st and draw up a loop. Insert hook into next st and draw up a loop. Yarn over, draw through all 3 loops on hook.
Chain Stitch Embroidery: Make a slip knot but do not place it on hook. Hold slip knot on wrong side of fabric. Insert hook from right side of fabric through to wrong side. Place slip knot on hook, draw loop to right side. Insert hook from right side to wrong side through next desired stitch or space, yarn over, draw loop to right side and through loop on hook (surface chain stitch made). To end a line of surface chain stitches, draw up a loop on right side of fabric. Remove hook from loop and take hook to wrong side of fabric. Insert hook from wrong side to right side, place loop on hook, draw loop through to wrong side of fabric. Fasten off, leaving a long tail. Draw tail through final loop and pull tight.
NOTES:
1. When changing colors, insert hook and draw up a loop with old color, switch to new color, yo and pull through the 2 loops on the hook, continue with new color.
2. To use Potholder as an oven mitt, make Back. The Right Arm creates thumb pocket, the Head and Body creates the hand pocket. Do not make Left Arm, this is the opening to the pocket.
POTHOLDER
FRONT
Body
With A, ch 2
Round 1: Work 6 sc in 2nd ch from hook, slip st to first sc to join.
Round 2: Ch 2 (counts as st here and throughout), turn, sc in same st, work 2 sc in each st around, slip st to top of beginning ch to join – 12 sts.
Round 3: Ch 2, turn, sc in same st, sc in next st, [2 sc in next st, sc in next st] 5 times, slip st to top of beginning ch – 18 sts.
Round 4: Ch 2, turn, sc in same st, sc in next 2 sts, [2 sc in next st, sc in next 2 sts] 5 times, slip st to top of beginning ch – 24 sts.
Round 5: Ch 2, turn, sc in same st, sc in next 3 sts, [2 sc in next st, sc in next 3 sts] 5 times, slip st to top of beginning ch – 30 sts.
Round 6: Ch 2, turn, sc in same st, sc in next 4 sts, [2 sc in next st, sc in next 4 sts] 5 times, slip st to top of beginning ch – 36 sts.
Round 7: Ch 2, turn, sc in same st, sc in next 5 sts, [2 sc in next st, sc in next 5 sts] 5 times, slip st to top of beginning ch – 42 sts.
Round 8: Ch 2, turn, sc in same st, sc in next 6 sts, [2 sc in next st, sc in next 6 sts] 5 times, slip st to top of beginning ch – 48 sts.
Round 9: Ch 2, turn, sc in same st, sc in next 7 sts, [2 sc in next st, sc in next 7 sts] 5 times, slip st to top of beginning ch – 54 sts.
Round 10: Ch 2, turn, sc in same st, sc in next 8 sts, [2 sc in next st, sc in next 8 sts] 5 times, slip st to top of beginning ch – 60 sts.
Left Arm
Row 1: Ch 1, sc in next 9 sts.
Row 2: Ch 1, turn, skip first sc, sc in 8 sc.
Row 3: Ch 1, turn, skip first sc, sc in 7 sc.
Row 4: Change to B, ch 1, turn. Do not cut A.skip first sc, sc in next 6 sc.
Row 5: Ch 1, turn, sc in next 6 sc.
Row 6: Change to A, ch 1, turn, sc in next 6 sc.
Row 7: Ch 1, turn, sc in next 4 sc, sc2tog.
Row 8: Ch 1, turn, sc in next 5 sc.
Row 9: Ch 1, turn, sc in next 3 sc, sc2tog.
Row 10: Ch 1, turn, skip first sc, sc in next sc, sc2tog, turn to work along edge of rows, slip st in next 3 rows, (hdc, dc, hdc, slip st) in next row for Thumb. Fasten off.
Left Leg
With right side facing, skip 4 sc along edge of Front from Left Arm, join A in next sc.
Row 1: Ch 1, work 8 sc across.
Row 2: Ch 1, turn, sc in next 8 sc.
Row 3: Ch 1, turn, sc in next 8 sc.
Row 4: Change to B, ch 1, turn, sc in next 6 sc, sc2tog.
Row 5: Ch 1, turn, sc in next 7 sc.
Row 6: Ch 1, turn, sc in next 7 sc.
Row 7: Change to C, ch 1, turn, sc in next 7 sc.
Row 8: Ch 1, turn, sc in next 5 sc, sc2tog.
Row 9: Ch 1, turn, sc in next 6 sc.
Row 10: Ch 1, turn to work along edge of rows, (hdc, dc) in next row, (hdc, sc, slip st) in next row. Fasten off.
Right Leg
With wrong side facing, skip 9 sc along edge of Front from edge of Left Leg. Join A in next st and work as for Left Leg.
Right Arm
With wrong side facing, skip 4 sc along edge of Front from edge of Right Leg. Join A in next st and work as for Left Arm.
Beard
With right side facing, join B in first sc after Left Arm.
Row 1: Ch 1, sc in next 8 sc.
Row 2: Ch 1, turn, sc in each sc to last 2 sts, sctog.
Repeat Row 2 until 1 st remains. Fasten off. Fold Beard to right side of Front.
Head
Row 1: Join B in first st of Beard, working through sts of both layers of Beard and Front, work 9 sc across.
Row 2: Ch 1, turn, skip next sc, sc in each sc.
Row 3: Repeat Row 2.
Rows 4 – 5: Ch 1, turn, sc in next 7 sc.
Rows 6-7: Change to D, ch 1, turn, sc in next 7 sc.
Row 8-9: Change to B, ch 1, turn, sc in next 7 sc.
Row 10: Change to A, ch 1, turn, sc in next 7 sc.
With A, repeat Row 2 until 1 st remains. Fasten off.
BACK
With A only, work Body and Right Arm as for Front.
FINISHING
Using C, embroider 2 French knots on Front Head for eyes. Using A, embroider 1 French Knot for nose. With wrong sides together, join A through both layers of Front and Back at edge of Left Arm, sc evenly around edges working through sts of both layers of Body and Head to tip of Head, ch 20 for hanging loop, slip st in same st, sc though sts of both layers of remaining edge of Head, Right Arm and Body to edge of Right Leg. Fasten off. With B make a pompom and tie on to hanging loop.
Belt
With C, ch 21, sc in 2nd ch from hook and in each ch across. Fasten off. Using E, work Chain Stitch embroidery to make a square in center of Belt for Buckle. Sew Belt across Front. Weave in ends.
Read NextRed Truck Christmas Ornament
Your Recently Viewed Projects
Thanks for your comment. Don't forget to share!
JaneEK
Jan 14, 2017
This is a cute little project, but it strikes me as more of a trivet than potholder. I can also see this as a dishcloth. The pattern is clearly writtenno photographs other than the finished project. Since this is originally a Red Heart Yarn project, there may be more photos on the home site. Another one to consider for my senior ladies since it involves simple stitches.
mulberrygalprinces s
Aug 23, 2016
What a sweet cute and great idea. After reading the pattern, I know I can make one up in no time. I can use it as a hot pad, a place mat or even a wall decoration. I wonder how three in different colors would look as a banner? One in traditional, one in greens and one in white.i think it would look very good, thank you for sharing this.
Report Inappropriate Comment
Are you sure you would like to report this comment? It will be flagged for our moderators to take action.
Thank you for taking the time to improve the content on our site.