Holly and Berry Striped Stockings
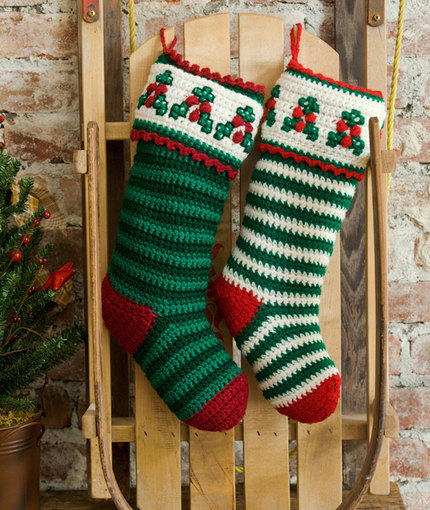
The Holly and Berry Striped Stockings seem like the perfect pair of stockings for a perfect couple. You and your spouse can pick who wants the double green version compared to the green and white version. Either way, you have a simply classic pair of wonderful crochet Christmas stockings that will last the years to come. They're so festive and neat that they will go with your other decorations as well as the Christmas tree. Let these fun crochet stockings accent your home this Christmas season.

Crochet HookH/8 or 5 mm hook, I/9 or 5.5 mm hook
Yarn Weight(4) Medium Weight/Worsted Weight and Aran (16-20 stitches to 4 inches)
Crochet Gauge13 sts and 14 rows sc = 4
Finished SizeStocking measures 16
Materials List
- Red Heart Super Saver: 1 skein each 316 Soft White A, 376 Burgundy B, 368 Paddy Green C and 389 Hunter Green D. Version 2: 1 skein each 316 Soft White A, 319 Cherry Red B and 368 Paddy Green C
- Crochet Hook: 5 mm [US H-8] and 5.5 mm [US I-9]
- Yarn needle
Notes
SPECIAL ABBREVIATIONS
sc2tog: [Insert hook in the next st, yo, draw yarn through the st] twice, yo, draw yarn through 3 loops on hook.
bobble: [Yo, insert hook in next st, yo, draw yarn through st] 3 times in same st, yo, draw yarn through 7 loops on hook.
NOTES To change color, on last st of first color, work first color until 2 loops remain on hook, yo with next color and draw through 2 loops on hook. Carry unused colors loosely up side of stocking to be picked up in later row.
Stocking
(Version 1: Use D for CC1 and C for CC2; Version 2: Use C for CC1 and A for CC2)
Leg
Starting at top edge of Leg, with larger hook and CC1, ch 42.
Row 1 (right side): Sc in 2nd ch from hook and in each ch across, turn41 sc.
Row 2: Ch 1, sc in each sc across, complete last st with CC2, drop CC1; turn.
Work even in sc, working in the following color sequence throughout: *2 rows CC1, 2 rows CC2; repeat from * until Leg measures 9 from beginning. Fasten off CC1 and CC2.
Heel
Row 1: With right side facing, skip first 30 sts, join B with slip st in next st, ch 1, sc in same st, sc in each of next 10 sts; bring other side of Leg around and sc in first 10 sc on top edge of Leg; turn21 sc.
Row 2: Ch 1, sc in each of first 14 sc; turn, leaving remaining sts unworked14 sc.
Row 3: Ch 1, sc in each of first 7 sc; turn, leaving remaining sts unworked7 sc.
Row 4: Ch 1, sc in each of first 7 sc, sc in next sc of Row 1 below; turn, leaving remaining sts unworked8 sc.
Row 5: Ch 1, sc in each of first 8 sc, sc in next sc of Row 2 below; turn, leaving remaining sts unworked9 sc.
Rows 6-17: Repeat Rows 4-5 until 21 sts are on work. Fasten off B.
Foot
Row 1: With right side facing, skip first 10 sts of Heel, join CC1 with slip st in next st, ch 1, sc in same st, sc in each of next 10 sts of Heel, skip next 2 sc of Leg, sc in next 16 sts, skip next 2 sts of Leg, sc in next 10 sts of Heel; turn37 sc.
Row 2: Ch 1, sc in each sc across, complete last st with CC2, drop CC1; turn.
Row 3: With CC2, ch 1, sc in first 10 sc, sc2tog in next 2 sts, sc in next 13 sts, sc2tog in next 2 sts, sc in last 10 sc; turn35 sc.
Row 4: Ch 1, sc in first 10 sc, sc2tog in next 2 sts, sc in next 11 sts, sc2tog in next 2 sts, sc in last 10 sc, complete last st with CC1, drop CC2; turn. 33 sc.
Work even in sc, working in the following color sequence throughout: *2 rows CC1, 2 rows CC2; repeat from * until 11 more rows have been completed, ending with a wrong side row with CC2, complete last st with B. Fasten off CC2 and CC1.
Toe
Row 1: With B, ch 1, sc in each sc across; turn. Divide for 2 sides of Toe First Side
Row 2: Ch 1, sc2tog in next 2 sts, sc in next 13 sts, sc2tog in next 2 sts, turn, leaving remaining sts unworked15 sts.
Row 3: Ch 1, sc2tog in next 2 sts, sc in each sc across to last 2 sts, sc2tog in next 2 sts, turn, leaving remaining sts unworked13 sts.
Rows 4-8: Repeat Row 33 sts at end of last row. Fasten off B.
Second Side
Row 1: With wrong side facing, join B with slip st in first st to the left of last st made in Row 2 of First Side, ch 1, sc in same st, sc in each st across to last 2 sts, sc2tog in last 2 sts; turn15 sts.
Row 3-8: Repeat Rows 3-8 of First Side. Fasten off.
Cuff
With larger hook and A, ch 44.
Row 1: Sc in 2nd ch from hook and in each ch across; turn43 sc.
Row 2: Ch 1, sc in each sc across; turn.
Row 3: Repeat Row 2.
Row 4: With A, ch 1, sc in first 3 sc, *change to B, bobble in next sc, [change to A, sc in next 6 sts, change to B, bobble in next st] twice*, change to A, sc in next 7 sts, repeat from * to * once, sc in last 3 sc; turn6 bobbles.
Row 5: Repeat Row 2.
Row 6: With A, ch 1, sc in first 2 sc, *change to B, bobble in next sc, change to A, sc in next st, change to B, bobble in next st, [change to A, sc in next 4 sts, change to B, bobble in next sc, change to A, sc in next st, change to B, bobble in next st] twice*, change to A, sc in next 5 sts, repeat from * to * once, sc in last 2 sc; turn12 bobbles. Fasten off B.
Rows 7-11: Repeat Row 2. Fasten off A.
Finishing
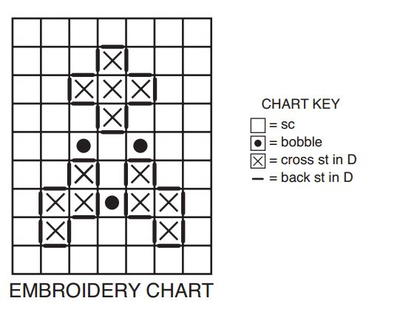
Embroidery
Embroider Cuff following Embroidery Chart.
For Version 1, work cross sts in C and back sts in D. For Version 2, work cross sts and back sts in C.
Top Trim
Attach Cuff to Leg as follows:
Row 1: With right side facing and larger hook, join CC2 with slip st to first st on top edge of Cuff, ch 1, sc in same st, holding with wrong side of Cuff facing right side of Leg, working through double thickness, sc in each sc across, sc in last st of Cuff43 sc. Fasten off.
Row 2: With right side facing, join CC1 with slip st in first st of last row, ch 1, sc in each sc across. Fasten off.
Row 3: With right side facing and smaller hook, join B with slip st in first sc of last row, *ch 2, slip st in 2nd ch from hook, skip next sc, slip st in next sc; repeat from * across. Fasten off.
Bottom Trim
Row 1: With right side facing, working across opposite side of foundation ch on bottom edge of Cuff, join CC2 with slip st in first ch, ch 1, sc in each ch across. Fasten off.
Rows 2-3: Repeat Rows 2-3 of Top Trim.
Assembly
With matching yarn, whipstitch Cuff and Leg seams. Whipstitch Foot and Toe seams. Whipstitch corners of Heels closed.
Hanger
With smaller hook, join B at back seam of Cuff, ch 15, slip st in same place as joining. Fasten off. Weave in ends.
Read NextChristmas Santa Ornament
Your Recently Viewed Projects
Thanks for your comment. Don't forget to share!
JaneEK
Jan 14, 2017
I love this project! The holly leaves and berries on the cuff set this design apart from so many others. When I got the Christmas decorations out this year, I sadly discovered that a mouse had gotten into my stash of stockings. I didnt have time to work up new ones, so I had to settle for some inexpensive ones from a discount store. Not next year! Plastic tubs and new stockings!
Heather Calluna Bl ue Lavender Co
Nov 11, 2015
This pattern is wonderful and I'm almost finished but am having trouble finding the embroidery chart mentioned to finish the holly berries. Help please?
suilucero 0952049
Nov 02, 2015
This is so pretty and easy ) I had to check out Mickey S. of Crochet Crowd for guidance in making the bobbles, also I added more rows of white for the top and bottom of the cuff and reduced the bobbles as stated in the pattern. Thank you so much for this pattern )
Report Inappropriate Comment
Are you sure you would like to report this comment? It will be flagged for our moderators to take action.
Thank you for taking the time to improve the content on our site.