Christmas Cheer Bottle Top
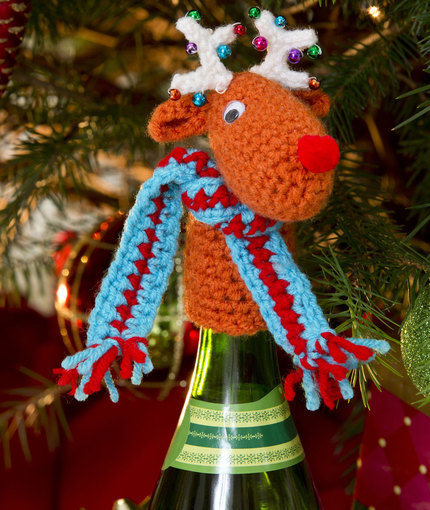
Bring on the smiles by working up a Christmas Cheer Bottle Top. This adorable little reindeer can sit on top of any bottle you're drinking in celebration of the holiday season. With its red nose and little bitty scarf, you'll have a fun way to top off your drink. Find a reason to give some wine or sparkling juice as a hostess gift by adding this touch of Christmas cheer on top as a bonus homemade Christmas decoration. Everyone will be sure to love it!

Crochet HookF/5 or 3.75 mm hook, H/8 or 5 mm hook
Yarn Weight(4) Medium Weight/Worsted Weight and Aran (16-20 stitches to 4 inches)
Crochet Gauge22 sts = 4 (10 cm); 20 rows = 4 (10 cm) in sc with smaller hook. Note: Gauge is not overly important for this project but stitches in the stuffed portion must be tight enough to prevent stuffing showing through.
Finished SizeTopper measures 5 (13 cm) high
Materials List
- RED HEART Super Saver: 1 skein each 256 Carrot A, 512 Turqua B, 319 Cherry Red C, and 316 Soft White D
-
Susan Bates Crochet Hooks: 3.75mm [US F-5], 5 mm [US H-8]
- Stitch Marker
- Stuffing
- Assorted round color beads
- Small red pompom for nose
- (2) small sew on wiggle eyes
- Sewing thread and needle
- Yarn needle
Notes
Special Abbreviation dec (decrease) = draw up a loop in next 2 sc, yarn over and draw through 3 loops
Reindeer
Head
Round 1: With A and smaller hook, ch 2; 6 sc in 2nd ch from hook; do not join but work in continuous rounds. Place marker in first sc and move up each round.
Round 2: 2 Sc in each sc around 12 sc.
Round 3: [Sc in next sc, 2 sc in next sc] 6 times 18 sc.
Rounds 4-6: Sc in each sc around.
Neck Opening
Round 7: Sc in first 12 sc, ch 4, skip next 4 sc, sc in last 2 sc.
Round 8: [Sc in next 2 sc, 2 sc in next sc] 6 times 24 sc.
Rounds 9-11: Sc in each sc around.
Round 12: [Sc in next 2 sc, dec] 6 times 18 sc.
Round 13: Sc in each sc around.
Round 14: [Sc in next sc, dec] 6 times 12 sc.
Round 15: [Sc in next sc, dec] 4 times 8 sc. Stuff head firmly.
Round 16: [Dec] 4 times 4 sc.
Fasten off. Finish stuffing.
Use yarn end threaded on tapestry needle to close hole. Set aside.
Neck
With A and smaller hook, attach yarn to any st at neck opening.
Round 1: Ch 1, sc in each sc and ch around; do not join 8 sc.
Round 2: Sc in each sc around.
Round 3: 2 Hdc in each sc around 16 hdc.
Round 4: [Hdc in next 7 hdc, 2 hdc in next hdc] twice 18 hdc.
Rounds 5-9: Hdc in each hdc around.
Rounds 10 and 11: Sc in each hdc around.
Fasten off.
Ears (Make 2)
With A and smaller hook, ch 5; sc in 2nd ch from hook and in next 2 ch, 2 sc in last ch, working in remaining loops on opposite side, sc in 3 ch, (slip st, ch 1, slip st) in next sc, slip st in next 3 sc, (slip st, ch 1, slip st) in next sc, slip st in next 3 sc.
Fasten off leaving long tail for attaching ear to head.
Antlers (Make 2)
With D and smaller hook, ch 8. Working in back bumps on wrong side of ch for each section, slip st in 2nd ch from hook and in next 2 ch, ch 4, slip st in 2nd ch from hook and next 2 ch, slip st in next 3 ch on ch- 8, ch 4, slip st in 2nd ch from hook and next 2 ch, slip st in last ch of ch-8. Fasten off leaving long tail for sewing.
Scarf
With B and larger hook, ch 43.
Row 1: Sc in 2nd ch from hook and each ch across changing to C in last st; turn 42 sc. Cut B.
Row 2: With C, ch 1, sc in each sc across changing to B in last st; turn. Cut C.
Row 3: With B, ch 1, sc in each sc across. Fasten off.
Fringe: Cut 4 (10 cm) strands of yarn. Knot fringe across each end of scarf as follows: fold strand in half forming a loop; insert the crochet hook through the fabric from the wrong side and draw the loop through, then draw the yarn ends through the loop and tighten. Trim yarn ends.
Finishing
Sew beads randomly on antlers. Sew ears and antlers to head with yarn ends. Locate desired eye placement and with A, soft sculpture eye socket by taking st in one eye placement, then insert needle and run it across to other eye placement area.
Bring needle out at this 2nd eye area and pull tightly causing yarn to make indentation for eye socket. Repeat process again and then bring yarn out behind ear and knot securely. Weave in yarn end. Sew wiggle eyes securely in eye sockets just made. Sew pom pom nose to face. Slip onto bottle, tie scarf around neck.
Read NextPoinsettia Stocking

Thanks for your comment. Don't forget to share!
JaneEK
Dec 22, 2016
Ive never seen bottle toppers before, but these are certainly going on my make it list! This happy little guy will be gracing the top of a bottle of sparkling apple for teetotaler friends of mine. They are expecting a grandchild just after the new year (thus the non-alcoholic bubbly), and I can see the topper finding new life as a finger puppet. Ill be on the look out for other toppers, too.
Report Inappropriate Comment
Are you sure you would like to report this comment? It will be flagged for our moderators to take action.
Thank you for taking the time to improve the content on our site.