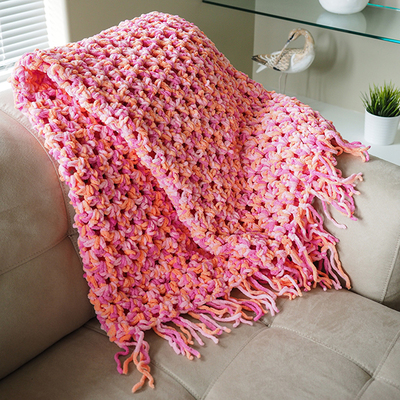
Berry Leaf Table Runner
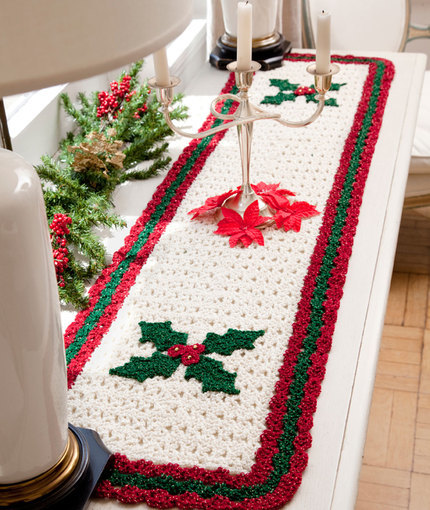
Don the table with this Berry Leaf Table Runner for Christmas this year. The holly design against the white background really makes it stick out in a good way. A little bit of sparkly yarn adds a nice embellishment to an already beautiful piece of homemade Christmas decor. Because it's not just a Christmas decoration, you can keep it up for the entire month of December if you'd like, so that dinner always has a nice addition.

Crochet HookH/8 or 5 mm hook
Yarn Weight(4) Medium Weight/Worsted Weight and Aran (16-20 stitches to 4 inches)
Crochet Gauge16 sts = 4; 11 rows = 4 in pattern.
Finished SizeRunner measures 14 x 56.
Materials List
- RED HEART Holiday: 2 balls 1360 Aran w/Gold A, 1 ball each 9560 Wine/Gold B and 6560 Hunter/Gold C
- Crochet Hook: 5mm [US H-8]
- Yarn needle
- Sewing needle and thread
- 6mm gold beads
Notes
Runner is made from the center out to Border Edge.
To Change Color in Dc: Work last dc before color change until 2 loops remain on hook, drop color in use, with next color to be used yo and draw through 2 loops on hook; continue with new color.
Runner
First Side
With A, starting at center, ch 214.
Row 1 (Right Side): Dc in 4th ch from hook, * ch 2, skip next ch, sc in next ch, ch 2, skip next ch, dc in next 2 ch; repeat from * across; turn.
Row 2: Ch 1, sc in first 2 dc, ch 3, * sc in next 2 dc, ch 3; repeat from * to last 2 sts; sc in dc, sc in top of ch-3; turn.
Row 3: Ch 3, skip first sc, dc in next sc, * ch 2, sc in ch-3 space, ch 2, dc in next 2 sc; repeat from * across; turn.
Repeat Rows 2 and 3 five more times, changing to B in last st of last row.
Border
Row 1: With B, repeat Row 2.
Row 2: Ch 3, dc in first sc, dc in next dc, * ch 2, sc in ch-3 space, ch 2, dc in next 2 sc; repeat from * across; work one more dc in last sc changing to C; turn.
Row 3: Ch 1, sc in first 3 dc, ch 3, * sc in next 2 dc, ch 3; repeat from * to last 3 sts; sc in next 2 dc and in top of ch- 3; turn.
Row 4: Ch 3, dc in first sc, dc in next 2 sc, * ch 2, sc in ch-3 space, ch 2, dc in next 2 sc; repeat from * to last 3 sc; dc in next 2 sc, 2 dc in last sc changing to B; turn.
Row 5: Ch 1, sc in first 4 dc, ch 3, * sc in next 2 dc, ch 3; repeat from * to last 4 sts; sc in next 3 dc, sc in top of ch-3;turn.
Row 6: Ch 3, dc in first sc, dc in next 3 sc, * ch 2, sc in ch-3 space, ch 2, dc in next 2 sc; repeat from * to last 4 sc; dc in next 3 sc, 2 dc in last sc. Fasten off.
Second Side
With right side facing, attach A in first st of beginning ch and work across remaining loops as follows:
Row 1 (Right Side): Ch 3, skip first st, dc in next st, * ch 2, skip next st, sc in next st, ch 2, skip next st, dc in next 2 sts; repeat from * across; turn.
Complete same as First Side.
Edging Row 1: With right side facing, skip edge of first Border, attach A at short end of First Side; ch 1, work 42 sc evenly across First and Second Side edge, leaving Second Border unworked, changing to B; turn
Row 2: Ch 3, dc in first sc, dc in next sc, [ch 2, skip next sc, sc in next sc, ch 2, skip next sc, dc in next 2 sc] 8 times, work one more dc in last sc changing to C; turn.
Rows 3-6: Repeat Border Rows 3-6. Fasten off. Repeat Edging on opposite short end.
Accents
Leaves (Make 8)
With C, ch 14; sc in 2nd ch from hook, * sc in next ch, hdc in next ch, dc in next ch, (tr, ch 3, slip st in top of tr, tr) all in next ch, dc in next ch, hdc in next ch, dc in next ch, (tr, ch 3, slip st in top of tr, tr) all in next ch, dc in next ch, hdc in next ch, sc in next 2 ch, ch 3 **, slip st in last sc made; working on opposite side of beginning ch, sc in next 2 sts, hdc in next st, dc in next st, (tr, ch 3, slip st in top of tr, tr) all in next st, dc in next st, hdc in next st, dc in next st, (tr, ch 3, slip st in top of tr, tr) all in next st, dc in next st, hdc in next st, sc in next 2 sts; slip st in first sc.
Fasten off leaving long end to sew leaf to runner.
Berry (Make 6)
With B, ch 2, 8 sc in 2nd ch from hook; join with a slip st in first sc.
Fasten off leaving long end to sew to runner.
Finishing
Sew corners of Border and Edge rows together. Sew groups of 4 leaves with 3 berries to runner as shown. With sewing thread and needle sew gold beads in middle of each berry.
Read NextRed Truck Christmas Ornament
Your Recently Viewed Projects
Thanks for your comment. Don't forget to share!
Delphine Bryant
Sep 25, 2018
This berry leaf table runner is really pretty. There way that this is made seems a little odd but I can comprehend the directions. I think the edging applied here really makes it that much more special. The holly leaves are a splendid touch.
Morehouse17
Aug 28, 2018
I went the the Red Heart site to order the materials to crochet this table runner. It appears that the Holiday yarns in aran and hunter green are no longer available. However, I think I will be able to find something that will work. I just think this is a lovey runner that will be able to be used the entire month of December.
alextlyn7
Nov 02, 2017
Love this table runner! And it fits my table perfectly. I made lovely Christmas place mats to match.
mulberrygalprinces s
Oct 09, 2017
This is gorgeous. I love table runners. I have a very pretty wood table and I dislike covering it with a table cloth. A runner works much better. This is going on my to do list right now. I think I may make matching place mats. Thank you for sharing this great project.
dljoyce 8589267
Aug 21, 2017
Red Heart has a free download that is much easier to read http//www.redheart.com/files/patterns/pdf/LW2622.p == df
AFC Editor Julia
Aug 21, 2017
Hi dljoyce, We've updated the formatting on this pattern to make it easier to read. :) Thanks! Julia, editor for AllFreeCrochet
Member 9545009
Aug 14, 2017
The edging is confusing to me too. My sister, an experienced crocheter can't figure it out either. We need help to finish.
Hippie Chick
Aug 08, 2017
This is a great design and a very pretty table runner. It could be used for so much more than just a table though. I could lay it across my fireplace or line my book shelf with these to get the room into a Christmas spirit. With the new sparkle yarns that I have seen debut this year already, they would add a little extra spirit to this.
JaneEK
Dec 23, 2016
This is such a pretty table runner, but Im actually going to use it on my mantle. Its festive enough to say Christmas, but plain enough that it wont conflict with my other projects and ornaments. Ive tried using fake snow blankets, but they just dont go with my other crocheted items. I love doing something I can pull out year after year, even if I change themes next Christmas.
Zeemer
Nov 25, 2016
I can imagine giving this as a present to a lady who lives in an old house with huge wooden dining tables and huge cabinets. This Berry Leaf Table Runner is perfect to give to that lady. I'm sure the lady of the house will appreciate the effort of making this customized table runner that will surely give life and color to a rather quiet and old house that has seen better days.
nicola1timms 57065 29
Oct 30, 2016
It sure is a pretty runner! Terribly confusing from 'Edging' in the instructions. I've read it ten times and I am a fairly experienced crocheter. One person writes that the corners of the edging have to be sewn together but I don't see it in the instructions. I have not begun the edging yet... just waiting for a lightbulb moment. I would certainly do the edging all around once the main colour is finished, and not in bits and pieces.
mulberrygalprinces s
Aug 24, 2016
This is a beautiful classic design. It really dresses up a holiday table. I have the dishes with the holly Berry design so this would be perfect to use with them. I am also thinking of making matching coasters or better yet, napkin rings. They would be oh so pretty on the plates. Thank you for sharing.
Furya
Sep 03, 2015
Also, why do you say to purchase 2 of the 1360 Aran w/Gold? I was perfectly able to do all the center with just one ball... Or are we supposed to double-up the Aran w/Gold, doing it with 2 strands, even though the pattern doesn't say it anywhere?
Furya
Sep 03, 2015
So, I LOVE this Table Runner, BUT... Can I ask why you just didn't do the reds and greens in the round, instead of finishing one side at a time, then sewing the corners together? It just seems much more complicated than doing it in the rounds...
sstio 3964115
Aug 22, 2016
I agree, this turned out great but there should be an easier way to work the edges--so many threads to deal with! I'm not savvy enough to figure it out so if anyone else sees a way to do this, I'd love to know. I also only used one skein of the white.
Report Inappropriate Comment
Are you sure you would like to report this comment? It will be flagged for our moderators to take action.
Thank you for taking the time to improve the content on our site.