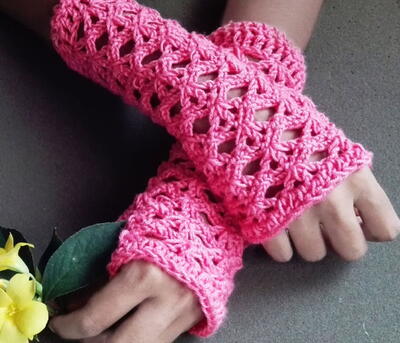
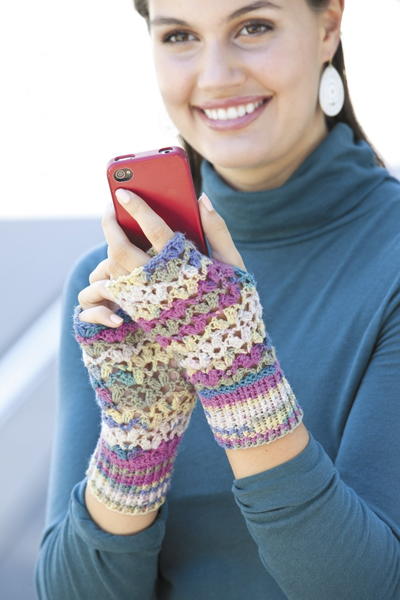
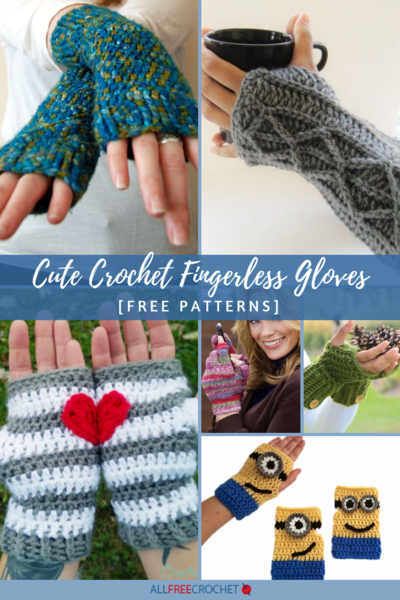
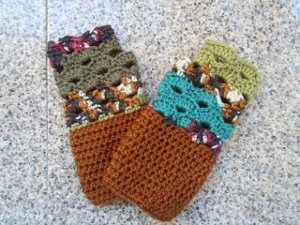
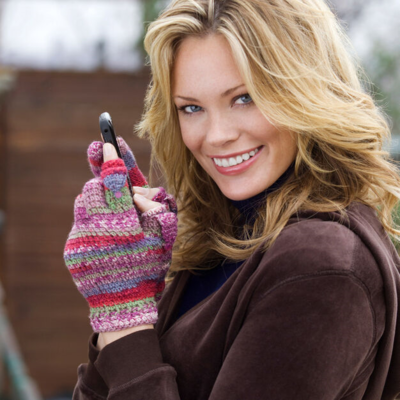
Striped Texting Gloves

Using Red Heart's variegated Berry Bliss yarn, you can easily get the beautiful look of these stylish Striped Texting Gloves. These fingerless crochet gloves are great for texting, typing at your keyboard or simply making a fashion statement. Everyone seems to have a smart phone these days, so this free crochet pattern would make an excellent gift idea for anyone on your holiday shopping list. Buttons add a nice finishing touch to this intermediate crochet pattern.

Crochet HookD/3 or 3.25 mm hook
Yarn Weight(1) Super Fine (27-32 stitches to 4 inches)
Materials:
- Red Heart® “Heart & Sole™”: 2 balls 3931 Berry Bliss
- Crochet Hook: 3.25mm [US D-4]
- Stitch markers
- Four ¼” buttons
- Yarn needle
GAUGE: 18 sts = 4”; 16 rows = 4” in pattern. CHECK YOUR GAUGE. Use any size hook to obtain the gauge.
Note: Index fingers and thumbs flip back and are buttoned open while using phone.
ABBREVIATIONS: ch = chain; dc = double crochet; mm = millimeters; rnd = round; sc = single crochet; st(s) = stitch(es); yo = yarn over; * or ** = repeat
SPECIAL ABBREVIATIONS:
Fsc (foundation single crochet) = First St: Ch 2, insert hook under top 2 strands of first ch, yo, draw up a loop, yo, draw through 1 loop, yo, draw through both loops (first fsc complete). Remaining sts: Insert hook under both loops of previous st, yo, draw up a loop, yo, draw through 1 loop, yo, draw through both loops.
Esc (extended single crochet) = Insert hook into the next st, yo and draw up a loop, yo and draw through 1 loop, yo and draw through both loops.
Esc2tog (extended single crochet two together) = Insert hook under front loop only of next 2 sts, yo and draw a loop through both sts, yo and draw through 1 loop, yo and draw through both loops.
Fpsc (front post single crochet) = Yo and insert hook from front to back and to front again around the vertical post of indicated st, Yarn-over and draw up a loop. (There are now 3 loops on your hook.) Yarn-over and draw through 2 loops on your hook. (There will be 2 loops left on the hook.) Yarn-over and draw through the last 2 loops on your hook.
Bpsc (back post single crochet) = Yo and insert hook from back to front and to back again around the vertical post of indicated st, Yarn-over and draw up a loop. (There are now 3 loops on your hook.) Yarn-over and draw through 2 loops on your hook. (There will be 2 loops left on the hook.) Yarn-over and draw through the last 2 loops on your hook.
Instructions:
Hand:
Foundation round: Fsc 30, join in a round with slip st.
Round 1: Ch 2, esc in each st around, join with slip st to the 2nd ch of ch-2
Round 2: Ch 2, fpsc in first st, bpsc in 2nd st, *fpsc in next st, bpsc in next st; repeat from * around, join with slip st to the 2nd ch of ch-2.
Rounds 3 & 4: Repeat Round 2.
Round 5: Ch 2, esc in each st around, join with slip st to the 2nd ch of ch-2 (30 sts).
Round 6: Ch 2, 2 esc in next st, esc in each st to last 2 sts, 2 esc in next st, esc in last st, join with slip st to the 2nd ch of ch-2 (32 sts).
Round 7: Repeat Round 5.
Round 8: Repeat Round 6 (34 sts).
Round 9: Repeat Round 5.
Round 10: Repeat Round 6 (36 sts).
Round 11: Repeat Round 5.
Round 12: Repeat Round 6 (38 sts).
Round 13: Repeat Round 5.
Round 14: Repeat Round 6 (40 sts).
Round 15: Repeat Round 5.
Round 16: Repeat Round 6 (42 sts).
Rounds 17 & 18: Repeat Round 5.
Round 19: Ch 2, esc in next 38 sts, esc into the post of the last esc made, place a marker in this st (counts as a ch-2) round complete.
Round 20: Skip the last 4 sts of the last round, esc into the 5th st of the round just finished (you just set aside sts for the thumb that will be worked later), esc in the next 33 sts, join the round with a slip st to the esc with the marker (34 sts).
Round 21: Ch 2, esc in each st around, join with slip st to the 2nd ch of ch-2 (34 sts).
Rounds 22, 24, 26: Repeat Round 21.
Round 23: Ch 2, 2 esc in next st, esc in each st to last 2 sts, 2 esc in next st, esc in last st, join with slip st to the 2nd ch of ch-2 (36 sts).
Round 25: Ch 2, 2 esc in next st, esc in each st to last 2 sts, 2 esc in next st, esc in last st, join with slip st to the 2nd ch of ch-2 (38 sts).
Round 27: Ch 2, esc in next 15 sts, skip 8 sts, esc in last 15 sts, join with slip st to the 2nd ch of ch-2 (you just set aside the sts for the pinkie that will be worked later) (30 sts).
Round 28: Ch 2, esc in next 10 sts, skip 10 sts, esc in last 10 sts, join with slip st to the 2nd ch of ch-2 (you just set aside the sts for the ring finger that will be worked later) (20 sts).
Round 29: Ch 2, esc in next 5 sts, [esc into the post of the last st] twice, skip 10 sts, esc in last 5 sts, join with slip st to the 2nd ch of ch-2 (you just set aside the sts for the middle finger that will be worked later) (12 sts).
Index Finger:
Round 30: Ch 2, esc in each st around, join with slip st to the 2nd ch of ch-2 (12 sts).
Rounds 31-37: Repeat Round 30.
FOR THE RIGHT HAND:
Round 38: Ch 2, esc in next 6 sts, esc through the back loop only of next 6 sts (across back of hand), join with slip st to the 2nd ch of ch-2 (12 sts).
FOR THE LEFT HAND:
Round 38: Ch 2, esc through the back loop only of next 6 sts (across back of hand), esc in next 6 sts, join with slip st to the 2nd ch of ch-2 (12 sts).
FOR BOTH HANDS:
Round 39: Ch 2, esc in each st around, join with slip st to the 2nd ch of ch-2, fasten off and weave in ends.
Fingertip:
Round 1: Join yarn to front loop of the first esc that was worked through the back loop only in Round 38, ch 2 and esc through the same front loop, esc through the front loop only of the next 5 sts, [work esc in the post of the last st] 6 times, being careful not to twist, join with slip st to the 2nd ch of ch-2 (12 sts).
Rounds 2, 3, 4: Ch 2, esc in each st around, join with slip st to the 2nd ch of ch-2 (12 sts).
Round 5: Ch 2, [esc2tog] 6 times, join with slip st to the 2nd ch of ch-2, ch 4, slip st in joined st (this creates button loop). Fasten off, weave tail through the top of all sts and tighten to close, weave in ends.
Middle Finger:
Round 1: Join yarn between 2 sts at the base of the index finger facing the middle finger, ch 2, esc in the 5th st of Round 28 (same as the base of the index finger), esc in next 10 sts, esc in the 15th st of Round 28 (again, same as the base of the index finger), join with slip st to the 2nd ch of ch-2 (12 sts).
Rounds 2-13: Ch 2, esc in each st around, join with slip st to the 2nd ch of ch-2 (12 sts).
Round 14: Ch 2, [esc2tog] 6 times, join with slip st to the 2nd ch of ch-2. Fasten off, weave tail through the top of all sts and tighten to close, weave in ends.
Ring Finger:
Round 1: Join yarn through the posts of both sts at the base of the middle finger, facing the ring finger, ch 2, esc in the 10th st of Round 27 (same as the base of the middle finger), esc in next 10 sts, esc in the 21st st of Round 27 (again, same as the base of the middle finger), join with slip st to the 2nd ch of ch-2 (12 sts).
Rounds 2-12: Ch 2, esc in each st around, join with slip st to the 2nd ch of ch-2 (12 sts).
Round 13: Ch 2, [esc2tog] 6 times, join with slip st to the 2nd ch of ch-2. Fasten off, weave tail through the top of all sts and tighten to close, weave in ends.
Pinkie:
Round 1: Join yarn through the posts of both sts at the base of the ring finger, facing the pinkie finger, ch 2, esc in the 15th st of Round 26 (same as the base of the ring finger), esc in next 8 sts, esc in the 24th st of Round 26 (again, same as the base of the ring finger), join with slip st to the 2nd ch of ch-2 (10 sts).
Rounds 2-8: Ch 2, esc in each st around, join with slip st to the 2nd ch of ch-2 (10 sts).
Round 9: Ch 2, [esc2tog] 5 times, join with slip st to the 2nd ch of ch-2. Fasten off, weave tail through the top of all sts and tighten to close, weave in ends.
There may be small gaps at the base of the fingers; use yarn tails to weave closed.
Thumb:
Round 1: This round of the thumb was begun in Round 20 of the hand (ch 2 and 4 esc already exist). Join yarn to the 5th st of Round 20, ch 2 (this counts as an esc), 2 esc in the 38th st of Round 19, esc in the next 3 sts, 2 esc in last st, join with slip st to the 2nd ch of ch-2 (12 sts).
Rounds 2-6: Ch 2, esc in each st around, join with slip st to the 2nd ch of ch-2 (12 sts).
FOR THE RIGHT HAND:
Round 7: Ch 2, esc in next 6 sts, esc through the back loop only of next 6 sts, join with slip st to the 2nd ch of ch-2 (12 sts).
FOR THE LEFT HAND:
Round 7: Ch 2, esc through the back loop only of next 6 sts, esc in next 6 sts, join with slip st to the 2nd ch of ch-2 (12 sts).
FOR BOTH HANDS:
Round 8: Ch 2, esc in each st around, join with slip st to the 2nd ch of ch-2, fasten off and weave in ends.
Thumb Tip:
Round 1: Join yarn to the front loop of the first esc that was worked through the back loop only in Round 7, ch 2 and esc through the same front loop, esc through the front loop only of the next 5 sts, [work esc in the post of the last st] 6 times, being careful not to twist, join with slip st to the 2nd ch of ch-2 (12 sts).
Rounds 2-4: Ch 2, esc in each st around, join with slip st to the 2nd ch of ch-2 (12 sts).
Round 5: Ch 2, [esc2tog] 6 times, join with slip st to the 2nd ch of ch-2, ch 4, slip st in joined st (buttonhole made).
Fasten off, weave tail through the top of all sts and tighten to close. Weave in ends.
FINISHING:
Lay the index finger and thumb tips back against hand and mark the st that lies underneath the buttonhole loop at the tip; sew buttons at these points.
Read NextEighties Fishnet Gloves
Your Recently Viewed Projects
Thanks for your comment. Don't forget to share!
Stephanie Hantz
Jan 26, 2017
I made this pattern, but changed it a little bit. When I get my nails done, I have to put my hands under the UV light to dry the gel. Well, it turns out that I am allergic to the UV light and it causes little skin cancers to pop up. So I made this pattern without ANY fingers. It works great! I even use them when I am driving!
andrealuxton 00859 53
Dec 03, 2016
I LOVE these gloves. My niece has married into a Scottish family and has lots of Scottish friends. I aim to make a pair of these for everyone in the colours of their traditional clan tartan! Cannot wait to see how they all turn out. It gets very cold in the Highlands in winter and I think these gloves will be a huge hit.
Zeemer
Nov 20, 2016
I think these gloves were designed specifically for texting. Before texting became the order of the day, gloves had fingers then came the fingerless gloves which became very popular and in fact became a fashion statement. Then all sorts of designs, color schemes came out for the fingerless gloves. One good thing about crochet is that you can do a lot of things in so many ways that you cannot do with simply sewing a piece of cloth into a piece of clothing or accessory. Thanks to the designers of crochet fingerless gloves. Nothing compares to their beauty. Any fashionista would love to have several pairs of these accessories.
Scrappers
Oct 21, 2013
I would like to make these gloves for my granddaughter, but while reading the pattern I'm confused about what is the correct stitch for the bpsc/fpsc. It sounds like a bpdc/fpdc description but is called bpsc/fpsc. Is it supposed to be sc or dc?
Patches1958
Sep 28, 2012
I think this pattern is fantastic but I am looking for a pattern for one simular to this for a man. Anyone out there can help i would be grateful
Report Inappropriate Comment
Are you sure you would like to report this comment? It will be flagged for our moderators to take action.
Thank you for taking the time to improve the content on our site.