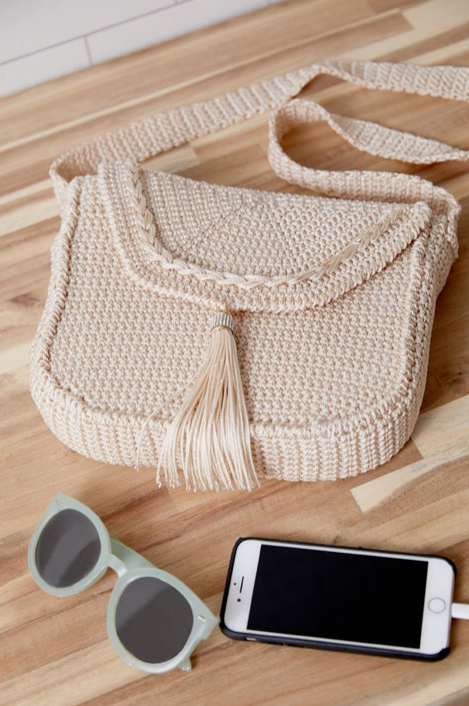
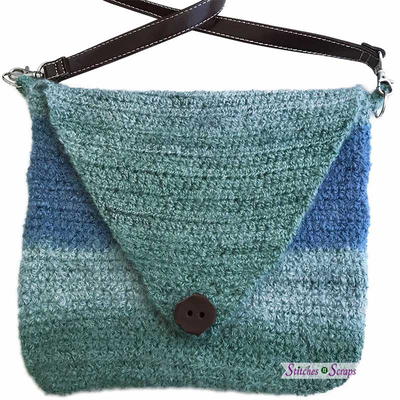
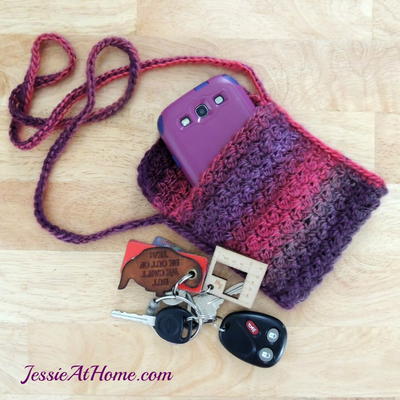
Crochet Cross Body Bag

Do you ever spot a chic crochet bag in a shop and think you can make it yourself? This pattern will help you create your own stylish cross body bag that is just as cute and functional as options you see in stores. You may have thought handmade crochet bags were all casual and stretchy, but this sturdy Crochet Cross Body Bag is an elegant take on a crochet purse pattern. This crossbody bag is crocheted using nylon for extra durability, and the optional jeweled tassel cap adds an extra touch of glamour.

Crochet HookF/5 or 3.75 mm hook
Yarn Weight(0) Lace (33-40 stitches to 4 inches). Includes crochet thread.
Crochet Gauge17 sts = 4" [10 cm]; 20 rows = 4" [10 cm] in single crochet (sc). CHECK YOUR GAUGE. Use any size hook to obtain the gauge.
Finished SizeBag measures about 10" [25.5 cm] wide, 9" [23 cm] high and 2½" [6.5 cm] deep, not including strap.
Materials List
- RED HEART® Crochet Nylon™, 100% Nylon Size 18: 4 tubes 16 Natural
- Crochet Hook: 3.75mm [US F-5]
- Susan Bates® Knit Clips™ (10 pack)
- Clear nail polish
- 10–11" [25.5–28 cm] piece of heavy cardboard or a thin book (for making tassel)
- Yarn Needle
- Optional: Decorative tassel cap and super glue, lining and stiffening materials such as craft felt, fabric, interfacing, and/or plastic canvas.
NOTES
- Bag is made in 5 pieces: Front, back, "sides" panel, flap and strap.
- All pieces are worked separately then crocheted together with reverse single crochet.
- The flap is embellished with a thick surface slip stitch curve and a tassel.
- Use a drop of clear nail polish or super glue on all cut ends of nylon to ensure that weaved-in ends are secured.
- A lining is suggested but not mandatory. Craft felt makes an easy-to-use, non-fraying alternative to traditional lining materials. Plastic canvas, especially placed inside the bag’s bottom section, serves as support for the bag.
- Decorative tassel caps can be found in the notions section of fabric and craft stores. Many purchased faux-leather tassels at local discount stores are constructed without glue. Try pulling out the faux-leather part and reusing the tassel cap.
- reverse sc (reverse single crochet) = Work single crochet in opposite direction from which you would usually work (left to right if you are righthanded, and right to left if you are lefthanded). This stitch is also known as crab stitch. It creates a rope-like twisted single crochet edging.
- sc2tog (single crochet 2 stitches together) = [Insert hook in next stitch, yarn over and pull up a loop] twice, yarn over and draw through all 3 loops on hook.
SPECIAL TECHNIQUES
- Adjustable-ring = Wrap yarn into a ring, ensuring that the tail falls behind the working yarn. Grip ring and tail between middle finger and thumb. Insert hook through center of ring, yarn over (with working yarn) and draw up a loop. Work stitches of first round in the ring. After the first round of stitches is worked, pull gently on tail to tighten ring.
- surface slip stitch = Make a slip knot and hold it on wrong side of piece, insert hook from right side to wrong side in space between stitches, place slip knot on hook and draw up loop (stretching the loop to about ½" [1.5 cm] long), *insert hook from right side to wrong side in next space, yarn over and draw loop through crochet fabric and through loop on hook; repeat from * as desired. To finish last surface slip stitch, on right side of piece, remove loop from hook, insert hook from wrong side to right side in next space, return loop to hook and draw it to the wrong side. Cut nylon, draw end through loop and pull to tighten. Weave in end securely.
ch = chain; sc = single crochet; st(s) = stitch(es); [ ] = work directions in brackets the number of times specified.
FRONT
- Beginning at top edge, ch 41.
- Row 1: Sc in 2nd ch from hook and in each remaining ch across—40 sc.
- Rows 2–34: Ch 1, turn, sc in each st across.
- Shape Lower Section
- Rows 35–42: Ch 1, turn, sc2tog, sc in each st to last 2 sts, sc2tog—24 sc remain in Row 42.
- Fasten off.
BACK
Make same as front.
FLAP
Beginning at center of top edge, make an adjustable ring. Work back and forth in rows (not rounds).
- Row 1: Ch 1, 3 sc in ring.
- Row 2: Ch 1, turn, 2 sc in each st across—6 sc.
- Row 3: Ch 1, turn, 2 sc in first st, sc in next st, [2 sc in next st, sc in next st] twice—9 sc.
- Row 4: Ch 1, turn, 2 sc in first st, sc in next 2 sts, [2 sc in next st, sc in next 2 sts] twice—12 sc.
- Row 5: Ch 1, turn, 2 sc in first st, sc in next 3 sts, [2 sc in next st, sc in next 3 sts] twice—15 sc.
- Row 6: Ch 1, turn, 2 sc in first st, sc in next 4 sts, [2 sc in next st, sc in next 4 sts] twice—18 sc.
- Row 7: Ch 1, turn, 2 sc in first st, sc in next 5 sts, [2 sc in next st, sc in next 5 sts] twice—21 sc.
- Row 8: Ch 1, turn, 2 sc in first st, sc in next 6 sts, [2 sc in next st, sc in next 6 sts] twice—24 sc.
- Row 9: Ch 1, turn, 2 sc in first st, sc in next 7 sts, [2 sc in next st, sc in next 7 sts] twice—27 sc.
- Row 10: Ch 1, turn, 2 sc in first st, sc in next 8 sts, [2 sc in next st, sc in next 8 sts] twice—30 sc.
- Row 11: Ch 1, turn, 2 sc in first st, sc in next 9 sts, [2 sc in next st, sc in next 9 sts] twice—33 sc.
- Row 12: Ch 1, turn, 2 sc in first st, sc in next 10 sts, [2 sc in next st, sc in next 10 sts] twice—36 sc.
- Row 13: Ch 1, turn, 2 sc in first st, sc in next 11 sts, [2 sc in next st, sc in next 11 sts] twice—39 sc.
- Row 14: Ch 1, turn, 2 sc in first st, sc in next 12 sts, [2 sc in next st, sc in next 12 sts] twice—42 sc.
- Row 15: Ch 1, turn, 2 sc in first st, sc in next 13 sts, [2 sc in next st, sc in next 13 sts] twice—45 sc.
- Row 16: Ch 1, turn, 2 sc in first st, sc in next 14 sts, [2 sc in next st, sc in next 14 sts] twice—48 sc.
- Row 17: Ch 1, turn, 2 sc in first st, sc in next 15 sts, [2 sc in next st, sc in next 15 sts] twice—51 sc.
- Row 18: Ch 1, turn, 2 sc in first st, sc in next 16 sts, [2 sc in next st, sc in next 16 sts] twice—54 sc.
- Row 19: Ch 1, turn, 2 sc in first st, sc in next 17 sts, [2 sc in next st, sc in next 17 sts] twice—57 sc.
- Row 20: Ch 1, turn, 2 sc in first st, sc in next 18 sts, [2 sc in next st, sc in next 18 sts] twice—60 sc.
- Row 21: Ch 1, turn, 2 sc in first st, sc in next 19 sts, [2 sc in next st, sc in next 19 sts] twice—63 sc.
- Row 1: Ch 1, do not turn, working in ends of rows, draw up a loop in end of next 2 rows, yarn over and draw through all 3 loops on hook (sc2tog made), sc in end of next 18 rows, draw up a loop in end of next row, draw up a loop in center adjustable ring, yarn over and draw through all 3 loops on hook (sc2tog made), sc in end of next 19 rows, sc2tog (working in ends of last 2 rows)—40 sc.
- Rows 2–8: Ch 1, turn, sc in each st across
Connect Flap to Back
- Hold flap and back with wrong sides (insides) together and stitches of top edges matching. Use Knit Klips™ to hold the pieces together.
- With right side of flap facing you and working through both thicknesses, reverse sc in each st across top edges to connect flap to back; continuing around remaining edges of front, reverse sc evenly spaced along curved edges of flap.
- Fasten off.
"SIDES" PANEL
- Ch 12.
- Row 1: Sc in 2nd ch from hook and in each remaining ch across—11 sc.
- Rows 2–112: Ch 1, turn, sc in each st across.
- Do not fasten off.
- Measure the "sides" panel to ensure it will fit correctly around the side and lower edges of the back. Work additional rows or unravel rows if necessary.
- Place back on flat surface with wrong side (inside) facing up. Beginning at one top corner and ending at other top corner of back, arrange one long edge of "sides" panel along sides and lower edges of back, use Knit Klips™ evenly spaced to hold the pieces together.
- Working from the right side (outside) and working through both thicknesses, join yarn at one corner and work reverse sc evenly spaced all the way along the edges to join "sides" panel to back.
- Place front on flat surface with wrong side (inside) facing up. Arrange remaining long edge of "sides" panel around sides and lower edges of front, use Knit Klips™ evenly spaced to hold the pieces together.
- Working from the right side (outside) and working through both thicknesses, join yarn at one corner and work reverse sc evenly spaced all the way along the edges to join "sides" panel to front.
FINISHING
Surface Slip Stitch Line
Holding 3 strands of nylon together and beginning and ending at top edge of flap, work a surface slip stitch curve along the spaces between stitches of Row 17.
Tassel
Using 10–11" [25.5–28 cm] piece of heavy cardboard or a thin book, wrap nylon thread around the cardboard (or book) 25 times. Cut a 12" [30.5 cm] piece of nylon thread for tying tassel top. Thread the 12" [30.5 cm] piece under one end of the wraps and tie a strong knot. Place a few drops of super glue in the tassel cap and quickly insert the tassel top section into the cap. Once dried, trim the tassel to create a clean edge. Follow instructions on tassel cap package to attach tassel to bag flap.
Lining (Optional)
Line the bag if desired. Refer to the Notes on suggested methods and materials. Weave in any remaining ends.
Read NextEdgewater