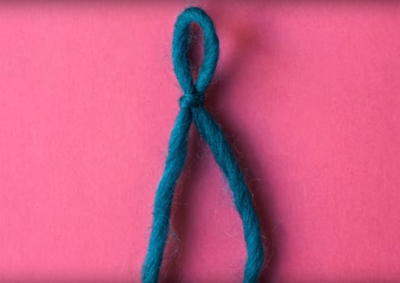
How to Make a Slip Knot

The first step in beginning your crochet pattern, after choosing your yarn and hook size, is by making a slip knot. This is the starting loop you will be working your chains or foundation chains from. It's your starting point for all projects, and it's a resizeable loop so that you can use it with any hook size or yarn weight you have.

Instructions
-
Unwind your skein a little and grab your yarn tail (that you'll be working from) in your hand.
-
Lay your yarn across your nondominant hand and secure the tail with your thumb, ring finger and pinky.
-
Wrap the working end (the end that connects to the yarn ball) around your pointer and middle finger.
-
Bring your working tail down between your middle and ring fingers and secure it with your thumb, ring finger and pinky.
-
Insert your hook through middle and hook the far strand, bringing it through. Then drop your pointer and middle finger.
-
Tighten the yarn a bit and drop everything else. Now you can hold the knot and pull the tail to test it out. You can easily adjust the size by tugging on the tail or the loop itself!
Your Recently Viewed Projects
Thanks for your comment. Don't forget to share!
sdsavio 7243649
Nov 22, 2013
In trying to make this, I find both beginning and ending of article curl. I can not understand what I am doing wrong. I do not see how the chain stitch row is turned. It does not show on the video, but the second row does show.
haandren 5204382
Jan 11, 2013
I think the beginning tutorial was very helpful. It's been many years since I picked up a crochet hook and would like to try again. Thank you!
sherryg9218
Jan 09, 2013
The tutorial on the slip knot was very easy to understand. I'm not sure as to what I did wrong when at one end, it was not even. Somehow I must have dropped a stitch. It has been many years since I have crochet & it will take a bit for me to pick it back up & learn new things. But I am enjoying it.
ambray8508 1446773
Jul 30, 2012
i don't have any speakers to hear what she is saying. but my aunt who recently passed away taught me the basic stitch. all i know is the basic chain, and rows.
chiggypig
Feb 22, 2012
Awesome. was reading a book and just not getting it, but, after watching how to crochet-part 1, not only did it teach me a basic stitch, but, i could see how the stitch formed the patern. thank you so much :)
carol in sc
Feb 01, 2012
Excellent video. What was confusing for me now seems much easier to understand. I hope the other tutorials are this good!
hillman 5866290
Jan 21, 2012
Good video but I do not like the opening instructions of "put the hook in your right hand whether you are left or right handed". As a lefty crocheter I have always held the hook in my left hand and think I would be at a strong disadvantage to do it the other way. I've just always reversed everything as if watching in a mirror. She did instruct clearly and I found a few areas of uncertainty that she cleared up well esp. in the 2nd video.
mypetchann01 03478 80
Jan 06, 2012
Finally, instructions simple enough for me, a beginner, to understand...
tbhess 6982338
Jan 18, 2011
Do you crochet in the first and last spacce available on the row or do you skip either or both??
shazleeshazlee 647 6624
Nov 20, 2010
i am a beginer i make three crochet hats and some flower. now i want to make a sweater(front open) or you say top for my sister.if you give me the design for beginer i shell thankfull to you
Report Inappropriate Comment
Are you sure you would like to report this comment? It will be flagged for our moderators to take action.
Thank you for taking the time to improve the content on our site.