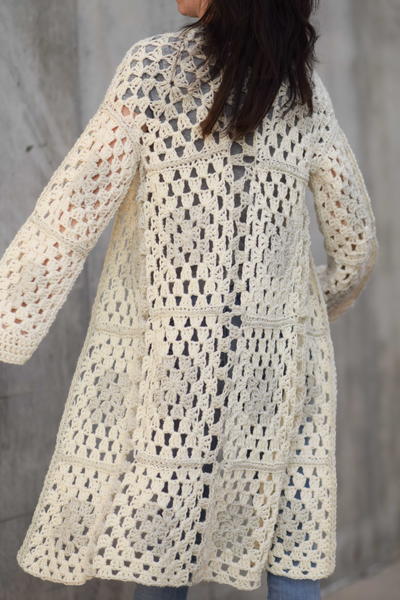
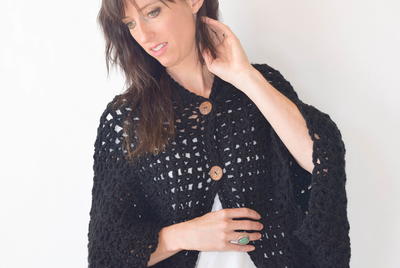
Curvy Girl Cable Crochet Cardigan

Feel comfortable in your own skin even when it's cold outside with the Curvy Girl Cable Crochet Cardigan. We think everyone, no matter your size, is absolutely beautiful, so celebrate that with this lovely crochet sweater. You'll be super cozy in this worsted weight masterpiece of a cardigan. Layer it over a long-sleeved shirt and under a jacket to be extra warm this winter. It would be great for throwing over things in the fall as well, especially if you like to sit outside at night when the breeze is blowing autumn leaves around.
NotesPattern Notes:
1. Cardigan is made in 5 pieces: Back, 2 Fronts, and 2 Sleeves. Each piece is worked from beg at the lower edge.
2. The Back is worked in Post St Lines pattern. Fronts are worked in Post St Lines pattern, with the front bands worked in Cable pattern.
3. Each Sleeve begins with a band worked in Cable pattern, then sts for the Sleeve are worked along one long edge of the Cable band.
4. This pattern includes some crocheter's lingo. When you see '– 12 sts' at the end of a sentence, this is the number of sts you will have after working that row.
5. When the pattern says to 'work even' this means that you continue in the specified st or pattern and keep the number of sts the same – without increasing or decreasing.
6. When the pattern says to work in Post St Lines pattern "as established," work a double crochet in each dc and a post st around each post st, working front post sts (FPDC) on RS rows and back post sts (BPDC) on WS rows.
7. Our pattern includes diagrams to help you visualize how the Cardigan is made and put together. Take the time to review the diagrams before you start crocheting. The Cardigan is easy to make, but having the big picture will make it even easier

Crochet HookJ/10 or 6 mm hook
Yarn Weight(4) Medium Weight/Worsted Weight and Aran (16-20 stitches to 4 inches)
Crochet Gauge11 1/2 dc + 7 1/2 rows = about 4 in. (10 cm). 9 sts = about 2 1/4 in. (5.5 cm) in Cable pattern.
Finished SizeCurvy Girl 1 (2, 3, 4) Finished Bust 46 (51, 55, 58) in. (117 (129.5, 139.5, 147.5) cm) Finished Hips 56 (62, 66, 70) in. (142 (157.5, 167.5, 178) cm) Finished Length 32 1/2 (33 1/2, 34 1/2, 34 1/2) in. (82.5 (85, 87.5, 87.5) cm)
Materials List
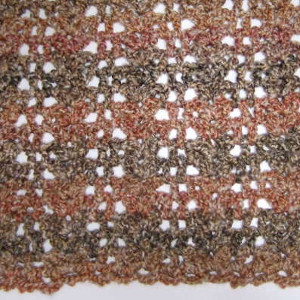
- 136-350 Lion Brand® Heartland Yarn: Mount Rainier Tweed - 8 balls
- Lion Brand Crochet Hook - Size J-10 (6 mm)
- Lion Brand Large-Eye Blunt Needles (Set of 6)
Special Stitches
-
Post Stitch Lines Pattern
Row 1 (RS): Ch 3 (counts as first dc), turn, dc in each st to first post st, *FPDC around post, dc in each st to next post st; rep from * to last post st, FPDC around last post st, dc in each st to end of row.
Row 2: Ch 3 (counts as first dc), turn, dc in each st to first post st, *BPDC around post, dc in each st to next post st; rep from * to last post st, BPDC around last post st, dc in each st to end of row.
Rep Rows 1 and 2 for Post St Lines pattern. -
Cable Pattern (worked over 9 sts)
Row 1 (RS): Skip next 3 sts, FPTR around each of next 3 sts; working behind the 3 sts just made, FPTR around each of the 3 skipped sts, FPDC around each of next 3 sts.
Row 2: BPTR around each of next 9 sts.
Row 3: FPDC around each of next 3 sts, skip next 3 sts, FPTR around each of next 3 sts; working in front of the 3 sts just made, FPTR around each of the 3 skipped sts.
Row 4: Rep Row 2.
Rep Rows 1-4 for Cable pattern.
Pattern
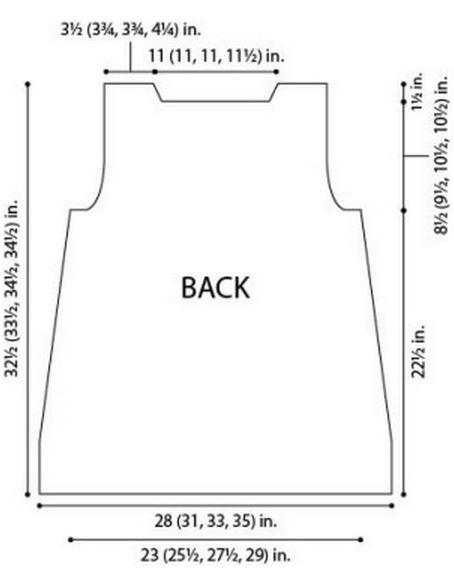
BACK
Ch 82 (90, 96, 102).
Row 1 (RS): Hdc in 3rd ch from hook (2 skipped ch count as first hdc) and in each ch across – you will have 81 (89, 95, 101) hdc.
Row 2: Ch 3 (counts as first dc in this row and all following rows), turn, dc in first 9 (8, 11, 9) sts, BPDC around next st, *dc in next 9 sts, BPDC around next st; rep from * to last 10 (9, 12, 10) sts, dc in each st to end of row – 74 (81, 87, 92) dc and 7 (8, 8, 9) post sts.
Rows 3-10: Beg with Row 1 of pattern, work in Post St Lines pattern for 8 rows.
Row 11 (Decrease Row – RS): Ch 3, turn, dc2tog, dc in each st to next post st, *FPDC around post st, dc in each st to next post st; rep from * to last post st, FPDC around last post st, dc in each st to last 3 sts, dc2tog, dc in last st – 72 (79, 85, 90) dc and 7 (8, 8, 9) post sts.
Rows 12-18: Beg with Row 2 of pattern, work in Post St Lines pattern for 7 rows.
Row 19: Rep Row 11 – 70 (77, 83, 88) dc and 7 (8, 8, 9) post sts.
Rows 20-35: Rep Rows 12-19 twice – 66 (73, 79, 84) dc and 7 (8, 8, 9) post sts.
Rows 36-42: Beg with Row 2 of pattern, work in Post St Lines pattern for 7 rows.
Shape Armholes
Row 1 (RS): Ch 1, turn, sl st in next 5 (6, 7, 8) sts, ch 3 (counts as dc), dc2tog, work in Post St Lines pattern as established to last 8 (9, 10, 11) sts, dc2tog, dc in next st; leave rem 5 (6, 7, 8) sts unworked – 61 (67, 71, 75) total sts.
Decrease Rows 2-5 (7, 9, 9): Ch 3, turn, dc2tog, work in Post St Lines pattern as established to last 3 sts, dc2tog, dc in last st – 53 (55, 55, 59) sts at the end of Row 5 (7, 9, 9).
Next Row: Work Row 2 of Post St Lines pattern.
Next Row: Rep Decrease Row 2 – 51 (53, 53, 57) sts.
Next 9 Rows: Beg with Row 2 of pattern, work in Post St Lines pattern for 9 rows.
Shape Right Shoulder
Row 1 (RS): Work in Post St Lines pattern as established over first 10 (11, 11, 12) sts, dc2tog, dc in next st; leave rem sts unworked – 12 (13, 13, 14) sts.
Row 2: Ch 3, turn, dc2tog, work in Post St Lines pattern as established to end of row – 11 (12, 12, 13) sts.
Row 3: Work in Post St Lines pattern as established to last 3 sts, dc2tog, dc in last st – 10 (11, 11, 12) sts.
Fasten off.
Shape Left Shoulder
From RS, sk 25 (25, 25, 27) unworked sts following right shoulder, join yarn with a sl st in next st.
Row 1 (RS): Ch 3, dc2tog, work in Post St Lines pattern as established to end of row – 12 (13, 13, 14) sts.
Row 2: Ch 3, turn, work in Post St Lines pattern as established to last 3 sts, dc2tog, dc in last st – 11 (12, 12, 13) sts.
Row 3: Ch 3, turn, dc2tog, work in Post St Lines pattern as established to end of row – 10 (11, 11, 12) sts.
Fasten off.
LEFT FRONT
Ch 47 (50, 53, 56).
Row 1 (RS): Hdc in 3rd ch from hook (2 skipped ch count as first hdc) and in each ch across – 46 (49, 52, 55) dc.
Row 2: Ch 3 (counts as first dc in this row and all following rows), turn, work Row 2 of Cable pattern over next 9 sts, (dc in next 9 sts, BPDC around next st) 3 times, dc in each st to end of row.
Row 3: Work in Post St Lines pattern as established to last 10 sts, work next row of Cable pattern over next 9 sts, dc in last st.
Row 4: Ch 3, turn, work next row of Cable pattern over next 9 sts, work in Post St Lines pattern as established to end of row.
Rows 5-38 (40, 40, 40): Rep last 2 rows 17 (18, 18, 18) times.
Shape Neck
Row 1 (RS): Work in Post St Lines pattern as established to last 12 sts, dc2tog, work next row of Cable pattern to last st, dc in last st – 45 (48, 51, 54) sts.
Row 2: Ch 3, turn, work next row of Cable pattern over next 9 sts, dc2tog, work in Post St Lines pattern as established to end of row – 44 (47, 50, 53) sts.
Rep last 2 rows 1 (0, 0, 0) time(s) – 42 (47, 50, 53) sts.
Note: When you see '0' repeats, this means that you should not perform that particular instruction, just skip to the next part of the instruction.
Shape Armhole and Continue Shaping Neck
Row 1 (RS): Ch 1, turn, sl st in first 5 (6, 7, 8) sts, ch 3 (counts as dc), dc2tog, work in Post St Lines pattern as established to last 12 sts, dc2tog, work next row of Cable pattern to last st, dc in last st – 35 (39, 41, 43) sts.
Row 2: Ch 3, turn, work next row of Cable pattern over next 9 sts, dc2tog, work in Post St Lines pattern as established to last 3 sts, dc2tog, dc in last st – 33 (37, 39, 41) sts.
Row 3: Ch 3, turn, dc2tog, work in Post St Lines pattern as established to last 12 sts, dc2tog, work next row of Cable pattern to last st, dc in last st – 31 (35, 37, 39) sts.
Rep last 2 rows 1 (2, 3, 3) time(s) – 27 (27, 25, 27) sts.
Next Row (WS): Ch 3, turn, work next row of Cable pattern over next 9 sts, work in Post St Lines pattern as established to end of row.
Next Row: Ch 3, turn, dc2tog, work in Post St Lines pattern as established to last 12 sts, dc2tog, work next row of Cable pattern to last st, dc in last st – 25 (25, 23, 25) sts.
Next Row: Ch 3, turn, work next row of Cable pattern over next 9 sts, work in Post St Lines pattern as established to end of row.
Note: Armhole shaping is now complete.
Complete Neck Shaping
Row 1 (RS): Work in Post St Lines pattern as established to last 12 sts, dc2tog, work next row of Cable pattern to last st, dc in last st – 24 (24, 22, 24) sts.
Row 2: Ch 3, turn, work next row of Cable pattern over next 9 sts, work in Post St Lines pattern as established to end of row.
Rep last 2 rows 3 (2, 0, 1) times(s) – 21 (22, 22, 23) sts.
Next Row (RS): Work in Post St Lines pattern as established to last 10 sts, work next row of Cable pattern to last st, dc in last st.
Next Row: Ch 3, turn, work next row of Cable pattern over next 9 sts, work in Post St Lines pattern to end of row.
Rep last 2 rows until piece measures same as Back, end with a RS row as the last row you work.
Neckband
Row 1 (WS): Ch 3, turn, work next row of Cable pattern over next 9 sts, dc in next st; leave rem 10 (11, 11, 12) sts unworked for shoulder.
Row 2: Ch 3, turn, work next row of Cable pattern over next 9 sts, dc in last st.
Rep Row 2 until neckband measures about 5 1/2 (5 1/2, 5 1/2, 5 3/4) in. (14 (14, 14, 14.5) cm).
Fasten off.
RIGHT FRONT
Ch 47 (50, 53, 56).
Row 1 (RS): Hdc in 3rd ch from hook (2 skipped ch count as first hdc) and in each ch across – at the end of this row you will have 46 (49, 52, 55) dc.
Row 2: Ch 3 (counts as first dc in this row and all following rows), turn, dc in next 5 (8, 11, 14) sts, (BPDC around next st, dc in next 9 sts) 3 times, work Row 2 of Cable pattern over next 9 sts, dc in last st.
Row 3: Ch 3, turn, work next row of Cable pattern over next 9 sts, work in Post St Lines pattern as established to end of row.
Row 4: Work in Post St Lines pattern as established to last 10 sts, work next row of Cable pattern over next 9 sts, dc in last st.
Rows 5-38 (40, 40, 40): Rep last 2 rows 17 (18, 18, 18) times.
Shape Neck
Row 1 (RS): Ch 3, turn, work next row of Cable pattern over next 9 sts, dc2tog, work in Post St Lines pattern as established to end of row – 45 (48, 51, 54) sts.
Row 2: Work in Post St Lines pattern as established to last 12 sts, dc2tog, work next row of Cable pattern to last st, dc in last st – 44 (47, 50, 53) sts.
Rep last 2 rows 1 (0, 0, 0) time(s) – 42 (47, 50, 53) sts.
Shape Armhole and Continue Shaping Neck
Row 1 (RS): Ch 3, turn, work next row of Cable pattern over next 9 sts, dc2tog, work in Post St Lines pattern as established to last 8 (9, 10, 11) sts, dc2tog, dc in next st; leave rem 5 (6, 7, 8) sts unworked – 35 (39, 41, 43) sts.
Row 2: Ch 3, turn, dc2tog, work in Post St Lines pattern as established to last 12 sts, dc2tog, work next row of Cable pattern to last st, dc in last st – 33 (37, 39, 41) sts.
Row 3: Ch 3, turn, work next row of Cable pattern over next 9 sts, dc2tog, work in Post St Lines pattern as established to last 3 sts, dc2tog, dc in last st – 31 (35, 37, 39) sts.
Rep last 2 rows 1 (2, 3, 3) time(s) – 27 (27, 25, 27) sts.
Next Row (WS): Work in Post St Lines pattern as established to last 10 sts, work next row of Cable pattern to last st, dc in last st.
Next Row: Ch 3, turn, work next row of Cable pattern over next 9 sts, dc2tog, work in Post St Lines pattern as established to last 3 sts, dc2tog, dc in last st – 25 (25, 23, 25) sts.
Next Row: Work in Post St Lines pattern as established to last 10 sts, work next row of Cable pattern to last st, dc in last st.
Note: Armhole shaping is now complete.
Complete Neck Shaping
Row 1 (RS): Ch 3, turn, work next row of Cable pattern over next 9 sts, dc2tog, work in Post St Lines pattern as established to end of row – 24 (24, 22, 24) sts.
Row 2: Work in Post St Lines pattern as established to last 10 sts, work next row of Cable pattern to last st, dc in last st.
Rep last 2 rows 3 (2, 0, 1) time(s) – 21 (22, 22, 23) sts.
Next Row (RS): Ch 3, turn, work next row of Cable pattern over next 9 sts, work in Post St Lines pattern as established to end of row.
Next Row: Work in Post St Lines pattern as established to last 10 sts, work next row of Cable pattern to last st, dc in last st.
Rep last 2 rows until piece measures same as Back, end with a RS row as the last row you work.
Fasten off.
Neckband
From WS, sk first 10 (11, 11, 12) sts for shoulder, join yarn with a sl st in next st.
Row 1 (WS): Ch 3, work next row of Cable pattern over next 9 sts, dc in last st – 11 sts.
Row 2: Ch 3, turn, work next row of Cable pattern over next 9 sts, dc in last st.
Rep Row 2 until neckband measures about 5 1/2 (5 1/2, 5 1/2, 5 3/4) in. (14 (14, 14, 14.5) cm).
Fasten off.
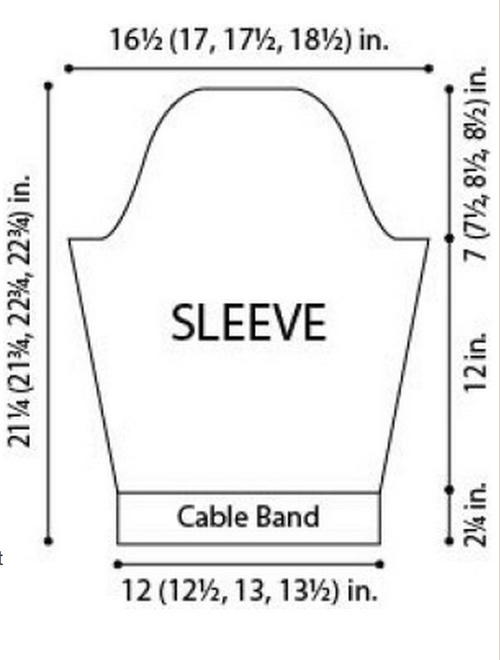
SLEEVES (make 2)
Cable Band
Ch 12.
Row 1 (RS): Hdc in 3rd ch from hook and in each ch across – you will have 11 hdc in this row.
Row 2: Ch 3 (counts as first dc in this row and all following rows), turn, work Row 2 of Cable pattern over next 9 sts, dc in last st.
Row 3: Ch 3, turn, work next row of Cable pattern over next 9 sts, dc in last st.
Rep Row 3 until piece measures about 12 (12 1/2, 13, 13 1/2) in. (30.5 (32, 33, 34.5) cm) from beg, end with a WS row as the last row you work.
Last Row (WS): Ch 1, do not turn, work 35 (37, 39, 41) sc evenly spaced across long side of Cable Band.
Body of Sleeve
Row 1 (RS): Ch 2 (counts as hdc), turn, hdc in each st across.
Row 2: Ch 3, turn, dc in next 1 (2, 3, 4) st(s), (BPDC around next st, dc in next 9 sts) 3 times, BPDC around next st, dc in last 2 (3, 4, 5) sts.
Row 3 (Increase Row): Ch 3, turn, dc in first st (increase made), work in Post St Lines pattern as established to last 2 sts, dc in next st, 2 dc in last st – 37 (39, 41, 43) sts.
Rows 4-6: Work in Post St Lines pattern as established for 3 rows.
Rep last 4 rows 3 times – 43 (45, 47, 49) sts.
Rep Rows 3 and 4 twice – 47 (49, 51, 53) sts.
Shape Cap (top of Sleeve)
Row 1 (RS): Ch 1, turn, sl st in first 5 (6, 7, 8) sts, dc2tog, work in Post St Lines pattern as established to last 8 (9, 10, 11) sts, dc2tog, dc in next st; leave rem 5 (6, 7, 8) sts unworked – 35 sts.
Rows 2-5: Ch 3, turn, dc2tog, work in Post St Lines pattern to last 3 sts, dc2tog, dc in last st – 27 sts.
Row 6: Work in Post St Lines pattern as established.
Rows 7-9: Ch 3, turn, dc2tog, work in Post St Lines pattern to last 3 sts, dc2tog, dc in last st – 21 sts.
Work even in Post St Lines pattern as established for 1 (2, 4, 4) row(s).
Next 3 Rows: Rep Rows 7-9 – 15 sts.
Fasten off.
-
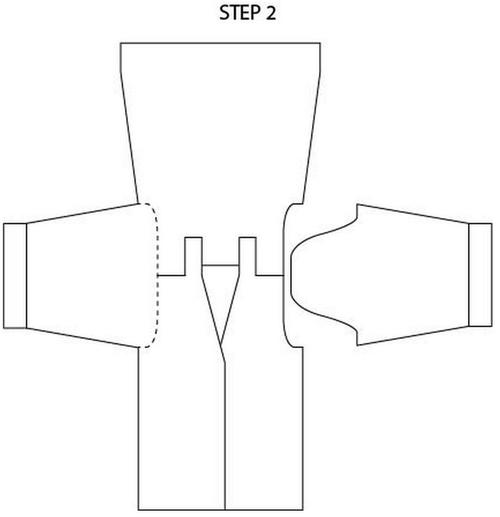
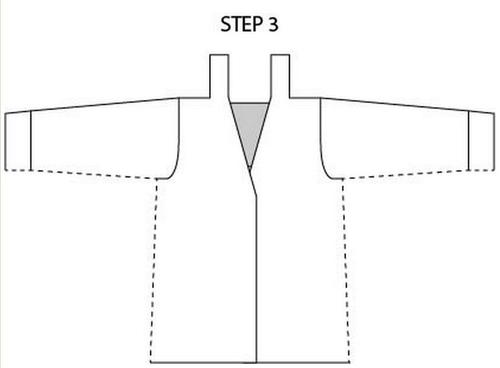
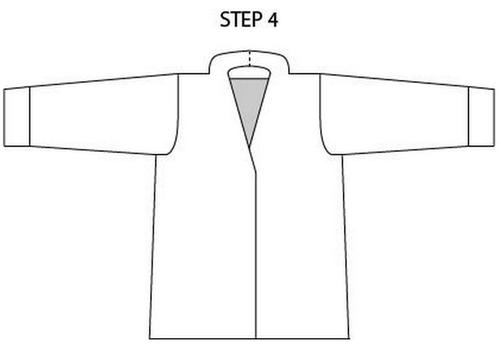
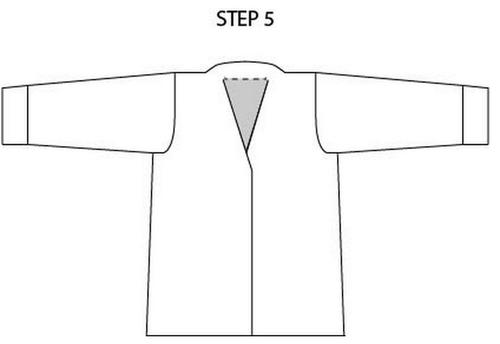
Diagrams - Click Each Image to enlarge
-
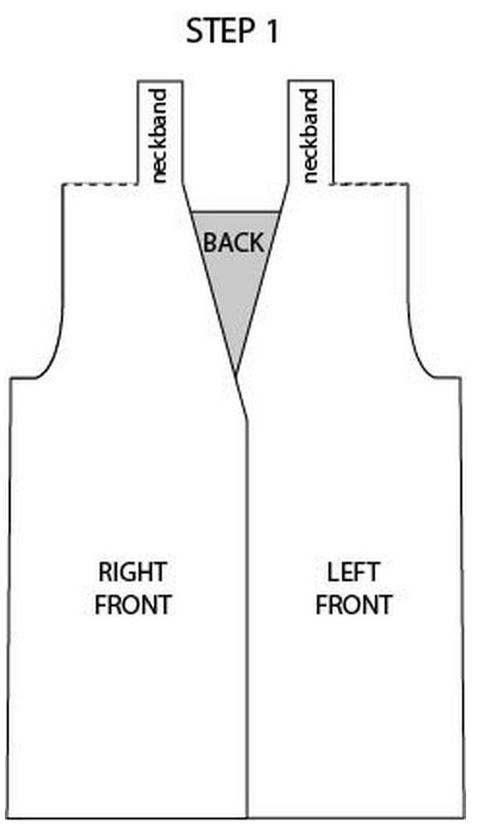
FINISHING
Step 1: Sew Fronts to Back at shoulders.
Step 2: Matching the center of the Sleeve cap to the shoulder seam of the Cardigan, sew in Sleeves.
Step 3: Matching the underarm seams, sew side and Sleeve seams.
Step 4: Sew ends of neckbands together.
Step 5: Sew edge of neckbands to back neck edge of Cardigan.
Weave in ends.
Abbreviations
- BPDC (back post double crochet)
- Yarn over, insert hook from back to front then to back, going around post of indicated st, draw up a loop, (yarn over and draw through 2 loops on hook) twice. Skip st in front of the BPDC.
- FPDC (front post double crochet)
- Yarn over, insert hook from front to back then to front, going around post of indicated st, draw up a loop, (yarn over and draw through 2 loops on hook) twice. Skip st behind the FPDC.
- BPTR (back post treble crochet)
- Yarn over twice, insert hook from back to front then to back, going around post of indicated st, draw up a loop, (yarn over and draw through 2 loops on hook) 3 times. Skip st in front of the BPTR.
- FPTR (front post treble crochet)
- Yarn over twice, insert hook from front to back then to front, going around post of indicated st, draw up a loop, (yarn over and draw through 2 loops on hook) 3 times. Skip st behind the FPTR.
- dc2tog (dc 2 sts together)
- (Yarn over, insert hook in next st and draw up a loop, yarn over and draw through 2 loops) twice, yarn over and draw through all 3 loops on hook – 1 st decreased.
Read NextCuddler Cocoon Sweater
Your Recently Viewed Projects

Thanks for your comment. Don't forget to share!
mcgarvey12 9691513
Feb 07, 2022
There are stitches missing in the cable pattern, please give me a corrected pattern
EditorLP
Feb 14, 2022
Hi mcgarvey12 9691513, sorry for the inconvenience. Row 3 of the cable pattern has been corrected to read "FPDC around each of next 3 sts, skip next 3 sts, FPTR around each of next 3 sts working in front of the 3 sts just made, FPTR around each of the 3 skipped sts." I hope this helps! - Laura, editor of AllFreeCrochet
samjoell 4526183
Jan 10, 2021
I got 3/4 way through the back and realised that this pattern is in US terms not UK, so my back piece is 10inch too short. Would be really handy for a quick note saying its a pattern
luanne
Feb 26, 2019
Working on this now and yes, the cable portion is very confusing. Thank you for your clarification rjnuthouse, I'm giong to try it again.
MickieD
Aug 14, 2018
On the cable instructions ROW #3 doesn't make sense FPDC around each of next 3 sts, This is OK then THIS IS THE PART THAT DOESN'T MAKE SENSE ,next 3 sts, what do I do with these 3sts? and then the rest of the instructions are confusing also please explain.
Cheryl Y
Jul 24, 2018
This Curvy Girl Cable Crochet Cardigan is just beautiful, I just wish there were directions for a smaller size like a 36 bust size. The directions here on this page are well written and easy to follow with some nice drawings to show how to put it together. I am wondering if I can use a smaller hook size to get a smaller cardigan? I have saved this one and hope to give it a go in the future. Thank you so much for sharing this free crochet cardigan pattern.
Sharon M
May 31, 2018
I love this pattern. Is there any chance of a video walking us step by step throughout the entire pattern? I don't mean a short 10 minute video. I mean a tutorial like Mikey from the Crochet Crowd does.
Zeemer
Jan 30, 2018
When the cable crochet pattern is used, it makes the project looks heavy and bulky but of course there are those that like that kind of look and feel. The finished look of this type of pattern appears like it is knitted. Beautiful!
mulberrygalprinces s
Nov 19, 2017
It's not very often that you find crochet patterns for plus size ladies, so I grab them when I see them. I have a few friends that will really love this. I read the directions and they are extremely easy to follow. There are written instructions and diagrams. It couldn't be any easier!
Morehouse17
Oct 31, 2017
I am so tempted to make this cardigan. The design in the front is timeless and I am sure I would get a lot of wear out of it. However the skill level is a little intimidating. Nonetheless, I am going to at least purchase the material and I hope I will be successful in my attempt to make it.
slm215 5651869
Oct 18, 2017
I would love to convert this to knit.. I do crochet but not sure that I can do this pattern. I can knit much easier.. I just love this sweater..
Delphine Bryant
Sep 30, 2017
I love to have a cardigan to wear when the weather is just turning chilly. I keep one in the car for when I get caught out and need something on my arms. I really like this pattern because of the beautiful cable on the front lapel. I need a new cardigan and I think this will be the project of the month.
Butterflkisses
Oct 13, 2016
I really like this pattern but I'm just having trouble figuring out where cable pattern row 1 is worked. I'm only seeing instructions for row 2,34
rjnuthouse
Nov 26, 2016
I think what you are seeing is that the instructions say it starts at row 2 of cable, then they keep saying next row after that. So it goes row 2, row 3, row 4 and then row 1. I had a hard time at first, but once I got the cable stitch down pat, the pattern was a breeze.
mrbcows 2795835
Oct 08, 2016
Love this pattern! I'm not curvy either but going to make it with an H hook.
Jenannie
Aug 02, 2016
I really like this pattern but am not curvy enough. Is there any chance of downsizing it a bit (to a 38 inch bust)? My crocheting skills aren't good enough for me to do this myself and I'd love to have a go at this pattern
leannlrobertson 98 81633
Nov 30, 2016
Use a smaller hook and a lighter weight yarn. For a medium I would go down to a size I and for a small an H. Use a more sport weight rather than worsted weight.
CraftyFool
May 25, 2016
I've now made this cardi several times and every time I make it I love it all the more. The pattern is VERY easy to follow and the resulting garment is cosy, warm and makes me feel gorgeous. It is quite flattering (I'm a 2XL lady), and with the addition of pockets (I simply created two pockets following the same pattern only with a shorter chain and far fewer rows, placing the pockets so the post stitching on garment and pockets lined up), it's my go-to 'car coat', my running-errands cardi, and what I throw on to putter around the house. Love-love-love it!
Report Inappropriate Comment
Are you sure you would like to report this comment? It will be flagged for our moderators to take action.
Thank you for taking the time to improve the content on our site.