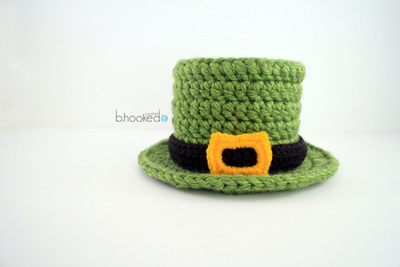
Lady Leprechaun Crochet Accessories

Find your ultimate St. Patrick's Day costume with these Lady Leprechaun Crochet Accessories. You will be set for the parade by learning how to crochet a hat, necklace, and beard. Wear one, two, or all three accessories to totally deck out your outfit and be the most celebratory person there! Your leprechaun look will be so authentic because you didn't have to go out and buy it.

Crochet HookE/4 or 3.5 mm hook, H/8 or 5 mm hook
Yarn Weight(4) Medium Weight/Worsted Weight and Aran (16-20 stitches to 4 inches)
MATERIALS:
- Premier Yarns Deborah Norville Collection Everyday Soft Worsted
- MC: Electric Green (2 balls)
- CC1: Black (1 ball)
- CC3: Kiwi (1 ball)
- CC4: Shamrock (1 ball)
- CC5: Pine Green (1 ball)
- Premier Yarns Merry: CC2:Dancing Flame (1 ball)
- Crochet Hooks (Size H/8, 5 mm and Size E/4, 3.5 mm)
- Tapestry Needle
- Cardboard
SIZE:
Hat Circumference: 21" (to fit adult)
Clover Necklace: 40" circumference
GAUGE:
16 sc x 20 rows = 4" in SC using MC and larger hook
HAT
With MC and larger hook, ch 2.
Rnd 1: [6 sc] in 2nd ch from hook, join with sl st to 1st sc.
Rnd 2: Ch 1, [2 sc] in each sc around, join with sl st to 1st sc – 12 sc.
Rnd 3: Ch 1, [sc in next sc, 2 sc in next sc] around, join with sl st to 1st sc – 18 sc.
Rnd 4: Ch 1, [sc in next 2 sc, 2 sc in next sc] around, join with sl st to 1st sc – 24 sc.
Rnd 5: Ch 1, [sc in next 3 sc, 2 sc in next sc] around, join with sl st to 1st sc – 30 sc.
Rnd 6: Ch 1, [sc in next 4 sc, 2 sc in next sc] around, join with sl st to 1st sc – 36 sc.
Rnd 7: Ch 1, [sc in next 5 sc, 2 sc in next sc] around, join with sl st to 1st sc – 42 sc.
Rnd 8: Ch 1, [sc in next 6 sc, 2 sc in next sc] around, join with sl st to 1st sc – 48 sc.
Rnd 9: Ch 1, [sc in next 7 sc, 2 sc in next sc] around, join with sl st to 1st sc – 54 sc.
Rnd 10: Ch 1, [sc in next 8 sc, 2 sc in next sc] around, join with sl st to 1st sc – 60 sc.
Rnd 11: Ch 1, [sc in next 9 sc, 2 sc in next sc] around, join with sl st to 1st sc – 66 sc.
Rnd 12: Ch 1, [sc in next 10 sc, 2 sc in next sc] around, join with sl st to 1st sc – 72 sc.
Rnd 13: Ch 1, [sc in next 11 sc, 2 sc in next sc] around, join with sl st to 1st sc – 78 sc.
Rnd 14: Ch 1, [sc in next 12 sc, 2 sc in next sc] around, join with sl st to 1st sc – 84 sc.
Rnd 15: Ch 1, sc in each sc around, join with sl st to 1st sc.
Rnd 16: Ch 1, sc through back loop only of each sc across, join with sl st to 1st sc.
Rnds 17-50: Ch 1, sc in each sc around, join with sl st to 1st sc.
Rnd 51: Ch 1, [2 sc in next sc, sc in next 3 sc] around – 105 sc.
Rnd 52: Ch 1, [2 sc in next sc, sc in next 4 sc] around – 126 sc.
Rnd 53: Ch 1, [2 sc in next sc, sc in next 5 sc] around – 147 sc.
Rnd 54: Ch 1, [2 sc in next sc, sc in next 6 sc] around – 168 sc.
Rnd 55: Ch 1, [2 sc in next sc, sc in next 7 sc] around – 189 sc.
Rnd 56: Ch 1, [2 sc in next sc, sc in next 8 sc] around – 210 sc.
Rnd 57: Ch 1, [2 sc in next sc, sc in next 9 sc] around – 231 sc.
Rnd 58: Ch 1, [2 sc in next sc, sc in next 10 sc] around – 252 sc.
Rnd 59: Ch 1, work Reverse Single crochet in each sc around. Fasten off.
Band
With CC 1 and larger hook, ch 9.
Row 1: Sc in 2nd ch from hook and each ch across, turn.
Row 2: Ch 1, sc in each ch across, turn – 8 sc.
Rep Row 2 until Band measures 21”. Fasten off.
Buckle
With CC2 and larger hook, ch 10.
Top
Row 1: Sc in 2nd ch from hook and each ch across, turn – 9 sc.
Row 2: Ch 1, sc in each sc across, turn.
Left Side of Buckle
Row 1: Ch 1, sc in next 2 sc, turn.
Rows 2-5: Rep Row 1. Break yarn.
Right Side of Buckle
Attach yarn at other side of Buckle, leaving center 5 sts unworked.
Row 1: Ch 1, sc in next 2 sc, turn.
Rows 2-5: Rep Row 3.
Bottom
Joining Row: Ch 1, sc in next 2 sc, ch 5, sc in 2 sc from Left Side of Buckle.
Next row: Ch 1, sc in each sc across. Rep this row, 1 more time. Fasten off.
FINISHING
With CC2, ch 6, fasten off. Attach one end of this chain to Top of Buckle, and the other end to Bottom of Buckle. Slide Band through this chain, attaching Buckle to Band.
Wrap Band around Base of Hat. Sew ends together.
Using top of Hat as template, cut out a circle of cardboard. Insert cardboard circle into top of Hat for structure.
Weave in ends.
BEARD
With CC2 and larger hook, ch 5.
Row 1: Hdc in 3rd ch from hook, hdc in next 2 ch, turn.
Row 2: Ch 2, 2hdc in 1st hdc, hdc in each hdc to last hdc, 2 hdc in last hdc, turn – 5 hdc.
Rep Row 3 until there are 17 hdc.
Right Side
Row 1: Hdc in next 5 hdc, hdc2tog, turn.
Row 2: Hdc2tog, hdc in next 4 hdc, turn.
Row 3: Hdc in next 3 hdc, hdc2tog, turn.
Row 4: Hdc2tog, hdc in next 2 hdc, turn.
Row 5: Hdc, hdc 2 tog, turn.
Row 6: Hdc 2tog, do not fasten off. Make a chain 10” long. Fasten off.
Left Side
Skip center 3 sts, attach yarn.
Row 1: Hdc2tog, hdc in next 5 hdc, turn.
Row 2: Hdc in next 4 hdc, hdc2tog, turn.
Row 3: Hdc2tog, hdc in next 3 hdc, turn.
Row 4: Hdc in next 2 hdc, hdc2tog, turn.
Row 5: Hdc2tog, hdc in next hdc, turn.
Row 6: Hdc2tog, do not fasten off. Make a chain 10” long. Fasten off.
FINISHING
Weave in ends. To wear, tie 10” chains together around head, tucking chains behind ears.
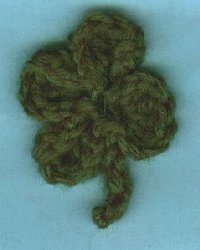
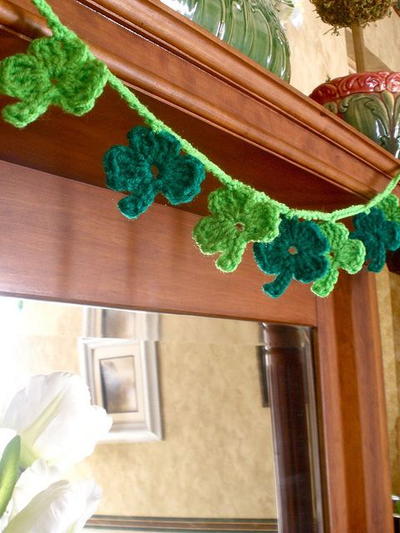
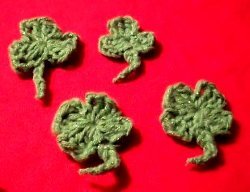
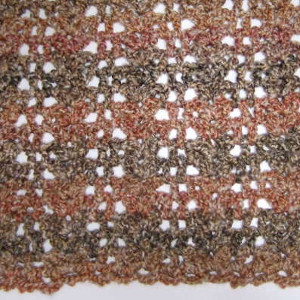
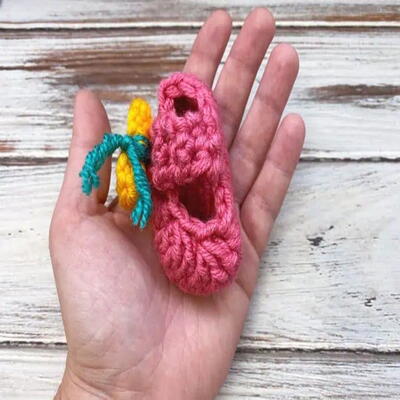
CLOVER NECKLACE
Clover Motif
With smaller hook, * ch 8, join with sl st to beg ch to form ring; rep from *, 2 more times.
Rnd 1: Ch 1, [2 sc, 2 hdc, 2 dc, 2 tr, 1 dtr, 2 tr, 2 dc, 2 hdc, 2 sc] in each of 3 rings.
Stem
Ch 5, work sc in 2nd ch from hook and each ch across, join with sl st to 1st sc from Rnd 1. Fasten off.
Make 4 Motifs in CC3, 4 Motifs in CC4, and 4 Motifs in CC5.
FINISHING
Join Clovers
With CC5, * ch 15, sl st in top of center Clover Petal from a CC3 Motif, ch 15, sl st in top of center Clover Petal from a CC4 Motif, ch 15, join with sl st in top of center Clover Petal from a CC5 Motif; rep from * for all Motifs, join with sl st to beg ch. Fasten off.
Weave in ends. Put around your neck and wear!
Read Next20+ Irish Crochet Patterns
Your Recently Viewed Projects
Thanks for your comment. Don't forget to share!
JaneEK
Mar 23, 2017
This is a fun set of projects that can be used together or separately. I really love the hat as you could work it in additional colors for the Steam Punk look or other costume ideas. It would be very easy to change the embellishments. I do wish there were some more photos for these projects as the details for the necklace are especially hard to see.
Report Inappropriate Comment
Are you sure you would like to report this comment? It will be flagged for our moderators to take action.
Thank you for taking the time to improve the content on our site.