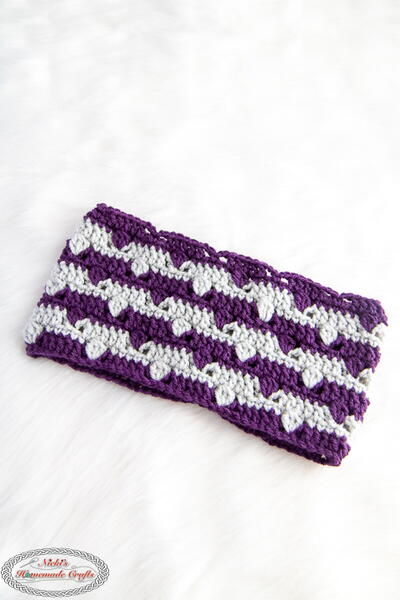
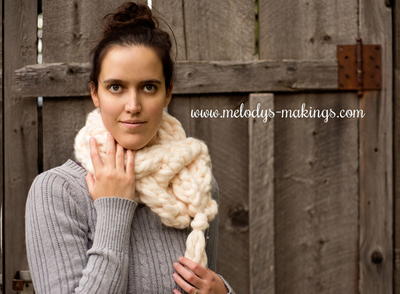
Aspen Neckwarmer

This free crochet pattern is for the intermediate crocheter. Using an I/9 crochet hook and worsted weight yarn you can have this fashionable neckwarmer all to yourself.

Crochet HookI/9 or 5.5 mm hook
Yarn Weight(4) Medium Weight/Worsted Weight and Aran (16-20 stitches to 4 inches)
FINISHED MEASUREMENTS:
Neck warmer measures approximately 20"/51 cm long x 8"/20.5 cm wide, before folding in half lengthwise
Materials:
- Naturally Caron.com Country (75% micro denier acrylic/25% merino wool; 3 oz/85 g, 185 yds/169 m skein): 1 skein (3 oz) A, 1 skein (3 oz) B, 1 skein (3 oz) C
- Shown in: #0016 Charcoal (A); #0008 Silver Service (B); #0017 Claret (C).
- One size US I-9 (5.5 mm), or size to obtain gauge.
- One decorative button—7/8"/22 mm
- Yarn needle
GAUGE
In ripple pattern, using I-9 (5.5 mm) hook, 1 ripple and 13 rows = 4"/10 cm.
STITCHES USED
Chain (ch), double crochet (dc), half double crochet (hdc), single crochet (sc), slip stitch (slip st), treble crochet (tr)
SPECIAL TERMS
Single crochet 2 together (sc2tog): Insert hook in next stitch, yarn over and draw up a loop, (2 loops on hook), insert hook in next stitch, yarn over and draw up a loop (3 loops on hook), yarn over and draw through all 3 loops on hook.
Modified Front-post double crochet (modFPdc): Yarn over, insert hook around post of indicated stitch from front to back to front again; yarn over and draw up a loop, yarn over and draw through 2 loops on hook (2 loops on hook); insert hook in next sc of current row, yarn over and draw up a loop, yarn over and draw through all 3 loops on hook.
Treble crochet 2 together (tr2tog): Yarn over twice, insert hook in next stitch, yarn over and draw up a loop, [yarn over and draw through 2 loops on hook] twice (2 loops on hook); yarn over twice, insert hook in next st, yarn over and draw up a loop, [yarn over and draw through 2 loops on hook] twice (3 loops on hook); yarn over and draw through all 3 loops on hook.
Treble crochet 4 together (tr4tog): Yarn over twice, insert hook in next stitch, yarn over and draw up a loop, [yarn over and draw through 2 loops on hook] twice (2 loops on hook); *yarn over twice, insert hook in next st, yarn over and draw up a loop, [yarn over and draw through 2 loops on hook] twice (1 additional loop on hook); repeat from * 2 more times; yarn over and draw through all 5 loops on hook.
NOTES
1. To change color at end of row: Work last stitch in old color to last yarn over, yarn over with new color and draw through all loops on hook to complete stitch. Drop old color, continue work with new color. You may fasten off the old color or carry it loosely up the side of the piece. If you choose to carry unused colors up the side of the piece, take care to cover these strands when working the band along the short edge.
2. The neck warmer begins as a rectangular piece with two buttonholes at one end. The rectangle is then folded lengthwise, aligning the buttonholes to form a double-thickness and a single (double-layered) buttonhole.
3. Take care when working the modified front post stitch. The stitch in the current row, behind the front post stitch, is not skipped. Instead, it is worked into as part of completing the modified front post stitch. This helps keep the fabric smooth on both sides.
NECK WARMER
With A, chain 84.
Row 1 (RS): Sc in second ch from hook and in next 6 ch, 3 sc in next ch, sc in next 7 ch, *skip next 2 ch, sc in next 7 ch, 3 sc in next ch, sc in next 7 ch; repeat from * across, turn—5 "ripples".
Row 2: Ch 1, sc2tog, sc in next 6 sc, *3 sc in next sc, sc in next 7 sc, skip next 2 sc, sc in next 7 sc; repeat from * across to last 9 sc, 3 sc in next sc, sc in next 6 sc; sc2tog, changing to B, turn.
Rows 3 and 4: With B, repeat Row 2, changing to A in last st of last row.
Row 5: With A, Ch 1, sc2tog, sc in next 2 sc, modFPdc in corresponding sc 3 rows below (in Row 2), sc in next 3 sc, *(sc, modFPdc in corresponding sc 3 rows below, sc) in next sc, sc in next 3 sc, modFPdc in corresponding sc 3 rows below, sc in next 3 sc, skip next 2 sc, sc in next 3 sc, modFPdc in corresponding sc 3 rows below, sc in next 3 sc; repeat from * across to last 9 sc, (sc, modFPdc in corresponding sc 3 rows below, sc) in next sc, sc in next 3 sc, modFPdc in corresponding sc 3 rows below, sc in next 2 sc, sc2tog, turn.
Row 6: Ch 1, sc2tog, sc in next 6 sts, *3 sc in next st, sc in next 7 sts, skip next 2 sts, sc in next 7 sts; repeat from * across to last 9 sts, 3 sc in next sc, sc in next 6 sts; sc2tog, changing to C, turn.
Rows 7 and 8: With C, repeat Row 2 twice; change to A in last st of last Row.
Rows 9–22: Maintaining color sequence of 2 rows with A, 2 rows with B, 2 rows with A, 2 rows with C, repeat Rows 5–8 three times, then repeat Rows 5 and 6 once more. DO not change color and turn at end of last row.
Buttonhole Band
Row 1 (WS): With A, ch 1; working along short edge of piece, work 22 sc evenly spaced in ends of rows, turn—22 sc.
Row 2: Ch 1, sc in each st across, turn.
Row 3 (buttonhole row): Ch 1, sc in first 4 sc, ch 2, skip next 3 sc (for buttonhole), sc in next 8 sc, ch 2, skip next 3 sc (for buttonhole), sc in next 4 sc, turn—2 buttonholes.
Row 4: Ch 1, [sc in each st across to next ch-2 space, 3 sc in ch-2 space] twice, sc in each st across—22 sc. Fasten off.
Button Band
With WS facing, join A with slip st in end of opposite short edge.
Row 1 (WS): With A, ch 1, work 22 sc evenly spaced in ends of rows, turn—22 sc.
Rows 2–4: Ch 1, sc in each st across, turn. Do not turn and do not fasten off at end of last row.
Lower Edge
With RS facing, ch 1; working across long side of Neck Warmer, sc in end of each row across Button Band; working in free loops along opposite side of foundation ch, sc in next 2 sts, *hdc in next 2 sts, dc in next 2 sts, tr4tog, dc in next 2 sts, hdc in next 2 sts, sc in next st**, sc in ch-2 space, sc in next 2 sts; repeat from * 3 more times; repeat from * to ** once; sc in end of each row across Buttonhole Band. Fasten off.
Upper Edge
With RS facing, join A with slip st in end of first row on Buttonhole Band, ch 3 (counts as first tr), tr in end of next 3 rows on Buttonhole Band; tr2tog, *dc in next 2 sc, hdc in next 2 sc, sc in next 2 sc, skip next sc, sc in next 2 sc, hdc in next 2 sc, dc in next 2 sc**, tr4tog; repeat from * 3 more times; repeat from * to ** once more, tr2tog; tr in end of each row on Button Band. Fasten off.
FINISHING
Using yarn needle, weave in all ends. Fold Neck Warmer in half lengthwise. Referring to photograph for placement, sew button centered on Button Band.
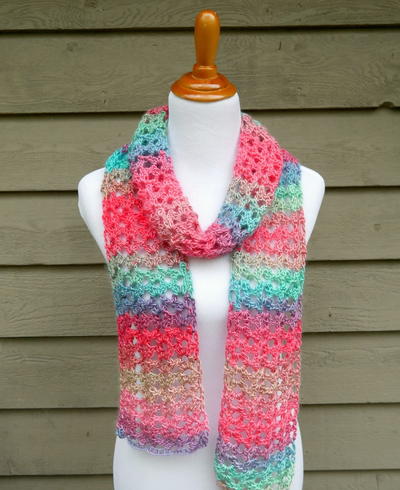
Read NextClover Puff Triangle Scarf
Your Recently Viewed Projects
Thanks for your comment. Don't forget to share!
psheppard23
Aug 14, 2012
If you Google, "Aspen Neck Warmer", you will see a link to the Caron website. It has the pattern with three color photos that you can actually see. It also has an option to print the instructions as a .PDF file.
lizzy
Jan 09, 2012
I think that it is really stupid that you cannot print out the patterns on your site.
gcarletti 2963972
Jan 05, 2012
Can you post a pic of working the lower and upper edge? I am at this point and can not get any further, because I am not clear with the directions. Please post.
beb1128 2014634
Jan 03, 2012
This looks like a beautiful scarf, but I would like a view that shows the complete pattern. I am a very visual person and need that sort of pic to make the scarf.
Report Inappropriate Comment
Are you sure you would like to report this comment? It will be flagged for our moderators to take action.
Thank you for taking the time to improve the content on our site.