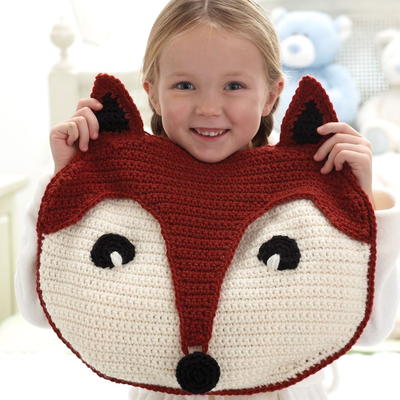
Fantastic Fox Pillow

I bet your kids never imagined they would be taking naps alongside a fox! This Fantastic Fox Pillow is an easy crochet pattern to make that will be treasured for years to come. Not only is this an insanely cute crochet pattern to enjoy, but it's also functional in more ways than one. Aside from being a super comfy pillow, this is one of the most unique crochet designs ever because it actually has a hidden pocket that it meant for stashing pajamas. How neat!

Crochet Hook4.5 mm hook
Yarn Weight(4) Medium Weight/Worsted Weight and Aran (16-20 stitches to 4 inches)
MATERIALS
-
Bernat® Super Value™ (197 g/7 oz; 389 m/426 yds)
Contrast A Redwood Heather (53522) 1 ball
Contrast B Natural (07414) 1 ball
Contrast C Black (07421) 1 ball - Size 5 mm (U.S. H/8) crochet hook or size needed to obtain gauge.
- 1¼" [3 cm] button with shank (to be covered for ‘nose’).
GAUGE
13 sc and 14 rows = 4" [10 cm].
INSTRUCTIONS
Note: The friendly fox's snout lifts up and there is a special opening to tuck in your pjs!
FRONT
Top of Head and Snout
Snout: Beg at base of Snout, with A, ch 4.
1st row: (RS). 1 sc in 2nd ch from hook. 1 sc in each of next 2 ch. Turn. 3 sc.
2nd to 4th rows: Ch 1. 1 sc in each sc to end of row. Turn.
5th row: Ch 1. 2 sc in first sc. 1 sc in each sc to last sc. 2 sc in last sc. Turn. 5 sc.
6th to 9th rows: As 2nd row.
10th row: As 5th row. 7 sc.
11th and 12th rows: As 2nd row.
13th row: As 5th row. 9 sc.
14th to 16th rows: As 2nd row.
17th row: As 5th row. 11 sc.
18th to 20th rows: As 2nd row.
21st to 24th rows: As 5th row. 19 sc at end of 24th row. Fasten off and set aside to be joined to Sides later.
Right Side of Head
With A, ch 6.
1st row: (RS). 1 sc in 2nd ch from hook. 1 sc in each of next 4 ch. Turn. 5 sc.
2nd row: Ch 3. 1 sc in 2nd ch from hook. 1 sc in next ch. 1 sc in each of next 5 sc. Turn. 7 sc.
3rd row: Ch 1. 1 sc in each sc to last sc. 2 sc in last sc. 8 sc. Fasten off.
Left Side of Head
Work as for Right side of Head, noting RS and WS are reversed. Do not fasten off.
Join Sides of Head to Snout:
1st row: (RS). Ch 1. 1 sc in each of next 8 sc of Left side of Head. Ch 8. Work 1 sc in each of next 19 sc of Snout. Ch 8. Work 1 sc in each of next 8 sc of Right side of Head. Turn.
2nd row: Ch 1. 1 sc in each of first 8 sc. 1 sc in each of next 8 ch. 1 sc in each of next 19 sc. 1 sc in each of next 8 ch. 1 sc in each of last 8 sc. Turn. 51 sc. Place markers at each end of row.
3rd to 6th rows: Ch 1. Sc2tog. 1 sc in each sc to last 2 sc. Sc2tog. Turn. 43 sts at end of 6th row.
7th row: Sl st in each of first 2 sc. Ch 1. 1 sc in each sc to last 2 sc. Turn. Leave rem sts unworked.
8th to 13th rows: As 7th row. 15 sts rem at end of 13th row. Fasten off.
Edging: With RS facing, join A with sl st at corner of Left Side of Head at side edge. Ch 1. Work sc evenly around outer edge of Top of Head and Snout, working 2 sc in corners. Join with sl st to first sc. Fasten off.
Lower Section of Front
Beg at lower edge, with B, ch 30.
**1st row: (RS). 1 sc in 2nd ch from hook. 1 sc in each ch to end of chain. Turn. 29 sc.
2nd to 9th rows: Ch 1. 2 sc in first sc. 1 sc in each sc to last sc. 2 sc in last sc. Turn. 45 sc at end of 9th row.
10th row: Ch 1. 1 sc in each sc to end of row. Turn.
11th row: Ch 1. 2 sc in first sc. 1 sc in each sc to last sc. 2 sc in last sc. Turn.
12th to 15th rows: As 10th and 11th rows twice more. 51 sc at end of 15th row.
16th to 32nd rows: Ch 1. 1 sc in each sc to end of row. Turn.** Place markers at each end of last row.
33rd to 35th rows: Ch 1. Sc2tog. 1 sc in each sc to last 2 sc. Sc2tog. Turn. 45 sts rem at end of 35th row.
Do not fasten off.
Cont as follows for edging: Ch 1. Work sc evenly down side of piece, across foundation ch and up opposite side. Fasten off.
BACK
Beg at lower edge, with A, ch 30.
Work from ** to ** as given for Lower Section of Face.
33rd to 36th rows: Ch 1. Sc2tog. 1 sc in each sc to last 2 sc. Sc2tog. Turn. 43 sts rem at end of 36th row.
37th row: Sl st in each of first 2 sc. Ch 1. 1 sc in each sc to last 2 sc. Turn. Leave rem sts unworked.
38th to 43rd rows: As 37th row. 15 sts rem at end of 43rd row. Do not fasten off.
Cont as follows for edging: Ch 1. Work sc evenly around outer edge, working 2 sc in corners. Join with sl st to first sc. Fasten off.
Front Ear (make 2):
With C, ch 6.
1st row: (RS). 1 sc in 2nd ch from hook. 1 sc in each ch to end of chain. Turn. 5 sc.
2nd and 3rd rows: Ch 1. 1 sc in each sc to end of row. Turn.
4th row: Ch 1. Sc2tog. 1 sc in next sc. Sc2tog. Turn. 3 sts.
5th row: Ch 1. 1 sc in each st to end of row. Turn.
6th row: Ch 1. Sc3tog. Fasten off.
Edging: (RS). Join A with sl st at lower corner. Ch 1. Work 6 sc up side edge, 3 sc in point and 6 sc down opposite side edge. Fasten off.
Back Ear (make 2): With A only, work as given for Front Ear (including edging).
Join Front and Back Ears: Place WS of Front and Back Ears tog. With RS of Front Ear facing, join A with sl st through both thicknesses in first sc of edging. Ch 1. Work 1 sc in each sc up side, 3 sc in point and 1 sc in each sc down opposite side. Working through both thicknesses, sl st
across lower edge, then work 1 more row of sc up side, 3 sc in point and down opposite side to lower edge. Fasten off.
Eyes (make 2)
**With C, ch 2.
1st rnd: 6 sc in 2nd ch from hook. Join with sl st to first sc.
2nd rnd: Ch 1. 2 sc in same sp as last sl st. 2 sc in each sc around. Join with sl st to first sc. 12 sc.**
3rd rnd: Ch 1. 1 sc in same sp as last sl st. (2 sc in next sc. 1 sc in next sc) 4 times. Sl st in next sc. Fasten off. Leave rem sts unworked.
Nose Button Cover
Work from ** to ** as given for Eyes.
3rd rnd: Ch 1. 1 sc in same sp as last sl st. *2 sc in next sc. 1 sc in next sc. Rep from * to last sc. 2 sc in last sc. Join with sl st to first sc. 18 sc.
4th rnd: Ch 1. 1 sc in same sp as last sl st. 1 sc in each sc around. Join with sl st to first sc.
5th rnd: Ch 1. 1 sc in same sp as last sl st. *Sc2tog. 1 sc in next sc. Rep from * to last 2 sc. Sc2tog. Join with sl st to first sc. 12 sts.
6th rnd: As 4th rnd. Fasten off.
Place button inside button cover. Stitch around cover opening, leaving shank free to attach to Pillow.
FINISHING
With RS of pieces facing, place Lower Section of Front Face under Top of Head and Snout, matching marked rows. Pin overlapping sections on each side to secure.
Join Back and Front: Place WS of Back against WS of Front Sections and match outer edges. With RS of Front facing, working through all thicknesses, join A with sl st in corner of Top of Head and Snout at side edge. Ch 1. Work 1 rnd of sc around outer edge. Join with sl st to first sc. Fasten off.
With B, embroider lower section of eyes with satin stitch as shown in picture. Sew Ears and Eyes in position as shown in picture.
Button loop: With RS facing, join A with sl st at side edge at base on 'Snout'. Ch 9. Join with sl st at opposite side edge. Fasten off.
Mark position for button on Lower Front Section to correspond to button loop. Sew button in position.
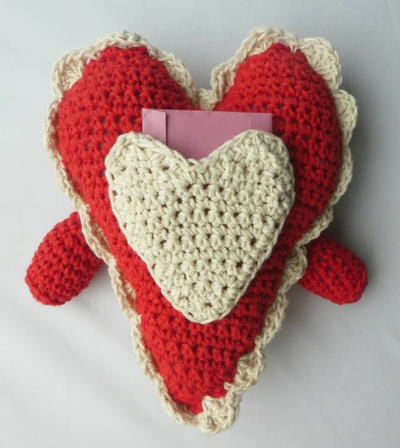
Read NextCrochet Heart Pillow Buddy
Your Recently Viewed Projects
Thanks for your comment. Don't forget to share!
dmdurkin06 8802278
Dec 26, 2018
This pattern is extremely confusing..really need to have better instructions and tutorial..maybe if you are proficient you can do this but if not it is very confusing and discouraging.
lil1mama42
Apr 28, 2018
Definitely need more pictures, actually a video would be real great where you attach the sides of head to the nose.It doesn't say your now crocheting down the side of the nose with the side of head. I cant even visualize it in my head. What is the chain 8 for? I now have what looks like a loop sticking out the side of the nose. is there a website I can go to that has more detailed instructions, with more pictures in progress of putting it together, or even a video? I really want to make this for my grand daughter
Susie41
Nov 01, 2017
In the process of making this and parts of the pattern are not clear at all.I have the head and snout done and after that I am lost. Should have more pictures or better instructions as to where parts go. Whoever made this pattern didnt give enough detailed instructions as to where parts go. So I am stuck on the bottom front of the Fox.
mulberrygalprinces s
Oct 24, 2017
OH wow! I have been looking for something like this to make for the grand kids. I have four of them that would just love having one. I read the directions and I can figure it out so I don't understand the confusion in some of the posters. Thank you for sharing this great project.
JaneEK
May 27, 2017
Pajama bag pillows remind me of growing up and slumber parties where very little slumber actually occurred. My only complaint with this project is that there arent any step by step photos. There are so many parts that need to be assembled that it really, really needs more illustration. Its just too hard to visualize constructing this from the text alone.
Hippie Chick
Apr 30, 2017
Very detailed directions, but could definitely use a few pics or diagrams to show how the pillow looks at various stages in the construction. I am a very visual crocheter and the pics are a big help to me. Very cute fox pillow. Maybe this would help my kids not fight naptime as much if they had one.
toree
May 09, 2015
I'm having an issue understanding the sides of head (3 rows each) connecting them to the snout. Has anyone tried this pattern? Just curious to find out if its written correctly. Thanks!
Report Inappropriate Comment
Are you sure you would like to report this comment? It will be flagged for our moderators to take action.
Thank you for taking the time to improve the content on our site.