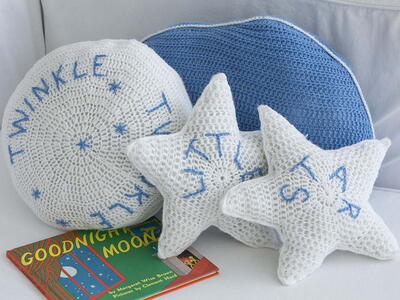
Celestial Pillows

There's nothing sweeter than a peaceful bedtime story and a kiss on the cheek to help your kids fall into a dream-filled sleep. Lull even the fussiest sleepers to sleep with the adorable Celestial Pillows. This charming crochet pillow pattern comes in both a round and star shape and are stitched with the words "twinkle, twinkle, little star." The Celestial Pillows make a great baby shower gift and are perfect for display in your child's room or baby's nursery.

Crochet HookH/8 or 5 mm hook
Yarn Weight(3) Light/DK (21-24 stitches to 4 inches)
MATERIALS:
-
LION BRAND® BABYSOFT® (Art. #920)
#100 White 2 balls (A)
#107 Bluebell 1 ball (B)
or colors of your choice - LION BRAND® crochet hook size H-8 (5 mm)
- LION BRAND® stitch markers
- LION BRAND® large-eyed blunt needle
SIZES:
Moon About 16 in. (40.5 cm) diameter
Cloud About 22 in. (56 cm) across at widest point
Star About 11 in. (28 cm) across
GAUGE:
14 dc = about 4 in. (10 cm)
BE SURE TO CHECK YOUR GAUGE.
When you match the gauge in a pattern, your project will be the size specified in the pattern and the materials specified in the pattern will be sufficient. If it takes you fewer stitches and rows to match the gauge, try using a smaller size hook or needles; if more stitches and rows, try a larger size hook or needles.
STITCH EXPLANATIONS:
dc2tog (dc 2 sts together) (Yarn over, insert hook in next st and draw up a loop, yarn over and draw through 2 loops) twice, yarn over and draw through all 3 loops on hook – 1 st decreased.
hdc2tog (hdc 2 sts together) (Yarn over, insert hook in next st and draw up a loop) twice, yarn over and draw through all 5 loops on hook – 1 st decreased.
NOTES:
- Each Pillow is made from 2 pieces, Front and Back. The Front and Back are crocheted together around the outer edges and stuffed before the seam is completely closed.
- For all Pillows, fiberfill stuffing will show through the spaces between the sts. If desired, you can create fabric inserts for the crochet pieces. Instructions for the fabric inserts are at the end of this pattern.
MOON PILLOW:
Note: Moon Pillow is worked in joined rnds, do not turn piece at end of rnds.
FRONT
With A, ch 4; join with sl st in first ch to form a ring.
Rnd 1: Ch 3 (counts as first dc in this rnd and in all following rnds), work 14 dc in ring; join with sl st in top of beg ch – 15 sts.
Rnd 2: Ch 3, dc in same st as joining, 2 dc in each dc around; join with sl st in top of beg ch – 30 sts at the end of this rnd.
Rnd 3: Ch 3, dc in same st as joining, dc in next dc, *2 dc in next dc, dc in next dc; rep from * around; join with sl st in top of beg ch – 45 sts.
Rnd 4: Ch 3, dc in same st as joining, dc in next 2 dc, *2 dc in next dc, dc in next 2 dc; rep from * around; join with sl st in top of beg ch – 60 sts.
Rnd 5: Ch 3, dc in same st as joining, dc in next 3 dc, *2 dc in next dc, dc in next 3 dc; rep from * around; join with sl st in top of beg ch – 75 sts.
Rnd 6: Ch 3, dc in same st as joining, dc in next 4 dc, *2 dc in next dc, dc in next 4 dc; rep from * around; join with sl st in top of beg ch – 90 sts.
Rnd 7: Ch 1, sc in each st around; join with sl st in beg ch.
Rnd 8: Ch 3, dc in same st as joining, dc in next 5 dc, *2 dc in next dc, dc in next 5 dc; rep from * around; join with sl st in top of beg ch – 105 sts.
Rnd 9: Ch 3, dc in same st as joining, dc in next 6 dc, *2 dc in next dc, dc in next 6 dc; rep from * around; join with sl st in top of beg ch – 120 sts.
Rnd 10: Rep Rnd 7.
Rnd 11: Ch 3, dc in same st as joining, dc in next 7 dc, *2 dc in next dc, dc in next 7 dc; rep from * around; join with sl st in top of beg ch – 135 sts.
Rnd 12: Ch 3, dc in same st as joining, dc in next 8 dc, *2 dc in next dc, dc in next 8 dc; rep from * around; join with sl st in top of beg ch – 150 sts.
Rnd 13: Rep Rnd 7.
Rnd 14: Ch 3, dc in same st as joining, dc in next 9 dc, *2 dc in next dc, dc in next 9 dc; rep from * around; join with sl st in top of beg ch – 165 sts.
Rnd 15: Ch 3, dc in same st as joining, dc in next 10 dc, *2 dc in next dc, dc in next 10 dc; rep from * around; join with sl st in top of beg ch – 180 sts.
Rnd 16: Ch 3, dc in each st around; join with sl st in top of beg ch.
Fasten off.
BACK
Make same as Front.
FINISHING
With WS of Back and Front together, join A with sl st anywhere in outer edge. Working through both thicknesses, ch 1, work sc evenly spaced around outer edge, leaving a 5 in. (12.5 cm) opening for stuffing. Stuff pillow with fiberfill, then continue to sc evenly spaced around outer edge; join with sl st in first sc. Fasten off.
Embroidery
With B, embroider TWINKLE, TWINKLE in chain st and 5 small stars in straight st.
Weave in ends.
STAR PILLOW (make 2):
FRONT
Note: Center of Star is worked in the rnd. Points are worked individually, back and forth in rows.
With A, ch 4; join with sl st in first ch to form a ring.
Rnd 1: Ch 3 (counts as first dc in this rnd and in all following rnds), work 14 dc in ring; join with sl st in top of beg ch – 15 sts.
Rnd 2: Ch 3, dc in same st as joining, 2 dc in each dc around; join with sl st in top of beg ch – 30 sts at the end of this rnd.
Rnd 3: Ch 3, dc in same st as joining, dc in next 5 dc, *2 dc in next dc, dc in next 5 dc; rep from * around; join with sl st in top of beg ch – 35 sts.
Rnd 4: Ch 3, dc in same st as joining, dc in next 6 dc, *2 dc in next dc, dc in next 6 dc; rep from * around; join with sl st in top of beg ch – 40 sts.
Rnd 5: Ch 3, dc in same st as joining, dc in next 7 dc, *2 dc in next dc, dc in next 7 dc; rep from * around; join with sl st in top of beg ch – 45 sts.
Rnd 6: Ch 3, dc in same st as joining, dc in next 8 dc, *4 dc in next dc, dc in next 8 dc; rep from * around, work 2 more dc in same st as joining; join with sl st in top of beg ch – 60 sts.
First Point
Row 1: Ch 3 (counts as first dc in this row and in all following rows), dc in next 11 dc, dc in next sp between sts; leave remaining sts unworked – 13 sts at the end of this row.
Row 2: Ch 3, turn, dc2tog, dc in each st to last 2 sts, dc2tog – 11 sts.
Row 3: Ch 3, turn, dc in each st across.
Rows 4 and 5: Rep Row 2 twice – 7 sts at the end of Row 5.
Row 6: Rep Row 3.
Rows 7 and 8: Rep Row 2 twice – 3 sts at the end of Row 8.
Row 9: Ch 1, turn, sc in each st across.
Fasten off.
Next 4 Points
From RS, join A with sl st in next unworked dc following previous point, rep Rows 1-9 of first point. Rep for a total of 5 points.
BACK
Make same as Front.
FINISHING
With WS of Back and Front together, join A with sl st anywhere in outer edge. Working through both thicknesses, ch 1, work sc evenly spaced around outer edge, leaving a 5 in. (12.5 cm) opening for stuffing. Stuff pillow with fiberfill, then continue to sc evenly spaced around outer edge; join with sl st in first sc. Fasten off.
Embroidery
With B embroider LITTLE on one pillow and STAR on the other pillow in chain st.
CLOUD PILLOW:
FRONT
Note: Cloud Pillow beg working in joined rnds and then changes to rows.
With B, ch 51.
Rnd 1 (RS): Work 3 sc in 2nd ch from hook, sc in next 48 ch, 6 sc in last ch. Working along opposite side of foundation ch, sc in next 48 ch, 3 sc in last ch; join with sl st in first sc – 108 sc.
Rnd 2: Ch 3 (counts as first dc in this rnd and in all following rnds), 4 dc in next st, dc in next 50 sts, 4 dc in next st, dc in next 2 sts, 4 dc in next st, dc in next 50 sts, 4 dc in next st, dc in next st; join with sl st in top of beg ch – 120 dc at the end of this rnd. Rnd 3: Ch 3, dc in next 2 sts, 2 dc in next st, dc in next 53 sts, 2 dc in next st, dc in next 5 sts, 2 dc in next st, dc in next 53 sts, 2 dc in next st, dc in next 2 sts; join with sl st in top of beg ch – 124 sts. Rnd 4: Ch 3, dc in next 3 sts, 4 dc in next st, dc in next 54 sts, 4 dc in next st, dc in next 6 sts, 4 dc in next st, dc in next 54 sts, 4 dc in next st, dc in next 2 sts; join with sl st in top of beg ch – 136 sts.
Rnd 5: Ch 1, sc in same st as joining, sc in next 5 sts, 2 sc in next st, sc in next 57 sts, 2 sc in next st, sc in next 9 sts, 2 sc in next st, sc in next 57 sts, 2 sc in next st, sc in next 3 sts; join with sl st in first sc – 140 sts.
Rnd 6: Ch 3, dc in next 6 sts, 4 dc in next st, dc in next 58 sts, 4 dc in next st, dc in next 10 sts, 4 dc in next st, dc in next 58 sts, 4 dc in next st, dc in next 3 sts; join with sl st in top of beg ch – 152 sts.
Rnd 7: Ch 3, dc in next 8 sts, 4 dc in next st, dc in next 61 sts, 4 dc in next st, dc in next 13 sts, 4 dc in next st, dc in next 61 sts, 4 dc in next st, dc in next 4 sts; join with sl st in top of beg ch – 164 sts.
Rnd 8: Ch 3, dc in next 10 sts, 2 dc in next st, dc in next 64 sts, 2 dc in next st, dc in next 16 sts, 2 dc in next st, dc in next 64 sts, 2 dc in next st, dc in next 5 sts; join with sl st in top of beg ch – 168 sts.
Rnd 9: Ch 1, sc in same st as joining, sc in next 11 sts, 2 sc in next st, sc in next 65 sts, 2 sc in next st, sc in next 17 sts, 2 sc in next st, sc in next 65 sts, 2 sc in next st, sc in next 5 sts; join with sl st in first sc – 172 sts.
Rnd 10: Ch 1, sc in same st as joining, sc in next 12 sts, 2 sc in next st, place marker in 2nd sc of 2-sc group just made for beg of top of Cloud, hdc in next st, dc in next 64 sts, hdc in next st, 2 sc in next st, sc in next 18 sts, 2 sc in next st, place marker in first sc of 2-sc group just made for beg of bottom of Cloud, hdc in next st, dc in next 64 sts, hdc in next st, 2 sc in next st, sc in last 5 sts; join with sl st in first sc – 176 sts. Fasten off.
Top of Cloud
Work now proceeds back and forth in rows.
Row 1 (RS): From RS, join B with sl st in first marked st, ready to work across long side of piece, remove marker, ch 1, hdc in next st, dc in next 63 sts, hdc in next st, sc in next st; leave rem sts unworked – 66 sts at the end of this row.
Row 2: Ch 2 (counts as first hdc in this row and in all following rows), turn, hdc2tog, dc in each st to last 2 sts, hdc2tog – 64 sts.
Rows 3 and 4: Ch 2, turn, hdc2tog, hdc in each st to last 2 sts, hdc2tog – 60 sts at the end of Row 4.
Rows 5 and 6: Ch 2, turn, hdc in each st across.
Row 7: Ch 2, turn, hdc in each st to last 2 sts, hdc2tog – 59 sts.
Row 8: Ch 2, turn, hdc2tog, hdc in each st to end of row – 58 sts.
Row 9: Rep Row 5.
Row 10: Ch 1, turn, sk first st, sc in next 4 sts, hdc in next 3 sts, dc in next 5 sts, hdc in next 42 sts, hdc2tog; leave last st unworked – 55 sts.
Row 11: Ch 2, turn, hdc2tog, hdc in next 39 sts, dc in next 5 sts, hdc in next 2 sts, sc in next st, sl st in next st; leave rem sts unworked – 50 sts.
Row 12: Ch 1, turn, sk the sl st, sc in next 12 sts, hdc in next 30 sts, sc in next 2 sts, sl st in next st; leave rem sts unworked – 45 sts.
Row 13: Ch 1, turn, sk the sl st, sc in next 2 sts, hdc in next 25 sts, sc in next 2 sts, sl st in next st; leave rem sts unworked – 30 sts.
Row 14: Ch 1, turn, sk the sl st, sc in next st, hdc in next 24 sts, sc in next st, sl st in next st; leave rem sts unworked – 27 sts.
Row 15: Ch 1, turn, sk the sl st, sc in next st, hdc in next 21 sts, sc in next st, sl st in next st; leave rem sts unworked – 24 sts.
Row 16: Ch 1, turn, sk the sl st, sc in next st, hdc in next 5 sts, dc in next 7 sts, hdc in next 5 sts, sc in next 2 sts, sl st in next st; leave rem sts unworked – 21 sts.
Row 17: Ch 1, turn, sk the sl st, sc in next 3 sts, hdc in next 3 sts, dc in next 7 sts, hdc in next 3 sts, sc in next st, sl st in next st; leave rem sts unworked – 18 sts.
Row 18: Ch 1, turn, sk the sl st, sc in next 12 sts, sl st in next st; leave rem sts unworked – 13 sts. Do not fasten off.
Bottom of Cloud
Row 1 (RS): Ch 1, turn, sc evenly spaced around outside edge of piece to next marked st at beg of bottom of Pillow, 2 sc in marked st, remove marker, working across bottom of Pillow, *sc in next 10 sts, hdc in next 2 sts, dc in next 10 sts, hdc in next 2 sts, sc in next 10 sts; rep from * once; leave rem sts unworked – 70 sts.
Row 2: Ch 1, turn, sk first st, sc in next 9 sts, hdc in next 2 sts, dc in next 9 sts, hdc in next 2 sts, sc in next 21 sts, hdc in next 2 sts, dc in next 9 sts, hdc in next 2 sts, sc in next 11 sts, sl st in next st; leave last st unworked – 68 sts.
Row 3: Ch 1, turn, sk the sl st, sc evenly spaced around rem Pillow to beg of Row 1; join with sl st in first sc of Row 1. Fasten off.
BACK
Make same as Front.
FINISHING
Rnd 1: With WS of Back and Front together, join B with sl st anywhere in outer edge. Working through both thicknesses, ch 1, work sc evenly spaced around outer edge, leaving a 5 in. (12.5 cm) opening for stuffing. Stuff pillow with fiberfill, then continue to sc evenly spaced around outer edge; join with sl st in first sc. Fasten off.
Rnd 2: Join A with sl st anywhere in outer edge, ch 1, sc in each st around; join with sl st in first sc. Fasten off.
Embroidery
With A, embroider 3 stars in straight st.
Weave in ends.
Optional Fabric Insert for Pillows:
MATERIALS:
- Cotton or cotton blend fabric, 3/4 yd (3/4 m) each for Cloud and Moon Pillows; 1/2 yd (1/2 m) for 2 Star Pillows
- Straight pins
- Sewing needle and thread or sewing machine
For each pillow, fold fabric in half, with RS together, and lay fabric onto a flat surface. Lay crochet piece onto doubled fabric and pin in place. Cut shape from fabric, about 1/2 in. (1.5 cm) outside edge of crochet shape.
Unpin and remove crochet shape. Keeping the 2 fabric pieces with RS together, seam pieces by hand or machine, 1/2 in. (1.5 cm) from outside edge and leaving an opening for stuffing.
Turn fabric to RS and stuff. By hand, sew opening closed.
Insert fabric insert into crocheted Pillow.
ABBREVIATIONS:
beg = begin(s)(ning)
ch = chain
dc = double crochet
hdc = half double crochet
rem = remain(ing)(s)
rep = repeat(s)(ing)
rnd(s) = round(s)
RS = right side
sc = single crochet
sk = skip
sl st = slip stitch
st(s) = stitch(es)
WS = wrong side
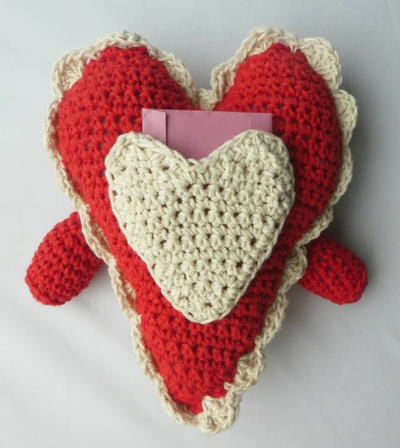
Read NextCrochet Heart Pillow Buddy
Your Recently Viewed Projects
Thanks for your comment. Don't forget to share!
Delphine Bryant
Aug 14, 2018
These celestial pillows sponsored by Lion Brand are just adorable. Even without the stitching for the verbiage, twinkle, twinkle, little star they could easily made a great addition to a baby or toddler's room.
Morehouse17
Jul 26, 2018
If the theme for a baby's nursery is celestial in any fashion this would be well appreciated.If you have the time, creating a baby blanket in the same hues or contrasting would make the baby shower gift just that much more appreciated.
freebyrd56 2315912
Oct 27, 2013
Can't find the pattern for the twinkle pillows... it take you to another site and there is still no pattern!
Report Inappropriate Comment
Are you sure you would like to report this comment? It will be flagged for our moderators to take action.
Thank you for taking the time to improve the content on our site.