Periwinkle Princess Dress
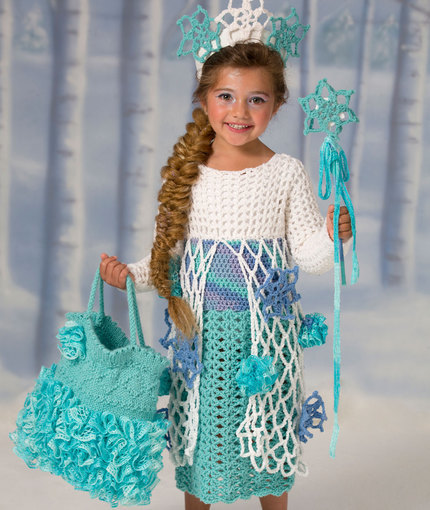
If you're familiar with a certain chilly Disney movie, then you may want to take a look at the Periwinkle Princess Dress. Made for the princess of ice and snow all throughout the land, this homemade Halloween costume is sure to be a favorite this year. I think my favorite part about this Halloween crochet pattern is all the layers of different patterns and colors to really create a fun and beautiful crochet costume. Your little girl will just want to float around from house to house while she trick-or-treats in her brand new homemade costume.

Crochet HookJ/10 or 6 mm hook
Yarn Weight(4) Medium Weight/Worsted Weight and Aran (16-20 stitches to 4 inches)
Crochet GaugeIn sleeve and yoke, 7 pattern repeats = 4 (10 cm); 6 rows = 4 (10 cm). Note: One pattern repeat consists of one double crochet and one chain. In bodice, 12 sts = 4 (10 cm); 11 rows = 4 (10 cm) in hdc. In skirt, 3 scallops = 5 (12.5 cm); 4 rows = 3 (9 cm).
Finished SizeTo Fit Chest: 22 (24, 25, 26) [56 (61, 66, 71) cm]. Finished Chest: 24 (26, 27, 28) [61 (66, 68.5, 71) cm]. Finished Length: 26 (27, 32, 34) [66 (70, 81.5, 87.5) cm].
Materials List
-
RED HEART Super Saver: 1 (1, 2, 2) skein(s) 311 White A, 1 (1, 1, 1) skein 995 Ocean B, 1 (2, 2, 2) skein(s) 505 Aruba Sea C, and 1 (1, 1, 1) skein 347 Lt. Periwinkle D
Note: Only a small quantity of D is needed for this project. - RED HEART Boutique Sashay Mini: 1 (1, 1, 1) ball 2936 Bubbles E
- Susan Bates Crochet Hook: 6mm [US J-10]
- Yarn needle
- Stitch marker
- White glue or fabric stiffener
- Aluminum foil
- Fabric sealant (optional)
Notes
Directions are for size 2. Changes for sizes 4, 6, and 8 are in parentheses. Special Stitches Beg dc2tog (beginning double crochet decrease) = Ch 3, dc in next dc1 dc and 1 ch-space decreased. Beg scallop = Ch 4 (counts as dc, ch 1), (dc, [ch 1, dc] twice) in indicated stitch or space. Beg 3-dc Cl (beginning 3 double crochet cluster) = Ch 2, yarn over, insert hook in indicated stitch or space, yarn over and pull up loop, yarn over, draw through 2 loops on hook (2 loops remain on hook); yarn over, insert hook in same stitch or space, yarn over and pull up loop, yarn over, draw through 2 loops, yarn over, draw through all 3 loops on hook. Scallop = (Dc, [ch 1, dc] 3 times) in indicated stitch or space. 3-dc Cl (3 double crochet cluster) = Yarn over, insert hook in indicated stitch or space, yarn over and pull up loop, yarn over, draw through 2 loops on hook (2 loops remain on hook); [yarn over, insert hook in same stitch or space, yarn over and pull up loop, yarn over, draw through 2 loops] 2 times, yarn over, draw through all 4 loops on hook. Special Techniques Join with sc = Place a slip knot on hook, insert hook in indicated stitch, yarn over and draw up a loop, yarn over and draw through both loops on hook. Working with mesh yarn = Spread the yarn open with ladder edge at top and wider metallic edge at bottom. Continue to spread the yarn open as you work so that you can see the spaces of the top ladder edge. Stitches are made by inserting the hook into a hole at the top of ladder edge and pulling the uppermost strand through the loop(s) on the hook. Always insert the hook from the front to the back through each hole. Skip one hole between each stitch to ensure dense ruffles. Notes 1. Dress begins with one sleeve worked in joined rounds, then divides for yoke and neck opening, then rejoins for second sleeve worked in joined rounds. 2. Bodice begins at yoke edging on back loops. Skirt is worked from the bodice. Overskirt is worked from the yoke edging on front loops. 3. Snowflakes and flowers are made separately and sewn to overskirt. In each flower, the ruffled appearance is accentuated by skipping a hole between each stitch. This gathers the yarn into dense ruffles.
Dress
First Sleeve
With A, ch 20 (22, 24, 26); taking care not to twist, join with slip st in first ch.
Round 1 (right side): Ch 4 (counts as dc, ch 1 here and throughout), skip next ch, dc in next ch, *ch 1, skip next ch, dc in next ch; repeat from * around, ch 1; join with slip st in 3rd ch of beginning ch10 (11, 12, 13) dc and 10 (11, 12, 13) ch-1 spaces.
Round 2 (increase round): Ch 4, dc in first dc, *ch 1, dc in next dc; repeat from * around, ch 1; join with slip st in 3rd ch of beginning ch11 (12, 13, 14) dc and 11 (12, 13, 14) ch-1 spaces.
Round 3: Ch 4, *ch 1, dc in next dc; repeat from * around, ch 1; join with slip st in 3rd ch of beginning ch.
Rounds 4-10 (11, 12, 13): Repeat Round 2 seven (eight, nine, ten) times18 (20, 22, 24) dc and 18 (20, 22, 24) ch-1 spaces. Repeat Round 3 until sleeve measures 10 (11, 12, 14) [25 (28, 30.5, 35.5) cm].
Yoke and First Shoulder Continue in rows.
Next row: Ch 4, dc in next dc, *ch 1, dc in next dc; repeat from * 15 (17, 19, 21) times, turn18 (20, 22, 24) dc and 17 (19, 21, 23) ch-1 spaces. Place marker on either end of this row.
Next row: Ch 4, dc in next dc, *ch 1, dc in next dc; repeat from * across to beginning ch, ch 1, dc in 3rd ch of beginning ch, turn. Repeat last row until yoke and first shoulder measure 3 (3, 3, 4) [7.5 (9, 9.5, 10) cm] from end of sleeve ending on a right side row. Back Neck Opening Next row (wrong side): Ch 4, dc in next dc, *ch 1, dc in next dc; repeat from * 6 (7, 8, 9) times; leave remaining sts unworked, turn9 (10, 11, 12) dc and 8 (9, 10, 11) ch-1 spaces. Next row: Ch 4, dc in next dc, *ch 1, dc in next dc; repeat from * across to beginning ch, ch 1, dc in 3rd ch of beginning ch, turn. Repeat last row until neck opening measures 6 (6, 6, 6) [15 (15, 16.5, 15) cm]. Fasten off.
Front Neck Opening
Next row: With right side of yoke facing, join yarn with slip st in first unworked dc, ch 4, dc in next dc, *ch 1, dc in next dc; repeat from * 6 (7, 8, 9) times, turn9 (10, 11, 12) dc and 8 (9, 10, 11) ch-1 spaces.
Next row: Ch 4, dc in next dc, *ch 1, dc in next dc; repeat from * across to beginning ch, ch 1, dc in 3rd ch of beginning ch, turn. Repeat last row until back neck opening measures same as front, ending on a right side row. Do not fasten off.
Yoke and Second Shoulder
Next row: Ch 4, dc in next dc, *ch 1, dc in next dc; repeat from * 15 (17, 19, 21) times, turn18 (20, 22, 24) dc and 17 (19, 21, 23) ch-1 spaces.
Next row: Ch 4, dc in next dc, *ch 1, dc in next dc; repeat from * across to beginning ch, ch 1, dc in 3rd ch of beginning ch, turn. Repeat last row until yoke and shoulder measure 12 (13, 13, 14) [30.5 (33, 34.5, 35.5) cm] from marked row18 (20, 22, 24) dc and 17 (19, 21, 23) ch-1 spaces. Do not fasten off. Remove marker.
Second Sleeve Continue in rounds.
Next round: Ch 4, *ch 1, dc in next dc; repeat from * around, ch 1; join with slip st in 3rd ch of beginning ch18 (20, 22, 24) dc and 18 (20, 22, 24) ch-1 spaces. Repeat last round until second sleeve measures 4 (5, 5, 6) [12 (12.5, 14, 17) cm].
Next round (decrease round): Beg dc2tog, *ch 1, dc in next dc; repeat from * around, ch 1; join with slip st in top of beginning ch17 (19, 21, 23) dc and 17 (19, 21, 23) ch-1 spaces. Repeat last round seven (eight, nine, ten) times10 (11, 12, 13) dc and 10 (11, 12, 13) ch-1 spaces. Fasten off. Yoke Edging Round 1 (right side): With right side facing, join A with sc in end of first row on front of yoke; working across ends of rows, sc 35 (37, 39, 41) sts evenly across front, sc 36 (38, 40, 42) sts evenly across back of yoke; join with slip st in first sc72 (76, 80, 84) sc. Fasten off. Place marker on first stitch.
Bodice
Round 1 (right side): With right side facing, join B with slip st in back loop of marked st, ch 2 (counts as first hdc here and throughout); working in back loops only, hdc in each st around; join with slip st in top of beginning ch. With front of yoke edging facing, move marker to unworked front loop at center of edging.
Round 2: Ch 2, hdc in each st around; join with slip st in top of beginning ch. Repeat Round 2 until piece measures 4 (4, 5, 5) [10 (11.5, 12.5, 14) cm] from yoke edging. Fasten off.
Skirt
Round 1 (right side): With right side of bodice facing, join C with slip st in first st, beg scallop in same st, *skip next 3 sts, scallop in next st; repeat from * around, skip last 3 sts; join with slip st in top of beginning ch18 (19, 20, 21) scallops.
Round 2: Slip st in first ch-1 space and in next dc, slip st in next ch-1 space, beg scallop in same ch-1 space, *scallop in center ch-1 space of next scallop; repeat from * around; join with slip st in top of beginning ch. Repeat Round 2 until skirt measures 17 (17, 21, 22) [44 (44.5, 53.5, 57) cm] from bottom edge of bodice. Fasten off.
Overskirt
Round 1: With right side of yoke edging facing, join A with slip st in unworked front loop of marked st, *ch 10, skip next 3 sts, slip st in next st; repeat from * around; join with slip st in first slip st, turn18 (19, 20, 21) ch-10 spaces. Continue in rows.
Row 2: *Ch 10, slip st in next ch-10 space; repeat from * across, turn. Repeat Row 2 until overskirt measures 19 (20, 24, 26) [48.5 (51, 61, 66) cm] from yoke edging. Fasten off.
Snowflake (make 5)
With D and leaving 10 (25.5 cm) tail, ch 4; join with slip st in first ch to form a ring.
Round 1: Ch 5 (counts as dc, ch 2), dc in ring, [ch 2, dc in ring] 4 times, ch 2; join with slip st to 3rd ch of beginning ch6 dc and 6 ch-2 spaces.
Round 2: Slip st in first ch-2 space, beg 3-dc Cl in same ch-2 space, ch 7, slip st in 3rd ch from hook, *ch 4, 3-dc Cl in next ch-2 space, ch 7, slip st in 3rd ch from hook; repeat from * around, ch 4; join with slip st to top of beg 3-dc Cl. Fasten off.
Weave in end tail only. Saturate piece with white glue or fabric stiffener, stretch and block on sheet of aluminum foil. Allow to dry thoroughly before handling.
Flower (make 5)
With D and leaving a long tail, ch 4; join with slip st in first ch to form a ring.
Round 1 (right side): Ch 1, 8 sc in ring; join with slip st in first sc8 sc.
Round 2: With right side facing, holding E at wrong side of piece, and working in back loops only, insert hook in first sc and in first hole of E, draw E through st and loop on hook, *skip next hole, insert hook in next sc and next hole, draw E through st and loop on hook; repeat from * around; working in front loops only, repeat from * around to first sc, with beginning tail of D, ch 1.
Fasten off D and cut E.
Finishing
Optional: Seal the cut edges of E with white glue, fabric stiffener, or fabric sealant to prevent unraveling or fraying. Sew snowflakes and flowers where desired to overskirt. Weave in ends
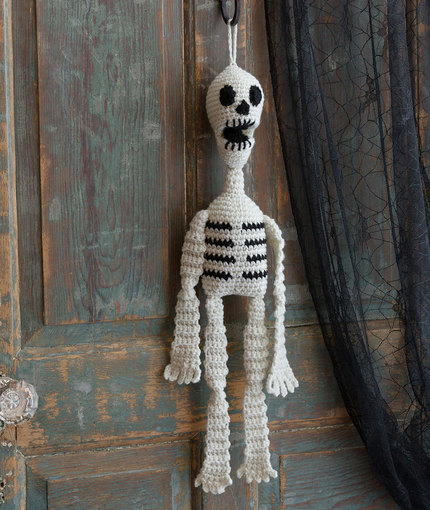
Read NextHanging Crochet Skeleton
Your Recently Viewed Projects
Thanks for your comment. Don't forget to share!
micky44646 6278690
Oct 02, 2016
I loved this dress as soon as I saw it!! But, as I am crocheting it, it says 6 inches for the head opening??? Is that a typo? I would like to finish this, please check and let me know. Thank you.
StacyV
Aug 04, 2015
Thank you so much for this darling pattern! My dearest friend has asked me to help her make this same costume for her precious daughter for Halloween. I have been so excited to help, and while I doubt we will use all of the pieces here, we will have the option of using as many as we choose! Thank you again!
Report Inappropriate Comment
Are you sure you would like to report this comment? It will be flagged for our moderators to take action.
Thank you for taking the time to improve the content on our site.