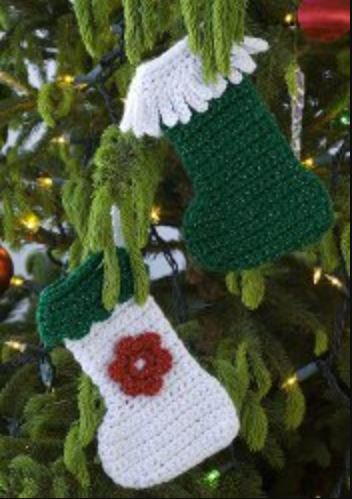
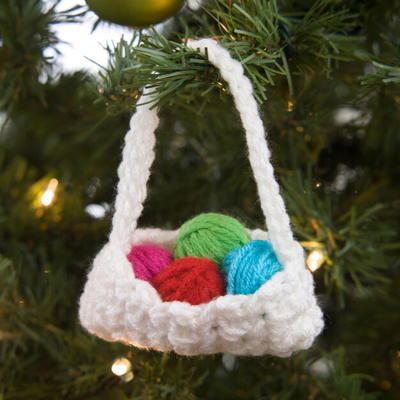
Picture Ornament Frames
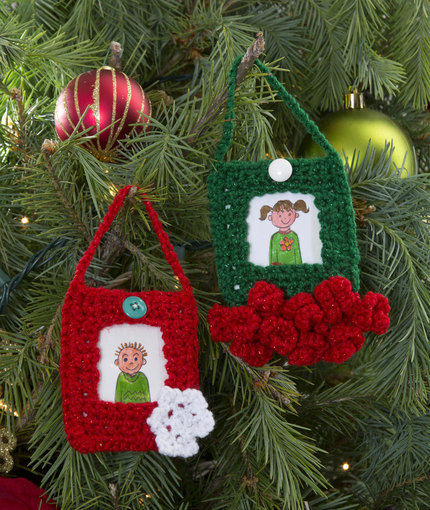
Picture Ornament Frames allow you to display pictures of your entire family dispersed throughout the Christmas tree this year. These easy crochet Christmas ornaments have different types of trim to make them unique and are perfect for every guy and girl in the family. Whether you want to put an individual picture in each or years of family pictures throughout, you'll have a nice array of personalized Christmas ornaments surrounding your tree. People will love the touch you've given your decorations this year.

Crochet HookF/5 or 3.75 mm hook
Yarn Weight(4) Medium Weight/Worsted Weight and Aran (16-20 stitches to 4 inches)
Crochet Gauge6 sts = 1 (3 cm); 6 rows = 1 4.4 cm) in sc.
Finished SizeFrame Ornaments measure 3 (8 cm) across x 3 (10 cm) high.
Materials List
- RED HEART Holiday: 1 ball each 9090 Red/Red A, 6060 Green/ Green B and 140 White/Silver C
-
Susan Bates Crochet Hook: 3.75mm [US F-5]
- Two pieces of cardboard 3 x 2 (8 x 6 cm)
- Two photos 138 (3.3 cm) wide x 1 (4. 4cm) high
- Small amount of wide clear mailing tape
- Two (3 cm) buttons one green and one white
Ornament
Tape a photo to center of each cardboard with mailing tape. Set aside.
Front (Make 1 with A and one with B)
Row 1 (Wrong Side): Ch 11; sc in 2nd ch from hook and in each ch across; turn 10 sc.
Rows 2 and 3: Ch 1, sc in each sc across, turn.
Divide for Right Side Edge-Row 4: Ch 1, sc in first 2 sc; turn leaving 8 sc unworked.
Rows 5-10: Ch 1, sc in 2 sc; turn. Fasten off at end of Row 10.
Left Side Edge: With right side facing, skip next 6 sc of Row 3; join yarn with sc in next sc, sc in last sc; turn.
Repeat Rows 5-10 same as for right side except do not fasten off; turn.
Join for Top Edge-Row 11: Ch 1, sc in next 2 sc, ch 6, sc across 2 sc of Right Side Edge; turn.
Row 12: Ch 1, sc in 2 sc, sc in 6 ch, sc in next 2 sc; turn 10 sc.
Rows 13 and 14: Ch 1, sc in each sc across. Fasten off.
Back (Make 1 with A and 1 with B)
Row 1 (Right Side): Ch 11; sc in 2nd ch from hook and in each ch across; turn 10 sc.
Rows 2-13: Ch 1, sc in each sc across; turn.
Row 14: Ch 1, sc in first 5 sc, ch 6 for button loop, sc in last 5 sc; turn.
Join Front and Back Hold front and back with wrong sides together; ch 1, working through both layers sc evenly down side edge, 3 sc in corner, sc across bottom edge, 3 sc in corner, sc up other side edge (do not sc across top edge), ch 20 for hanger, slip st in opposite top corner.
Fasten off. Weave in ends.
Sew button to top center front. Insert picture and button closed.
Flower for Red Frame
Round 1: With C, ch 2; 6 sc in 2 ch from hook.
Round 2: Working in back loops only * (slip st, ch 1, dc, ch 1) in next sc; repeat from * around; join.
Fasten off. Sew to frame. Weave in ends.
Trim for Green Frame
Holding frame up side down join A with a slip st in left bottom corner sc; * ch 6, 3 sc in 2nd ch from hook and each ch across, slip st in next sc on frame; repeat from * across bottom. Fasten off. Weave in ends.
Read NextEasy Breezy Christmas Ornaments
Your Recently Viewed Projects
Thanks for your comment. Don't forget to share!
elocin1104 2800379
Nov 21, 2018
This looks like such a cute idea! You could make these for all your relatives with little pictures of your kids. This would be super cute if you have a new baby also. Imagine a cute little baby forever captured on your familys Christmas trees for years to come! Thank you for the great pattern!
JaneEK
Dec 05, 2016
For a small project, this took longer to work up than I expected. I had initially planned to make one for each of my grandchildren, but gave up after the first set. The pattern is well written, but I found the multiple steps more than I wanted to tackle for such a mediocre projects. I could probably achieve the same result with felt and a hot glue gun. I really wanted to like this project, but I dont.
Report Inappropriate Comment
Are you sure you would like to report this comment? It will be flagged for our moderators to take action.
Thank you for taking the time to improve the content on our site.