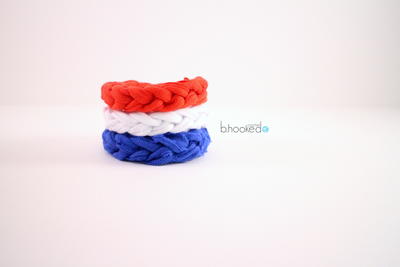
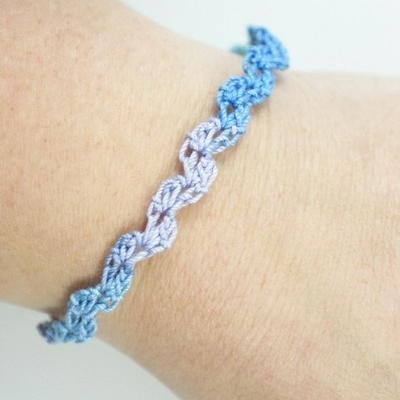
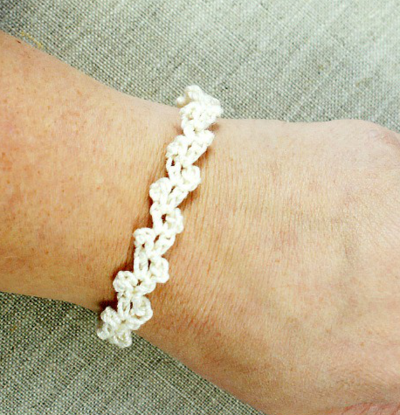
Stunning Wire Chunky Crochet Bracelets

Make a stunning wire chunky crochet bracelet with this free crochet pattern. Use fun blue colored beads for the spring and summer months and make a different bracelet with darker colored beads in the winter. You'll need crimping tubes and needle nose jewelry pliers along with some other materials.

Crochet HookI/9 or 5.5 mm hook
Materials:
- 1 Roll – 15 Yards, 26 Gauge Non Tarnish Jewelry Wire (Artistic Wire®)
- 1 Toggle Set – complimenting your color. Use Round Circle Toggles or Lobster Claw.
- 4 Crimping Tubes
- 27 Beads – Mix and Match in different sizes.
- Size 5.0mm or I - Steel Crochet Hook.
- Needle Nose Jewelry Pliers (no teeth)
- Wire Cutters
Notes:
We are doing 4 chains total. 3 of them will have beads, 1 of which will be strictly chaining to be a filler piece.
Chains 1, 2 & 3 Instructions:
- String 9 Beads of choice onto the wire.
- Slip Knot wire onto Hook. Leave 3 – 4” tail for using with the clasping.
- Chain 3, *move 1 bead up to the hook chain ensuring the chain wraps around the bead, chain 1* repeat * until all beads are used up. Chain 4 at the end. End chain leaving 3 – 4” tail for clasping.
- Repeat again for the next two chains following Steps 1 to 3.
Empty Chain
- Slip knot wire onto hook, leaving 4” Tail.
- Chain 25
- End chain leaving 3 – 4” tail for clasping.
Forming Bracelet
- Grab 1 side of the tails from all four chains. Ensure the look is what you want, sometimes larger beads may be on one side of the chains. Simply rotate the chains to ensure your bracelet is balanced.
- Finger twist all 4 tails from one side of the tails together. Using pliers will over tighten the twist causing wires to snap.
Forming Braid Technique
- Lay flat on a table and braid the 4 strands. Usually I have 2 chains acting together so that there are only 3 sections to braid.
- Twist the other side of the bracelet tails together. Adjust the braiding if necessary for shaping reasons.
Securing Ends and Adding Toggles
- Cut 1 side of tails so that it's about 3” from the starting of the chains.
- Slide on one crimping tube.
- Slide on one toggle.
- Bend wires and slip them through the crimping tube. The toggle will be left dangling in the loop that is formed.
- Pull the wires firm but let the toggle dangle loosely.
- Squeeze shut the crimping tube.
- Finger twist the grouping of wires around the first one or two chains.
- Slide on another crimping tube so that it's about 1/8” from the end of the grouped wires.
- Squeeze shut.
- Use pliers to bend the wires towards the crimping tube and compress tightly. This ensures that the wires won't slide out and will not stab the person wearing the bracelet. The crimping tube acts as a decorative piece though it's purpose is to secure the bracelet from falling apart.
- Weave the remaining section through the bracelet.
Repeat again for the other side.
Note:
You could do more or less chains depending on what strikes your fancy.
Follow Mikey's video for a similar bracelet.
Read NextNo-Crochet Necklace
Your Recently Viewed Projects
Thanks for your comment. Don't forget to share!
JaneEK
Jan 24, 2018
I am really happy that theres a link to an instructional video at the end of this pattern because I was trying to figure out how in the world this is a crochet project! Its not this exact project but something very similar. I watched the entire thing through, and this might be something that would appeal to my teen granddaughters. The nice thing about the internet is that I can email them the link for this!
shariestrickland 6 980575
Feb 10, 2012
haven't crocheted in a while, but this has me fascinated. going to get the materials today and try it. mikeys video is a great help. looks easy with stunning results. will let you know how it turns out!!
dnktat
Dec 20, 2011
at the top of the page mikey he has the video on u-tube along with all his crochet items it's really not that hard when you get the hang of it, it's easier is you see it good luck
ktkeysgal 2920388
Dec 15, 2011
way too difficult - need a video!
JennyBee1
Dec 19, 2011
@ktkeysgal 2920388,br I'm sorry to hear of your trouble. A video is a great idea. We will try to contact the designer and see if he is willing to make a video. Until then, perhaps you can try posting any questions you may have to our site's Facebook page. It is monitored by the editor and is a great resource for helpful tips and suggestions from our Facebook friends perhaps they can offer some guidance! Here is the link httpwww.facebook.comAllFreeCrochetbr --editors of AllFreeCrochet
Report Inappropriate Comment
Are you sure you would like to report this comment? It will be flagged for our moderators to take action.
Thank you for taking the time to improve the content on our site.