This project was submitted by one of our readers, just like you.
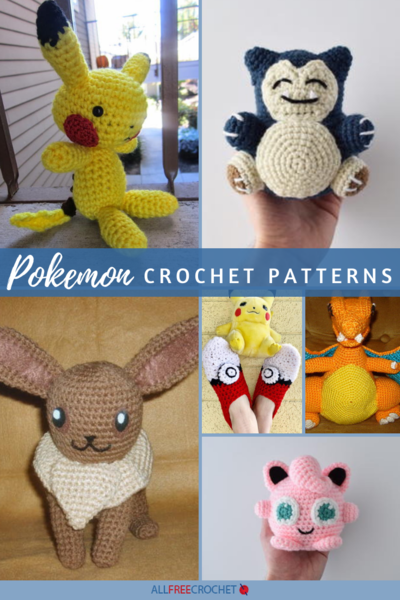
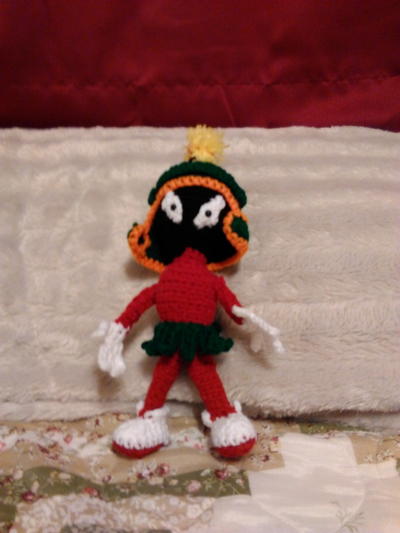
Marvin the Martian

Marvin the Martian
"This little guy has been my favorite cartoon for a long time. I have finally gotten comfortable to write my own pattern for Marvin The Martian because I couldn't find one out there on the net. Hope you enjoy it as much as I did."

Crochet HookB/1 or 2.25 mm hook
Yarn Weight(4) Medium Weight/Worsted Weight and Aran (16-20 stitches to 4 inches)
Crochet Gauge4 rows = 1 inch
Finished Size9 inches tall
Materials List
- Black
- Green
- Red
- Orange
- White
- Yellow
- Safety Eyes
Instructions
-
Starting at top of head working down.
1. Start with Black magic circle with 6 sc
2. 2 sc in each stitch (12)
3. *1 sc in 1 sts and then 2 sc in next st* repeat to end of row (18)
4. *1 sc in 2 sts and then 2 sc in next st* repeat to end of row (24)
5. *1 sc in 3 sts and then 2 sc in next st* repeat to end of row (30)
6. sc in each st for 5 rows 7. *1 sc in 3 sts and then dec.* repeat to end of row (24)
8. *1 sc in 2 sts and then dec.* repeat to end of row (18)
9. *1 sc in 1 sts and then dec.* repeat to end of row (12)
10-11. Change color to red and sc for 2 rows
12. 2 sc in each stitch (24) Place eyes on row 5 and 10. Stuff head
13. *1 sc in 1 sts and then 2 sc in next st* repeat to end of row (18)
14. *1 sc in 2 sts and then 2 sc in next st* repeat to end of row (24)
15-17. Sc in each st for 3 rows
18. *sc in 2 sts and the dec* repeat to end of row (18)
19– 21. Sc in each st for 3 rows
22. Sc in 1 st and then dec* repeat to end of row (12)
23. Sc in 1 st and then dec* repeat to end of row (6) pull tail thru each st and pull tight to close. -
Eyes (Make 2) (white)
1. Chain 6
2. sc in second st from last chain, sc in next stitch, hdc in next st, dc in next 2 sts, fo
3. Use either safety eyes or French knots for black dots for eyes. -
Helmet (green)
1. Start with magic circle with 6 sc
2. 2 sc in each st (12)
3. *1 sc in 1 sts and then 2 sc in next st* repeat to end of row (18)
4. *1 sc in 2 sts and then 2 sc in next st* repeat to end of row (24)
5. *1 sc in 3 sts and then 2 sc in next st* repeat to end of row (30)
6. *1 sc in 14 st and then 2 sc in next st* repeat to end of row (32)
7. sc in each st for 2 rows
8. ch 1 turn and sc in 20 st, work each 3 row with ch 1 and sc to end -
Helmet Neck Shield (green)
1. Ch 31
2. Dc in the 3nd st from hook and then each st, fo/ sew to the bottom of the helmet centering the shield so that you have equal parts on each side of helmet.
3. With orange sc around inside of helmet fo and hide tails -
Helmet Stem (black or gray)
1. Ch 10 and slip st to the start of the chain to make a circle.
2. Sc in each st for 3 rows fo and hide tails -
Helmet Crest (start with orange)
1. Ch 10
2. Working back and forth sc for 3 rows
3. Cut yellow strings and pull through the center row to make the fuzzy part.
4. Pull needle thru each string to separate for a fuller fuzzy part.
5. Sew to the top of the helmet. -
Helmet Shield (Green)
1. Start with a magic circle with 6 sc
2. Ch 19 creat another magic circle at this in with 6 sc
3. Working back along the chain, sc, hdc, *dc ch1, skip one st* repeat for 5 times, dc, hdc, sc and slst to magic circle.
4. Fasten to the helmet in row 8 on each side of helmet. -
Arm (Make Two)
1. Start with white. Ch 6
2. Sls to beginning st, Sc in each st (5)
3. Ch 4 and sls back down to form thumb.
4. *Ch 5, sls 4 times, sls to next st * Repeat 3 more times sls to hand to fo, hide tails.
5. With Red, connect yarn to beginning of white glove. start sc in each st for 5 rows to form arm. Should have 6 st in each row.
6. Fasten arm to body on either side. -
Hide tails. Leg (Make Two)
1. Start with red, ch 6, sc in second ch from hook. Sc in 3 st, 2 sc in next 2 st, sc in next 2 st, sls in next 3 st.
2. 2 sc in next 2 st. sc in rest of the row. Sls to beginning of row. Change color to white.
3. Sc in each st for the row.
4. Sc in next 8 st, dec. sc to finish the row.
5. Sc in 6 st, dec in next st, dec 2 times. Sls both sides of shoe together for two st, then sc around to opening, turn and sc back fo.
6. Change to Red. Start in the loops of the row where the opening begins so the high top is on the outside of the leg. (8)
7. Sc around for 5 rows
8. *Sc in next 3 st, then 2 sc in next st* repeat to finish row. (10 pleats)
9. Sc around for 5 rows, fo and stuff foot and leg. -
Skirt (green)
1. Ch 23
2. Sc in the 2nd st from the hook sc for 3 more times, sls in to the same whole you started with, skip a st, *sls in next st, ch 5, sc in the 2nd st from the hook, sc 3 more times, sls in to the same whole you started with, skip st* Repeat ** 8 times.
3. Sls to the beginning of the chain to make a circle. Tie ends together and trim ends. Should fit snugly around waste of body. May even want to tac skirt in place.

Read Next20+ Cute Beginner Amigurumi Patterns
Your Recently Viewed Projects
Thanks for your comment. Don't forget to share!
JaneEK
Aug 08, 2017
Marvin was one of my eldest sons favorite cartoon characters. Im going to try working up this pattern even though there are no photos to go by. The written instructions seem clear enough but I wont know for sure until Im well into the project. While I certainly appreciate the designers efforts, I wish there was a link back to her original page.
Michele
Jul 25, 2016
You can really see the personality of Marvin in this amigurumi! I have a puzzle of this guy that I do, and this is the perfect next project for me.
mulberrygalprinces s
Jun 14, 2016
Oh my gosh. I love it. I certainly remember him. He was going to blow up earth because it blocked his view of the moon. He and Buggs went a few very funny rounds. I have to make it. It will go into my nostalgia collection.thank you for sharing this gem.
Report Inappropriate Comment
Are you sure you would like to report this comment? It will be flagged for our moderators to take action.
Thank you for taking the time to improve the content on our site.

![61 Mini Crochet Animals [Free Patterns]](http://irepo.primecp.com/2021/02/484381/Mini-Crochet-Animals-square_Large400_ID-4198042.png?v=4198042)