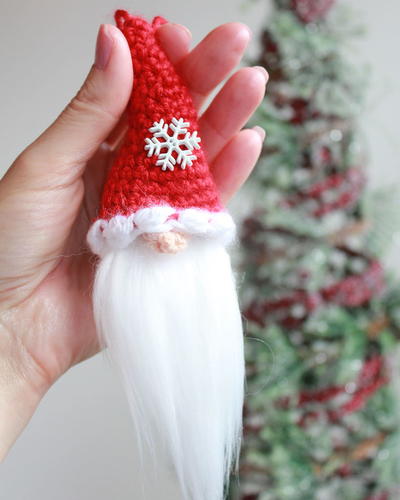
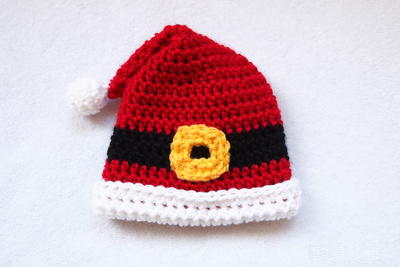
Santa's Favorite Preemie Crochet Hat

Santa's Favorite Preemie Crochet Hat is perfect for the little preemie that just can't wait to celebrate the holidays. This Christmas crochet hat is an easy pattern to work up - and since it's so small, you'll be finished with it in a jiffy! This half-double crochet pattern features an easy and repeating stitch pattern and minimal color changes. There's a separate instruction section for the buckle detail of the hat, an adorable little feature making this crochet hat different from all the other red Santa hats.
NotesOn the Rounds that are joined:
-Starting chain does NOT count as a stitch
-Each round is started in the same stitch as your starting chain
-The end of each round is joined by slip stitching in the first hdc of the round, not the starting chain

Crochet HookH/8 or 5 mm hook
Yarn Weight(4) Medium Weight/Worsted Weight and Aran (16-20 stitches to 4 inches)
Crochet Gauge14 stitches and 12 rows = 4” (10 cm)
Materials List
- Soft worsted weight yarn in Color A (Red), Color B (Black), Color C (White), Color D (Gold)
- 5.0 mm (H-8) crochet hook
- Yarn needle
- Small amount of fiber fill
Preemie Crochet Hat Pattern
-
Size: 1 - 2 lbs (1 kg)
Head Circumference = 9" - 10" (23-25 cm)
Hat Circumference = 8.5" (21.5 cm)
Round 1: With Color A - Ch 2, make 5 hdc in first chain, do not join, continue working in a spiral (5)
Round 2: Hdc in each stitch around (5)
Round 3: Make 2 hdc in each stitch around (10)
Round 4: Hdc in each stitch around (10)
Round 5: Make *2 hdc in first stitch, hdc in next stitch* repeat around (15)
Round 6: Hdc in each stitch around (15)
Round 7: Make *2 hdc in first stitch, hdc in next 2 stitches* repeat around (20)
Round 8: Hdc in each stitch around (20)
Round 9: Make *2 hdc in first stitch, hdc in next 3 stitches* repeat around (25)
Round 10: Hdc in each stitch around (25)
Round 11: Make *2 hdc in first stitch, hdc in next 4 stitches* repeat around (30)
Round 12: Hdc in each stitch around (30)
Round 13: Make *2 hdc in first stitch, hdc in next 14 stitches* repeat once (32)
Round 14: Hdc in each stitch around (32)
Fasten off Color A by working the following: sc in next stitch, sl st in next stitch
Round 15: With Color B – Ch 1, hdc around, join (32)
Round 16: Ch 1, hdc around, join (32)
Round 17: Ch 1, hdc around, join and fasten off (32)
Round 18: With Color A - Ch 1, hdc around, join (32)
Round 19: Ch 1, hdc around, join (32)
Round 20: Ch 1, hdc around, join (32)
Round 21: Ch 1, hdc around, join and fasten off (32)
Round 22: With Color C and the inside (or wrong side) of the hat facing you - Ch 1, hdc around, join (32)
Turned Portion of Brim
Round 23: Ch 1, hdc around, join (32)
Round 24: Ch 1, hdc around, join (32)
Round 25: Ch 1, hdc around, join (32)
Finishing: Attach the Ball Topper and Belt Buckle (instructions below). Fold the top of the hat part way down, as shown in the picture above, and use Color A to stitch it in place. Weave in all ends. -
Size: 2 - 3 lbs (1.4 kg)
Head Circumference = 10" - 11.25" (25-28 cm)
Hat Circumference = 9.5" (24 cm)
Round 1: With Color A - Ch 2, make 5 hdc in first chain, do not join, continue working in a spiral (5)
Round 2: Hdc in each stitch around (5)
Round 3: Make 2 hdc in each stitch around (10)
Round 4: Hdc in each stitch around (10)
Round 5: Make *2 hdc in first stitch, hdc in next stitch* repeat around (15)
Round 6: Hdc in each stitch around (15)
Round 7: Make *2 hdc in first stitch, hdc in next 2 stitches* repeat around (20)
Round 8: Hdc in each stitch around (20)
Round 9: Make *2 hdc in first stitch, hdc in next 3 stitches* repeat around (25)
Round 10: Hdc in each stitch around (25)
Round 11: Make *2 hdc in first stitch, hdc in next 4 stitches* repeat around (30)
Round 12: Hdc in each stitch around (30)
Round 13: Make *2 hdc in first stitch, hdc in next 5 stitches* repeat once (35)
Round 14: Hdc in each stitch around (35)
Round 15: Make 2 hdc in first stitch, hdc in each remaining stitch (36)
Round 16: Hdc in each stitch around (36)
Fasten off Color A by working the following: sc in next stitch, sl st in next stitch
Round 17: With Color B – Ch 1, hdc around, join (36)
Round 18: Ch 1, hdc around, join (36)
Round 19: Ch 1, hdc around, join and fasten off (36)
Round 20: With Color A - Ch 1, hdc around, join (36)
Round 21: Ch 1, hdc around, join (36)
Round 22: Ch 1, hdc around, join (36)
Round 23: Ch 1, hdc around, join and fasten off (36)
Round 24: With Color C and the inside (or wrong side) of the hat facing you - Ch 1, hdc around, join (36)
Turned Portion of Brim
Round 25: Ch 1, hdc around, join (36)
Round 26: Ch 1, hdc around, join (36)
Round 27: Ch 1, hdc around, join (36)
Finishing: Attach the Ball Topper and Belt Buckle (instructions below). Fold the top of the hat part way down, as shown in the picture above, and use Color A to stitch it in place. Weave in all ends. -
Size: 4 - 5 lbs (2.25 kg)
Head Circumference = 11.5" - 12.5" (29-32 cm)
Hat Circumference = 11" (28 cm)
Round 1: With Color A - Ch 2, make 5 hdc in first chain, do not join, continue working in a spiral (5)
Round 2: Hdc in each stitch around (5)
Round 3: Make 2 hdc in each stitch around (10)
Round 4: Hdc in each stitch around (10)
Round 5: Make *2 hdc in first stitch, hdc in next stitch* repeat around (15)
Round 6: Hdc in each stitch around (15)
Round 7: Make *2 hdc in first stitch, hdc in next 2 stitches* repeat around (20)
Round 8: Hdc in each stitch around (20)
Round 9: Make *2 hdc in first stitch, hdc in next 3 stitches* repeat around (25)
Round 10: Hdc in each stitch around (25)
Round 11: Make *2 hdc in first stitch, hdc in next 4 stitches* repeat around (30)
Round 12: Hdc in each stitch around (30)
Round 13: Make *2 hdc in first stitch, hdc in next 5 stitches* repeat around (35)
Round 14: Hdc in each stitch around (35)
Round 15: Make *2 hdc in first stitch, hdc in next 6 stitches* repeat around (40)
Round 16: Hdc in each stitch around (40)
Round 17: Hdc in each stitch around (40)
Fasten off Color A by working the following: sc in next stitch, sl st in next stitch
Round 18: With Color B – Ch 1, hdc around, join (40)
Round 19: Ch 1, hdc around, join (40)
Round 20: Ch 1, hdc around, join and fasten off (40)
Round 21: With Color A - Ch 1, hdc around, join (40)
Round 22: Ch 1, hdc around, join (40)
Round 23: Ch 1, hdc around, join (40)
Round 24: Ch 1, hdc around, join and fasten off (40)
Round 25: With Color C and the inside (or wrong side) of the hat facing you - Ch 1, hdc around, join (40)
Turned Portion of Brim
Round 26: Ch 1, hdc around, join (40)
Round 27: Ch 1, hdc around, join (40)
Round 28: Ch 1, hdc around, join (40)
Finishing: Attach the Ball Topper and Belt Buckle (instructions below). Fold the top of the hat part way down, as shown in the picture above, and use Color A to stitch it in place. Weave in all ends.
Belt Buckle and Ball Topper
Belt Buckle
With Color D - Ch 12, sl st in first chain made to form a circle, being careful not to twist the chain, *make 2 sc in first stitch, sc in next 2 stitches* repeat around, join and fasten off leaving a long tail for sewing. (16)
Ball Topper
Round 1: With Color B - Ch 2, make 5 sc in first chain, do not join (5)
Round 2: Make 2 sc in each stitch around (10)
Round 3: Sc in each stitch around (10)
Round 4: *Sc2tog* 5 times, fasten off. (5)
Use a small amount of fiber fill to stuff the ball. With a yarn needle, thread the tail through the front loop of each of the last 5 stitches. Pull to close the hole. Use the tail to sew the ball onto the tip of the hat.
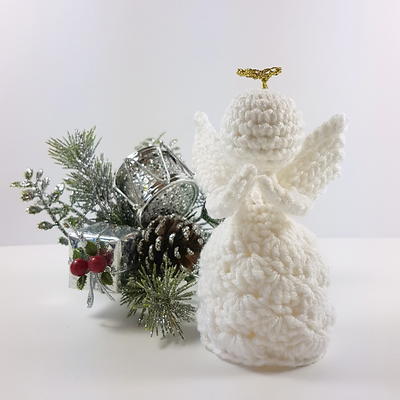
Read NextBeautiful Crocheted Christmas Angel
Your Recently Viewed Projects
Thanks for your comment. Don't forget to share!
JaneEK
Nov 16, 2017
This hat is worked up exactly the same way as a similar pattern posted on here but reduced in size for preemies. I havent worked this size but I did do a regular Newborn hat based on this pattern. I would still start this with a Magic Circle instead of using the Chain method. It makes the tip of the hat tighter, and if you leave a long tail when starting, that allows plenty of yarn for sewing on the pompon.
mulberrygalprinces s
Nov 11, 2016
This is so sweet. I make things like this for the local hospital and this will be perfect for next month. The little ones can sure use them and the families will love having them. Thank you so much for sharing this wonderful pattern and inspiration. It will certainly be put to go use.
Editor for AllFree CrochetAfghanPatte rns
Oct 24, 2016
This is great for those first photos during the holiday season. Not only is it a stylish hat, but it'll help keep baby warm.
Report Inappropriate Comment
Are you sure you would like to report this comment? It will be flagged for our moderators to take action.
Thank you for taking the time to improve the content on our site.