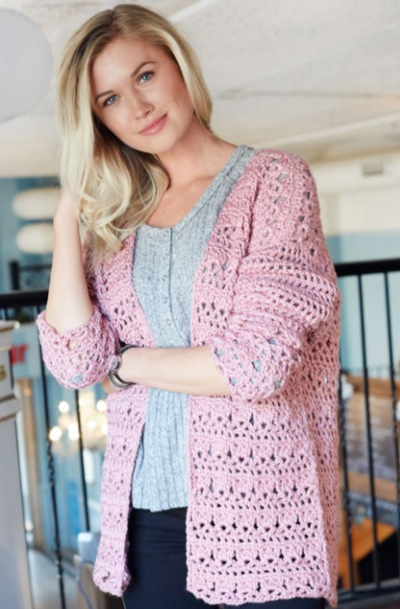
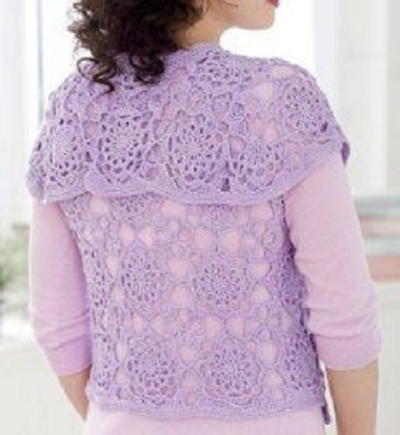
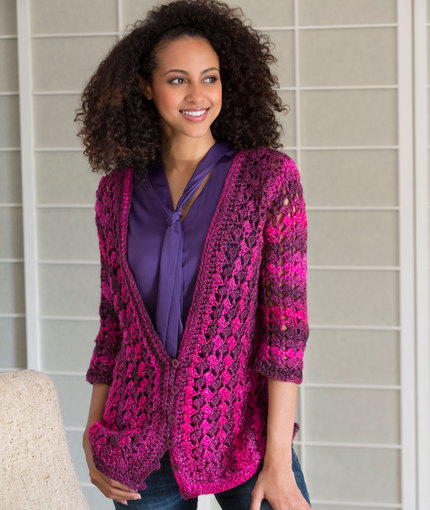
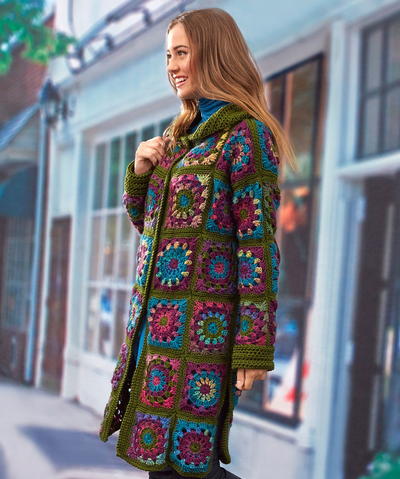
Vintage Blooms Crochet Coatigan

The Vintage Blooms Crochet Coatigan is a vivid, full-colored mosaic of floral-inspired granny squares. This crochet coatigan takes your individual crochet granny squares and combines them to form a knee-length button up crochet sweater coat. This cozy coatigan shines in shades of green and purple and is worked up in worsted weight yarn. Available in sizes small through 3x, this retro beauty will turns heads this fall. Stay cozy and warm with this fun crochet coatigan!
NotesNotes
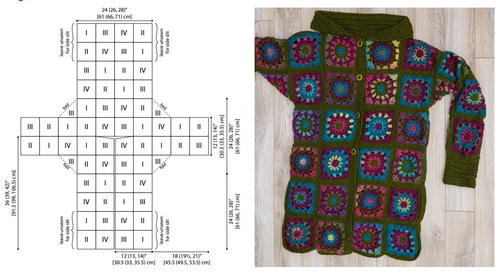
1. Sweater coat is made from 62 Granny Squares sewn together following assembly diagram.
2. Sweater coat is worked the same for all 3 sizes, using the smallest hook for size Small/Medium, the middle sized hook for size Large/X-Large, and the largest hook for size 2X-Large/3X-Large.
3. Each Granny Square is worked in joined rounds with right side always facing. The yarn color is changed every round (except the last round) by fastening off the old color and joining the new color.
4. Front bands, collar, and sleeve cuffs are worked directly on to the assembled coat.

Crochet HookJ/10 or 6 mm hook, K/10.5 or 6.5 mm hook, L/11 or 8 mm hook
Yarn Weight(4) Medium Weight/Worsted Weight and Aran (16-20 stitches to 4 inches)
Crochet GaugeOne Granny Square measures about 6 x 6" [15 x 15 cm] using smallest hook for size Small/Medium; about 6½ x 6½" [16.5 x 16.5 cm] using middle-sized hook for size Large/X-Large; about 7 x 7" [18 x 18 cm] using largest hook for size 2X-Large/3X-Large.
Finished SizeFinished Bust: 48 (52, 56)" [122 (132, 142) cm]; Finished Length: 36 (39, 42)" [91.5 (99, 106.5) cm]
Materials List
- RED HEART® Soft®: 5 (6, 6) balls 9523 Dark Leaf A, 2 (3, 3) balls 3729 Grape B, and 2 (2, 3) balls 9518 Teal C
- RED HEART® Unforgettable®: 4 (5, 5) balls 3943 Stained Glass D
- Susan Bates® Crochet Hooks: 6mm [US J-10], 6.5mm [US K-10½], and 8mm [US L-11]
- Four 1¼" [32mm] buttons, sewing needle and thread, yarn needle
Special Stitches
hdc2tog (half double crochet 2 stitches together) = [Yarn over, insert hook in next stitch, yarn over and pull up loop] 2 times, yarn over and draw through all 5 loops on hook.
join with sc = Place a slip knot on hook, insert hook in indicated stitch, yarn over and draw up a loop, yarn over and draw through both loops on hook.
Pattern
-
GRANNY SQUARE I (make 16)
With A, ch 5; join with slip st in first ch to form a ring.
Round 1 (right side): Ch 3 (counts as dc here and throughout), work 11 dc in ring; join with slip st in top of beginning ch- 3—12 dc. Fasten off.
Round 2: With right side facing, draw up a loop of D in any space between sts, ch 3, dc in same space, *ch 1, 2 dc in next space between sts; repeat from * around, ch 1; join wth slip st in top of beginning ch-3—24 dc and 12 ch-1 spaces. Fasten off.
Round 3: With right side facing, draw up a loop of B in any ch-1 space, ch 3, 2 dc in same ch-1 space, *ch 1, 3 dc in next ch-1 space; repeat from * around, ch 1; join with slip st in top of beginning ch- 3—36 dc and 12 ch-1 spaces. Fasten off.
Round 4: With right side facing, draw up a loop of D in any ch-1 space, ch 3, 2 dc in same ch-1 space, *ch 2, 3 dc in next ch-1 space; repeat from * around, ch 2; join with slip st in top of beginning ch- 3—36 dc and 12 ch-2 spaces. Fasten off.
Round 5: With right side facing, draw up a loop of C in any ch-2 space, ch 3, 3 dc in same ch-2 space, ch 1, 4 dc in next ch-2 space, *ch 1, (2 dc, 2 tr, ch 2, 2 tr, 2 dc) in next ch-2 space (corner made), [ch 1, 4 dc in next ch-2 space] twice; repeat from * 2 more times, ch 1, (2 dc, 2 tr, ch 2, 2 tr, 2 dc) in next ch-2 space, ch 1; join with slip st in top of beginning ch-3—4 corners with two 4-dc groups along each of 4 sides between corners. Fasten off.
Round 6: With right side facing, join A with slip st in any corner ch-2 space, *[skip next st, sc in next 3 sts, sc in next ch-1 space] 3 times, skip next st, sc in next 3 sts, 3 sc in corner ch-2 space; repeat from * 3 more times; join with slip st in first sc—72 sc (15 sc along each of 4 sides between 3-sc corners). Do not fasten off.
Round 7: Continuing with A, ch 1, *sc in each st to next 3-sc corner, 2 sc in each of next 3 sc; repeat from * 3 more times; join with slip st in first sc—84 sc. Fasten off. -
GRANNY SQUARE II (make 16)
Make same as Granny Square I using B for Round 1, D for Round 2, C for Round 3, D for Round 4, B for Round 5, and A for Rounds 6 and 7. -
GRANNY SQUARE III (make 16)
Make same as Granny Square I using C for Round 1, A for Round 2, D for Round 3, B for Round 4, D for Round 5, and A for Rounds 6 and 7. -
GRANNY SQUARE IV (make 14)
Make same as Granny Square I using D for Round 1, C for Round 2, B for Round 3, A for Round 4, D for Round 5, and A for Rounds 6 and 7.
Finishing
Arrange the Granny Squares as shown in assembly diagram. With A, sew the squares together. Take care when sewing the underarm/gusset squares in place. One square is placed under each arm and 2 edges of the underarm/ gusset square are sewn to edges of 2 squares in the sleeve and the other 2 edges of the underarm/gusset square are sewn to edges of 2 squares in the body of the coat. When sewing sides of coat, leave the last 2 side squares at the lower edge of the front and back unsewn for side slits.
-
Button Band
Row 1 (right side): With right side facing, join A with sc at beginning of left front edge, work sc evenly along the left front edge.
Row 2: Ch 1, turn, sc in each st across. Repeat Row 2 until button band measures about 1½" [4 cm]. Fasten off. -
Buttonhole Band
Row 1 (right side): With right side facing, join A with sc at beginning of right front edge, sc in each st to near top corner of first of upper four Granny Squares, [ch 3, sk next 3 sc (for buttonhole), sc in each st to near top corner of next Granny Square] 3 times, ch 3, sk next 3 sc, sc in each st to end of right front edge.
Row 2: Ch 1, turn, sc in each sc and ch across. Row 3: Ch 1, turn, sc in each st across. Repeat Row 3 until buttonhole band measures about 1½" [4 cm]. Fasten off. -
Collar
Row 1 (right side): With right side facing, join A with sc at beginning of neck edge, work 79 more sc evenly spaced along neck edge—80 sc.
Row 2: Ch 2 (counts as hdc here and throughout), turn, hdc2tog, hdc in each st across—79 hdc. Repeat Row 2 until collar measures about 6" [15 cm]. Fasten off. -
Sleeve Cuffs
Round 1 (right side): With right side facing and beginning under the arm, join A with sc in sleeve edge, work 39 more sc evenly spaced around edge; join with slip st in first sc—40 sc.
Round 2 (wrong side): Ch 2 (counts as first hdc here and throughout), turn, hdc in next sc, hdc2tog, *hdc in next 2 sc, hdc2tog; repeat from * around; join with slip st in top of beginning ch-2—30 hdc.
Round 3: Ch 2, hdc in each st around; join with slip st in top of beginning ch-2. Repeat Round 3 until cuff measures about 5" [12.5 cm]. Fasten off. Repeat around other sleeve edge. Fold cuffs up. -
Lower Edging
With right side facing, join A with sc in lower front corner, sc evenly spaced along entire lower edge (including side slits), working 2 sc in each lower corner of side slits. Fasten off. Sew buttons to button band, opposite buttonholes. Weave in ends. -
Assembly Diagram
Read NextChevron Lace Cardigan
Your Recently Viewed Projects
Thanks for your comment. Don't forget to share!
Morehouse17
Jan 30, 2018
princess6860504, thanks for the heads up. I have yet to make any item of great substance. Other than a king size bedspread that I used thread it is duly noted that it is heavy. So, with an item like this it may be a good idea to consider a light weight yarn? Both types of yarn used here are considered medium weight. Being a "coat" it may be a good thing to be heavy, but will that affect the shape over time?
princess6860504
Aug 23, 2017
In my experience, large crocheted apparel items can get pretty heavy once it's all said and done...so I am wondering about the weight of this coat and if it hangs and pulls due to sheer weight of yarn. I know it uses the Red Heart Soft and the Unforgettable, so that is a plus- I think it could be okay! This is a head turner for sure.
Delphine Bryant
Aug 21, 2017
This vintage blooms crochet coatigan is beautiful. I can not believe that this coatigan is made completely of granny squares sewn together. The collar leaves a little be desired. The fall colors just make me want to wrap up in this one.
Zeemer
Oct 25, 2016
I was just looking at the pattern and it looks so complicated. There are just so many activities involved in accomplishing this Vintage Blooms Crochet Coatigan before it is completed and actually worn outside for everyone to see but it's worth it because it is so gorgeous and unique. It deserves a second look especially from the women. Three colors were used to make this coatigan so uniquely elegant and eye-catching.
AFC Editor Annalis a
Oct 21, 2016
This is gorgeous! I love how bold and unique this is. It looks perfect for a fall day when you will be out and about.
Report Inappropriate Comment
Are you sure you would like to report this comment? It will be flagged for our moderators to take action.
Thank you for taking the time to improve the content on our site.