Buzzy Bee DIY Backpack Crochet Pattern
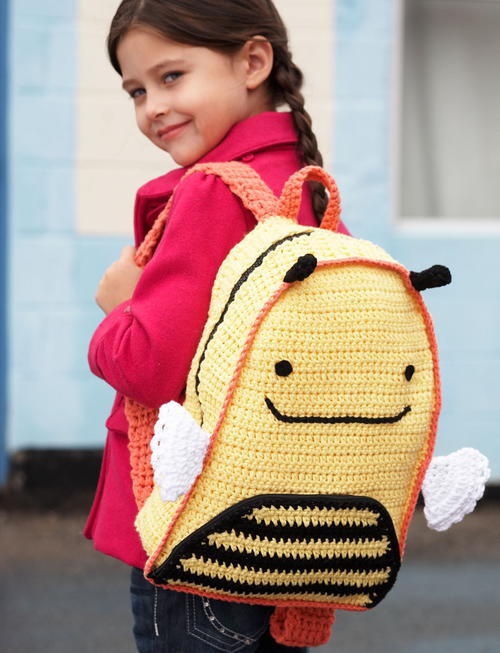
Prepare your busy little bee for a new year of school with the Buzzy Bee DIY Backpack Crochet Pattern. Your child will be the buzz of the school with his or her new backpack, and she can even brag that her mom or dad made it! We can't help but smile at this backpack and its cuteness. Your child will be able to fit all his or her school supplies safely in its compartment. Back to school can be difficult for both kids and parents, but with this crochet pattern you don't have to spend a ton of money on a backpack.

Crochet HookG/6 or 4 mm hook, H/8 or 5 mm hook
Yarn Weight(4) Medium Weight/Worsted Weight and Aran (16-20 stitches to 4 inches)
Crochet Gauge15 sc and 16 rows = 4" [10 cm] with smaller hook.
Finished Size10 x 14 x 3 in
Materials:
- Lily® Sugar’n Cream® Yarn:
- Contrast A = Yellow (00010) 330 m/363 yds or 3 balls
- Contrast B = Black (00002) 30 m/33 yds or 1 ball
- Contrast C = White (00001) 20 m/22 yds or 1 ball
- Contrast D = Tangerine (01699) 95 m/105 yds or 1 ball
- Sizes 4 mm (U.S. G or 6) and 5 mm (U.S. H or 8) crochet hooks or size needed to obtain gauge.
- Small piece of black felt for eyes
- Craft glue
- Black zippers 16" [40.5 cm] and 20" [51 cm] long
- 2 stitch markers.
INSTRUCTIONS
Note: Ch 2 for turning ch does not count as hdc.
FRONT and BACK (make 2 pieces alike)
With A and smaller hook, ch 35.
1st row: (RS). 1 hdc in 3rd ch from hook. 1 hdc in each ch to end of
chain. Turn. 33 hdc.
2nd row: Ch 1. 1 sc in each hdc to end of row. Turn.
3rd row: Ch 2. 1 hdc in each sc to end of row. Turn.
Rep last 2 rows for pat until work from beg measures 9" [23 cm], ending
with a RS row.
Shape top: 1st row: (WS). Ch 1. Sc2tog. 1 sc in each hdc to last 2 hdc.
Sc2tog. Turn.
2nd row: Ch 2. 1 hdc in each st to end of row. Turn.
3rd row: As 1st row.
4th row: Ch 2. Hdc2tog. 1 hdc in each st to last 2 sc. Hdc2tog. Turn.
5th to 8th rows: Rep last 2 rows twice more.
9th row: As 1st row. 17 sts rem. Fasten off.

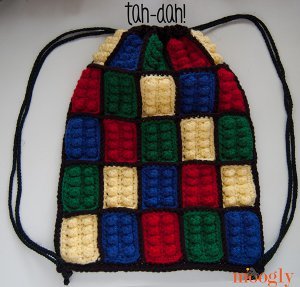
Find more adorable school stuff in our collection of 16 Back to School Crochet Patterns + 6 Favorite Teacher Gifts.
BASE and GUSSET
With A and smaller hook, ch 12.
1st row: (RS). 1 hdc in 3rd ch from hook. 1 hdc in each ch to end of chain. Turn. 10 hdc.
2nd row: Ch 1. 1 sc in each hdc to end of row. Turn.
3rd row: Ch 2. 1 hdc in each sc to end of row. Turn.
Rep last 2 rows for pat until work from beg measures 9" [23 cm], ending with a WS row. Place marker at end of last row.
Divide for zipper opening: Next row: (RS). Ch 2. 1 hdc in each of next 5 sc. Turn. Leave rem sts unworked.
Cont in pat on 5 sts until opening from marker measures 20" [51 cm],
ending with a WS row. Fasten off.
With RS facing, rejoin A with sl st to unworked sts. Ch 2. 1 hdc in same sp
as last sl st. 1 hdc in each of last 4 sts. Turn.
Cont in pat on 5 sts until opening measures 20" [51 cm], ending with a
WS row. Do not fasten off.
Join sides: Next row: Ch 2. 1 hdc in each of first 5 sc. 1 hdc in each of next 5 sc from first side. 10 hdc. Turn. Place marker on last st.
Cont in pat until work from marker measures 9" [23 cm], ending with a WS row. Fasten off. Sew last row and foundation row tog (center of bottom base).
WINGS (make 2)
With C and smaller hook, ch 8. Join with sl st in first ch to form a ring.
1st rnd: Ch 2. 1 hdc in each ch around. Join with sl st to first hdc. 8 hdc.
2nd rnd: Ch 2. 2 hdc in first hdc. (1 hdc in next hdc. 2 hdc in next hdc)
3 times. 1 hdc in last hdc. Join with sl st to first hdc. 12 hdc.
3rd rnd: Ch 2. 1 hdc in first hdc. (2 hdc in next hdc. 1 hdc in next hdc)
5 times. 2 hdc in last hdc. Join with sl st to first hdc. 18 hdc.
4th rnd: Ch 2. 2 hdc in first hdc. (1 hdc in next hdc. 2 hdc in next hdc)
8 times. 1 hdc in last hdc. Join with sl st to first hdc. 27 hdc.
Fold work flat.
Joining row: Ch 1. Working through both thicknesses, work 13 sc evenly
across. Turn.
Next row: Ch 1. 1 sc in first sc. *Ch 3. Miss next sc. 1 sc in next sc. Rep
from * to end of row. Fasten off.
ANTENNAE (make 2)
With B and smaller hook, ch 4. Join with sl st to first ch to form a ring.
1st rnd: Ch 2. 1 hdc in each ch around. Join with sl st to first hdc. 4 hdc.
2nd rnd: Ch 2. 1 hdc in each hdc around. Join with sl st to first hdc.
3rd rnd: Ch 2. 2 hdc in each hdc around. Join with sl st to first hdc. 8 hdc.
4th rnd: Ch 2. (Hdc4tog) twice. Join with sl st to first st. Fasten off,
leaving a long end. Thread end onto tapestry needle and draw tightly through rem 2 sts.
POCKET
With A and smaller hook, ch 33.
1st row: (RS). 1 hdc in 3rd ch from hook. 1 hdc in each ch to end of
chain. Turn. 31 hdc.
2nd row: Ch 1. 1 sc in each hdc to end of row. Join B. Turn.
3rd row: With B, ch 2. 1 hdc in each sc to end of row. Turn.
4th row: Ch 1. 1 sc in each hdc to end of row. Join A. Turn.
5th row: With A, ch 2. 1 hdc in each sc to end of row. Turn.
6th row: Ch 1. Sc2tog. 1 sc in each hdc to last 2 hdc. Sc2tog. Join B. Turn.
7th row: As 3rd row.
8th row: Ch 1. Sc2tog. 1 sc in each hdc to last 2 hdc. Sc2tog. Join A. Turn.
9th row: With A, ch 2. Hdc2tog. 1 hdc in each sc to last 2 sc. Hdc2tog.
Turn.
10th row: As 6th row.
11th row: With B, ch 2. Hdc2tog. 1 hdc in each sc to last 2 sc. Hdc2tog.
Turn.
12th and 13th rows: As 8th and 9th rows.
14th row: As 6th row. Fasten off. 15 sts rem.
Pocket edging: (RS). Join B with sl st at lower right corner. Ch 1. Work sc
evenly around outer edge of Pocket to opposite corner. Fasten off.
Leave edge of foundation row unworked.
Hanging Loop
With D and smaller hook, ch 22.
1st row: (RS). 1 sc in 2nd ch from hook. 1 sc in each ch to end of chain.
Turn. 21 sc.
2nd row: Ch 1. 1 sc in each sc to end of row. Turn.
Rep last row once more. Fasten off.
Straps (make 2)
With 2 strands of D and larger hook, ch 7.
1st row: (RS). 1 hdc in 3rd ch from hook. 1 hdc in each of next 4 ch. Turn. 5 hdc.
2nd row: Ch 2. 1 hdc in each hdc to end of row. Turn.
Rep last row until Strap measures 16" [40.5 cm], ending with a WS row.
Fasten off.
FINISHING
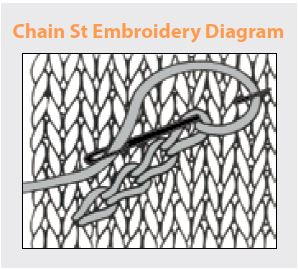
Cut black circles from felt for Eyes approx ½" [1.5 cm] and glue to Front of Bag. Embroider mouth with B, using chain stitch as shown in photo. Sew Pocket to Front. Sew shorter zipper to Pocket edge and corresponding edge of Front noting that zipper tape will fold towards Pocket. Pin Gusset and Base to outer edges of Front and Back, having Base seam
at center of bottom edge.
Joining rnd: With RS of Front facing and working through both thicknesses, join A with sl st at center of bottom edge. Work 1 rnd of sc
evenly around to join Gusset and Base to Front. Join D with sl st to first sc.
Next rnd: With D, ch 1. 1 sc in each sc around. Join with sl st to first sc.
Fasten off.
Rep these 2 rnds to join outer edge of Back, Gusset and Base.
Sew Wings and Antennae to outer edge of Front (behind joining rnds)
as shown in photo.
Sew longer zipper in position along Gusset opening. Attach Hanging
Loop as shown in picture. Sew Straps in position.
ABBREVIATIONS:
- Approx = Approximate(ly)
- Beg = Begin(ing)
- Ch(s) = Chain(s)
- Cont = Continue(ity)
- Hdc = Half double crochet
- Hdc2tog = Yoh and draw up a loop in next stitch. Yoh draw up aloop in next stitch. Yoh and draw through all 4 loops on hook
- Hdc4tog = (Yoh and draw up a loop in next stitch) 4 times. Yoh and draw through all 4 loops on hook
- Pat = Pattern
- Rem = Remain(ing)
- Rep = Repeat
- Rnd(s) = Round(s)
- RS = Right side
- Sc = Single crochet
- Sc2tog = Draw up a loop in each of next 2 stitches. Yoh and draw through all loops on hook
- Sl st = Slip stitch
- St(s) = Stitch(es)
- Tog = Together
- WS = Wrong side
- Yoh = Yarn over hook
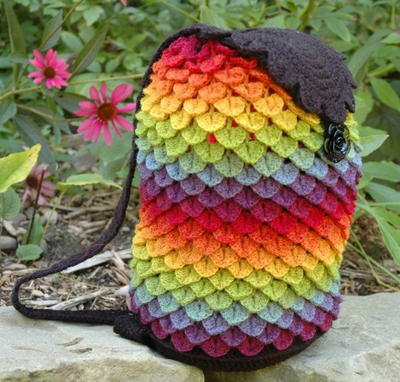
Read NextRainbow Dragon Bag
Your Recently Viewed Projects

Thanks for your comment. Don't forget to share!
Morehouse17
Jan 30, 2018
So the skill level here is easy but I disagree. The inclusion of a zipper bumps this project up to at least intermediate. I read over the pattern at least twice and not seeing that there is anything inside like cardboard to give stability to the pack. Once you put a book or two inside the shape will change. Any feedback on that?
AFC Editor Julia
Jan 31, 2018
Hi Morehouse, There's nothing on adding some cardboard in the original pattern from the company, but I'm sure you could. Also, since this is for smaller children, they won't be carrying so so much anyway so it should be alright for some lighter items. Thanks! Julia, AFC editor
Delphine Bryant
Aug 21, 2017
How cute! Not sure about the skill level provided for this project. The free pattern directions are provided right on this page and I guess because of a number of directions, I'm not seeing this as easy. Perhaps I'll try my hand at another backpack before I attempt this one.
Hippie Chick
Mar 27, 2017
So cute! Pattern is very detailed and looks simple enough with all the illustrations. I know little ones like to carry lots of stuff with them and sometimes they have lots of homework or papers to bring home for parents to sign. I am just wondering how the straps and or the bottom of this backpack holds up when it is full?
Report Inappropriate Comment
Are you sure you would like to report this comment? It will be flagged for our moderators to take action.
Thank you for taking the time to improve the content on our site.